DASHBOARD REMOVAL/INSTALLATION
id091700800300
1. Disconnect the negative battery cable.
2. Remove the following parts:
- (1) Decoration panel (See DECORATION PANEL REMOVAL/INSTALLATION.)
- (2) Front console box mat (See FRONT CONSOLE BOX MAT REMOVAL/INSTALLATION.)
- (3) Indicator panel (See INDICATOR PANEL REMOVAL/INSTALLATION.)
- (4) Front console box (See FRONT CONSOLE BOX REMOVAL/INSTALLATION.)
- (5) Dashboard under cover (See DASHBOARD UNDER COVER REMOVAL/INSTALLATION.)
- (6) Side wall (See SIDE WALL REMOVAL/INSTALLATION.)
- (7) Console panel (See CONSOLE PANEL REMOVAL/INSTALLATION.)
- (8) Console cover (See CONSOLE COVER REMOVAL/INSTALLATION.)
- (9) Console (See CONSOLE REMOVAL/INSTALLATION.)
- (10) Front scuff plate inner (See FRONT SCUFF PLATE REMOVAL/INSTALLATION.)
- (11) Front side trim (See FRONT SIDE TRIM REMOVAL/INSTALLATION.)
- (12) Glove compartment (See GLOVE COMPARTMENT REMOVAL/INSTALLATION.)
- (13) Bonnet release lever (See BONNET LATCH AND RELEASE LEVER REMOVAL/INSTALLATION.)
- (14) Fuel-filler lid release lever (R.H.D.) (See FUEL-FILLER LID OPENER REMOVAL/INSTALLATION.)
- (15) Lower panel (See LOWER PANEL REMOVAL/INSTALLATION.)
- (16) Column cover (See COLUMN COVER REMOVAL/INSTALLATION.)
- (17) Driver-side air bag module (See DRIVER-SIDE AIR BAG MODULE REMOVAL/INSTALLATION.)
- (18) Steering wheel (See STEERING WHEEL AND COLUMN REMOVAL/INSTALLATION.)
- (19) Combination switch (See COMBINATION SWITCH REMOVAL/INSTALLATION.)
- (20) Center panel (See CENTER PANEL REMOVAL/INSTALLATION.)
- (21) Meter hood (See METER HOOD REMOVAL/INSTALLATION.)
- (22) Instrument cluster (See INSTRUMENT CLUSTER REMOVAL/INSTALLATION.)
- (23) Audio unit (See AUDIO UNIT REMOVAL/INSTALLATION.)
- (24) Steering shaft (See STEERING WHEEL AND COLUMN REMOVAL/INSTALLATION.)
- (25) A-pillar trim (See A-PILLAR TRIM REMOVAL/INSTALLATION.)
- (26) Side panel (See SIDE PANEL REMOVAL/INSTALLATION.)
3. Disconnect the front door wiring harness connector (Driver side). (SeeFRONT DOOR MODULE REMOVAL/INSTALLATION.)
4. Disconnect the dashboard harness connectors.
5. Remove the brake switch from the brake pedal with the brake switch connector connected. (See BRAKE PEDAL REMOVAL/INSTALLATION [L.H.D.].) (See BRAKE PEDAL REMOVAL/INSTALLATION [R.H.D.].)
6. Remove the selector lever component. (See SELECTOR LEVER COMPONENT REMOVAL/INSTALLATION.)
7. Remove the windshield wiper arm and blade. (See WINDSHIELD WIPER ARM AND BLADE REMOVAL/INSTALLATION.)
8. Remove the cowl grille. (See COWL GRILLE REMOVAL/INSTALLATION.)
9. Remove the windshield wiper motor. (See WINDSHIELD WIPER MOTOR REMOVAL/INSTALLATION.)
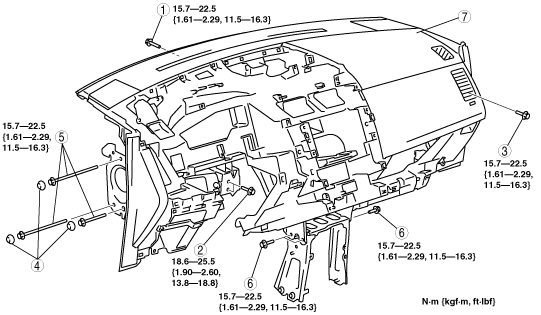
10. Remove in the order indicated in the figure.
11. Install in the reverse order of removal.
|
1
|
Bolt A
|
|
2
|
Bolt B
|
|
3
|
Cover
|
|
4
|
Bolt C
|
|
5
|
Bolt D
|
|
6
|
Bolt E
|
|
7
|
Dashboard
|
Bolt D Removal Note
-
Caution
-
• Bolt D cannot be removed from the body. Due to this, bolt D could be pinched when closing the front door, resulting in damage to the front door. When closing the front door, verify that bolt D is completely inserted
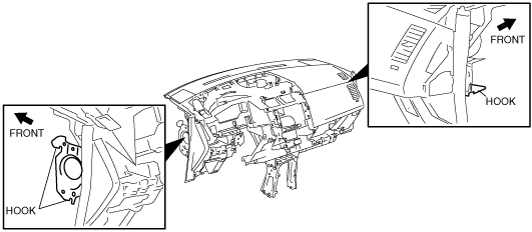
Dashboard Removal Note
-
Warning
-
• Removing the dashboard without supporting it can be dangerous. The dashboard may fall and injure you. Always perform the following procedure with at least another person.
1. Raise the dashboard and detach the hooks from the body.
2. Take the dashboard out through the opened front driver-side door.