|
ac9wzw00002180
WATER PUMP REMOVAL/INSTALLATION [MZI-3.7]
id0112d3800700
1. Drain the engine oil. (See ENGINE OIL REPLACEMENT [MZI-3.7].)
2. Remove the engine and transaxle component. (See ENGINE REMOVAL/INSTALLATION [MZI-3.7].)
3. Secure the engine and transaxle component using a hoist and the SST.
ac9wzw00002180
|
4. Remove the dynamic chamber and throttle body as a single unit. (See INTAKE-AIR SYSTEM REMOVAL/INSTALLATION [MZI-3.7].)
5. Remove the ignition coils. (See IGNITION COIL REMOVAL/INSTALLATION [MZI-3.7].)
6. Remove the dipstick.
7. Remove the power steering oil pump drive belt. (See DRIVE BELT REMOVAL/INSTALLATION [MZI-3.7].)
8. Remove the power steering oil pump. (See POWER STEERING OIL PUMP REMOVAL/INSTALLATION [L.H.D.].)(See POWER STEERING OIL PUMP REMOVAL/INSTALLATION [R.H.D.].)
9. Remove the timing chain component. (See TIMING CHAIN REMOVAL/INSTALLATION [MZI-3.7].)
10. Remove in the order indicated in the table.
11. Install in the reverse order of removal.
12. Start the engine and:
13. Perform a road test.
ac9wzw00002181
|
|
1
|
Upper timing chain guide (LH)
|
|
2
|
Upper timing chain guide (RH)
|
|
3
|
Water pump
(See Water Pump Removal Note.)
(See Water Pump Installation Note.)
|
|
4
|
Gasket
|
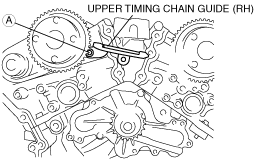
Upper Timing Chain Guide (RH) Removal Note
1. Loosen the upper timing chain guide (RH) bolt A.
ac9wzw00002182
|
2. Remove the upper timing chain guide (RH) bolt B.
3. Move the upper timing chain guide (RH) as shown.
ac9wzw00002183
|
4. Retighten the bolt A.
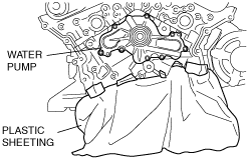
Water Pump Removal Note
1. Remove the oil pan drain plug. (See ENGINE OIL REPLACEMENT [MZI-3.7].)
2. To prevent engine coolant from penetrating the oil pan, line the cylinder block with plastic sheeting as shown in the figure before removing the water pump.
ac9wzw00002184
|
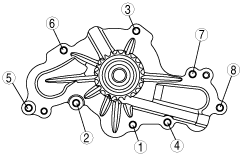
Water Pump Installation Note
1. Tighten the water pump bolts in the order shown in the figure.
ac9wzw00002185
|