|
am6xuw00004244
OIL SEAL (DIFFERENTIAL) REPLACEMENT [AY6A-EL, AY6AX-EL]
id0517k3336600
Transaxle Case Side
1. Drain the ATF. (See AUTOMATIC TRANSAXLE FLUID (ATF) REPLACEMENT [AY6A-EL, AY6AX-EL].)
2. Remove the front splash shield (LH). (See SPLASH SHIELD REMOVAL/INSTALLATION.)
3. Disconnect the drive shaft (LH) from the transaxle. (See FRONT DRIVE SHAFT REMOVAL/INSTALLATION.)
4. Remove the oil seal lip using a utility knife.
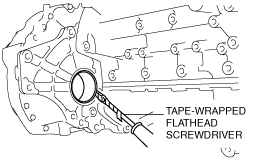
5. Remove and discard the oil seal using a tape-wrapped flathead screwdriver.
am6xuw00004244
|
6. Using the SST and a hammer, tap a new oil seal so that the specified oil seal position is obtained.
am6xuw00003276
|
7. Install the drive shaft (LH) to the transaxle. (See FRONT DRIVE SHAFT REMOVAL/INSTALLATION.)
8. Install the front splash shield (LH). (See SPLASH SHIELD REMOVAL/INSTALLATION.)
9. Add ATF. (See AUTOMATIC TRANSAXLE FLUID (ATF) LEVEL ADJUSTMENT [AY6A-EL, AY6AX-EL].)
10. Adjust the ATF level. (See AUTOMATIC TRANSAXLE FLUID (ATF) LEVEL ADJUSTMENT [AY6A-EL, AY6AX-EL].)
11. Perform the “MECHANICAL SYSTEM TEST”. (See MECHANICAL SYSTEM TEST [AY6A-EL, AY6AX-EL].)
Converter Housing Side (2WD)
1. Drain the ATF. (See AUTOMATIC TRANSAXLE FLUID (ATF) REPLACEMENT [AY6A-EL, AY6AX-EL].)
2. Remove the front splash shield (RH). (See SPLASH SHIELD REMOVAL/INSTALLATION.)
3. Disconnect the drive shaft (RH) from the joint shaft. (See FRONT DRIVE SHAFT REMOVAL/INSTALLATION.)
4. Remove the joint shaft. (See JOINT SHAFT REMOVAL/INSTALLATION [2WD].)
5. Remove the oil seal lip using a utility knife.
6. Remove and discard the oil seal using a tape-wrapped flathead screwdriver.
am6xuw00004245
|
7. Using the SST and a hammer, tap a new oil seal so that the specified oil seal position is obtained.
am6xuw00004299
|
8. Install the joint shaft. (See JOINT SHAFT REMOVAL/INSTALLATION [2WD].)
9. Install the drive shaft (RH) to the joint shaft. (See FRONT DRIVE SHAFT REMOVAL/INSTALLATION.)
10. Install the front splash shield (RH). (See SPLASH SHIELD REMOVAL/INSTALLATION.)
11. Add ATF. (See AUTOMATIC TRANSAXLE FLUID (ATF) LEVEL ADJUSTMENT [AY6A-EL, AY6AX-EL].)
12. Adjust the ATF level. (See AUTOMATIC TRANSAXLE FLUID (ATF) LEVEL ADJUSTMENT [AY6A-EL, AY6AX-EL].)
13. Perform the “MECHANICAL SYSTEM TEST”. (See MECHANICAL SYSTEM TEST [AY6A-EL, AY6AX-EL].)
Converter Housing Side (AWD)
1. Drain the ATF. (See AUTOMATIC TRANSAXLE FLUID (ATF) REPLACEMENT [AY6A-EL, AY6AX-EL].)
2. Remove the transaxle. (See AUTOMATIC TRANSAXLE REMOVAL/INSTALLATION [AY6A-EL, AY6AX-EL].)
3. Remove the torque converter. (See TORQUE CONVERTER REMOVAL/INSTALLATION [AY6A-EL, AY6AX-EL].)
4. Remove the converter housing. (See CONVERTER HOUSING REMOVAL/INSTALLATION [AY6A-EL, AY6AX-EL].)
5. Remove and discard the oil seal using a tape-wrapped flathead screwdriver.
am6xuw00004382
|
6. Using the SST and a hammer, tap a new oil seal so that the specified oil seal position is obtained.
am6xuw00004383
|
7. Install the converter housing. (See CONVERTER HOUSING REMOVAL/INSTALLATION [AY6A-EL, AY6AX-EL].)
8. Install the torque converter. (See TORQUE CONVERTER REMOVAL/INSTALLATION [AY6A-EL, AY6AX-EL].)
9. Install the transaxle. (See AUTOMATIC TRANSAXLE REMOVAL/INSTALLATION [AY6A-EL, AY6AX-EL].)
10. Add ATF. (See AUTOMATIC TRANSAXLE FLUID (ATF) LEVEL ADJUSTMENT [AY6A-EL, AY6AX-EL].)
11. Adjust the ATF level. (See AUTOMATIC TRANSAXLE FLUID (ATF) LEVEL ADJUSTMENT [AY6A-EL, AY6AX-EL].)
12. Perform the “MECHANICAL SYSTEM TEST”. (See MECHANICAL SYSTEM TEST [AY6A-EL, AY6AX-EL].)