360°VIEW MONITOR CONTROL MODULE REMOVAL/INSTALLATION
id152000103400
-
Warning
-
• Handling a seat equipped with a side air bag improperly can accidentally operate (deploy) the air bag, which may seriously injure you. Read the service warnings/cautions in the Workshop Manual before handling a front seat equipped with a side air bag.
1. Remove the front seat (LH) installation bolts. (With power seat)(See FRONT SEAT REMOVAL/INSTALLATION [(E)].)
2. Disconnect the negative lead-acid battery terminal and wait for 1 min or more. (See NEGATIVE LEAD-ACID BATTERY TERMINAL DISCONNECTION/CONNECTION.)
3. Remove the following parts.
- (1) Front seat (LH)(See FRONT SEAT REMOVAL/INSTALLATION [(E)].)
-
- (2) Backup power supply(See BACKUP POWER SUPPLY REMOVAL/INSTALLATION [(E)].)
-
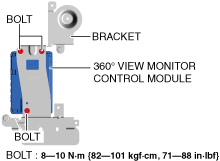
4. Remove the bolts.
5. Remove the 360° view monitor control module.
6. Install in the reverse order of removal.
7. If the 360° view monitor control module is replaced, perform the following procedure.
- (1) Switch the main power ON (READY off) and wait for 5 s or more to complete the global central configuration (GCC) for the 360° view monitor control module.
-
- (2) Switch the main power OFF and wait for 5 s or more.
-
- (3) Switch the main power ON again (READY off or on) and wait for 5 s or more.
-
- (4) Clear the DTC. (See CLEARING DTC.)
-
- (5) Perform the 360° view monitor system aiming. (See 360°VIEW MONITOR SYSTEM AIMING.)
-