 |
amxzzw00002717
PCM REMOVAL/INSTALLATION [L8, LF]
id0140i7802400
1. When replacing the PCM, perform the following:
2. Remove the battery cover.
3. Disconnect the negative battery cable. (See BATTERY REMOVAL/INSTALLATION [L8, LF].)
4. Remove the air cleaner case. (See INTAKE-AIR SYSTEM REMOVAL/INSTALLATION [L8, LF].)
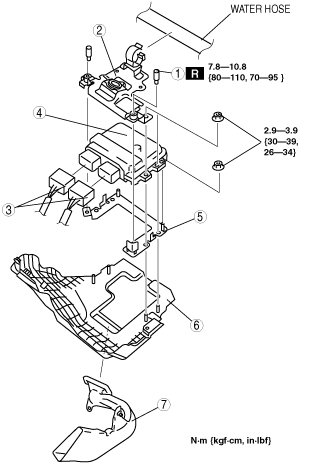
5. Move the water hose from the PCM cover slightly out of the way.
6. Remove in the order indicated in the table.
Except for U.K. specs.
amxzzw00002717
|
|
2
|
PCM cover
|
|
3
|
PCM connector
(See PCM Connector Connected Note.)
|
|
4
|
PCM
|
|
6
|
Air cleaner insulator
|
|
7
|
PCM duct
|
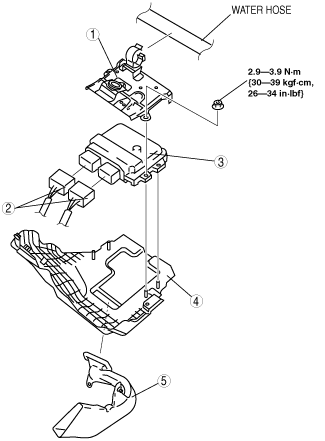
U.K. specs.
amxzzw00002718
|
|
1
|
Set bolt
(See Set Bolt Removal Note.)
(See Set Bolt Installation Note.)
|
|
2
|
PCM cover
|
|
3
|
PCM connector
(See PCM Connector Connected Note.)
|
|
4
|
PCM
|
|
5
|
PCM bracket
|
|
6
|
Air cleaner insulator
|
|
7
|
PCM duct
|
7. Install in the reverse order of removal.
8. When replacing the PCM on the vehicles, perform the following:
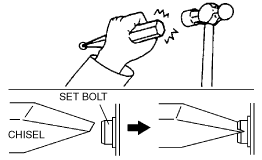
Set Bolt Removal Note
1. Using a chisel and a hammer, cut a groove on the head of the set bolt so that a screwdriver can be inserted.
2. Loose the set bolt using an impact screwdriver or pliers.
amxzzw00002719
|
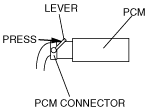
PCM Connector Connected Note
1. Connect the PCM connector fully into the PCM and push the lever until a click is heard.
amxzzw00002720
|
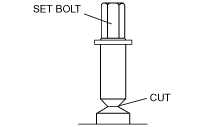
Set Bolt Installation Note
1. Install a new set bolt and tighten it until the neck of the bolt is cut.
amxzzw00002721
|