 |
e5u914aw4013
IMMOBILIZER SYSTEM COMPONENT REPLACEMENT/KEY ADDITION AND CLEARING [WITH ADVANCED KEYLESS SYSTEM]
id0914008050b2
Foreword
|
Ref. No. |
Condition |
Items necessary for procedure (prepare before starting procedure) |
Cautionary notes |
|---|---|---|---|
|
1
|
Since two or more keys that can start the engine are necessary, make a spare key. Or program an additional key.
|
• Programming key
|
• The M-MDS is necessary for the additional key programming if “Customer spare key programming disable” is performed before the procedure using the M-MDS. In this case, perform No. 2.
|
|
2
|
If there is only one key that can start the engine, make a spare key. If there is no key, program an additional key.
|
• Programming key
• M-MDS
|
-
|
|
3
|
Replacing the PCM only.
|
• New PCM
• Programmed card key or programmed key
• M-MDS
|
-
|
|
4
|
Changing the additional key programming procedure. (Method for programming other keys using two keys that can start the engine is disabled.)
|
• M-MDS
|
• The additional key programming using No. 1 cannot be performed after the procedure. It is possible to restore the setting. For restoring the setting, the M-MDS is necessary.
|
|
4
|
Changing the additional key programming procedure. Allows programming using two keys that can start the engine.
|
• M-MDS
|
• New vehicles have this setting.
|
|
5
|
Clearing the programmed key ID number.
|
• Programming keys (two or more)
• M-MDS
|
|
|
5
|
Replacing all the keys. (Steering lock unit is not replaced)
|
• Programming keys (two or more)
• M-MDS
|
|
|
5
|
Replacing the steering lock unit.
|
• New steering lock unit
• Programmed card key
• New keys (two or more)
• M-MDS
|
|
|
5
|
Replacing the keyless control module.
|
• New keyless control module
• Card key
• Programming keys (two or more)
• M-MDS
|
|
|
5
|
Replacing the instrument cluster.
|
• New instrument cluster
• Card key
• Programming keys (two or more)
• M-MDS
|
|
|
6
|
Program the keys(There is no programmed key or programmed card key) )
|
• Programming card key
• Programming keys (two or more)
• M-MDS
|
-
|
|
-
|
Replacing the coil antenna.
|
• New coil antenna
|
• Immobilizer system resetting is not necessary.
|
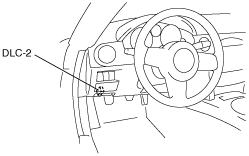
M-MDS Connecting Procedure
1. Fully lower the door glass.
2. Connect the M-MDS to the DLC-2.
e5u914aw4013
|
3. Pull out the M-MDS cable from the door glass opening and set the M-MDS outside the vehicle.
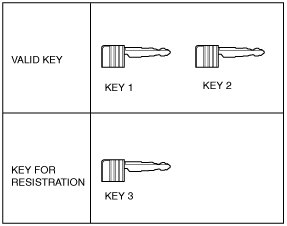
No.1 Additional Key Programming Procedure (Using Two Valid Keys)
Procedure
amxzzw00003969
|
1. Prepare key 3 for programming.
2. Start the engine using key 1.
3. Verify that the security light illuminates for approx. 3 s, and then goes out.
4. Turn the ignition switch to the LOCK position.
5. Using key 1, turn the ignition switch to the ON position.
6. Verify that the security light illuminates for approx. 3 s, and then goes out.
7. Using key 1, turn the ignition switch to the LOCK position within approx. 4 s after the security light goes out.
8. Remove key 1.
9. Repeat Steps 2—5 using key 2 instead of key 1.
10. Repeat Steps 5—8 using key 3 instead of key 1.
11. If additional keys need to be programmed, repeat Steps 1—10, and replace key 3 in Step 10 with the key to be programmed (key 4).
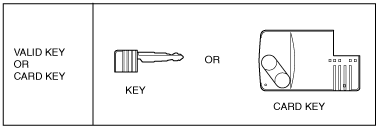
No. 2 Key Additional Programming Procedure (Using the M-MDS)
Procedure
1. Prepare key 1 for programming.
2. Start the engine using a valid key or card key.
3. Verify that the security light illuminates for approx. 3 s, and then goes out.
4. Turn the ignition switch to the LOCK position.
5. Connect the M-MDS to the DLC-2. (See M-MDS Connecting Procedure.)
6. Using key 1, turn the ignition switch to the ON position.
7. Select “Body/Security/PATS Function” from the M-MDS screen menu.
8. Select “Program Additional Ignition Key” from the M-MDS screen menu.
9. Perform the security access according to the directions on the M-MDS screen. (See SECURITY ACCESS PROCEDURE.)
10. Perform procedure according to the directions on the M-MDS screen.
11. After verifying that the PATS function menu is displayed again on the M-MDS screen, select the “Exit (From This Menu)” to finish the M-MDS procedure.
12. After Step 10, wait 5 s or more, and then turn the ignition switch to the LOCK position.
No.3 PCM Replacement Procedure
Procedure
acxaaw00001328
|
1. Turn the ignition switch to the LOCK position.
2. Connect the M-MDS to the DLC-2. (See M-MDS Connecting Procedure.)
3. Using a valid key or card key, turn the ignition switch to the ON position.
4. Verify that the keyless warning light illuminates for approx. 3 s, and then goes out.
5. Select “BODY/SECURITY/PATS functions” from the M-MDS screen menu.
6. Select “Parameter Reset” from the M-MDS screen menu.
7. Perform the security access according to the directions on the M-MDS screen. (See SECURITY ACCESS PROCEDURE.)
8. After verifying that the PATS function menu is displayed again on the M-MDS screen, select “Exit (From This Menu)” to finish the M-MDS procedure.
9. After Step 8, wait 5 s or more, and then turn the ignition switch to the LOCK position.
10. Turn the ignition switch to the ON position.
11. After verifying that the security light and keyless warning light illuminates for 3 s or more turn the ignition switch to the LOCK position.
12. Verify that the all keys can start the engine for 5 s or more after the procedure.
No. 4 Key Additional Programming Procedure Changing
Procedure
1. Using the key, turn the ignition switch to the ON position. (The key can be either the valid key or an unprogrammed key)
2. Connect the M-MDS to the DLC-2.
3. Select “Body/Security/PATS Function” from the M-MDS screen menu.
4. Select “Customer spare key programming enable” or “Customer spare key programming disable” from the M-MDS screen menu. The key additional programming procedure is as follows according to the selected menu:
|
Setting |
Additional key programming procedure |
|
|---|---|---|
|
Method using two valid keys |
Method using the M-MDS |
|
|
Customer Spare Key Programming Enable
|
–
|
–
|
|
Customer Spare Key Programming Disable
|
×
|
–
|
5. Perform the security access according to the directions on the M-MDS screen. (See SECURITY ACCESS PROCEDURE.)
6. After verifying that the PATS function menu is displayed again on the M-MDS screen, select “Finish (this menu)” to finish the M-MDS procedure.
7. After Step 6, wait 5 s or more and then turn the ignition switch to the LOCK position.
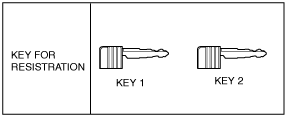
No.5 Resetting Procedure for the Immobilizer System when Replacing the related parts
|
|
Priority ranking |
||||
|---|---|---|---|---|---|
|
1 |
2 |
3 |
4 |
||
|
Replace parts |
M-MDS menu |
Ignition key code erase |
Parameter reset |
Program additional card key |
Steering lock unit programming |
|
Ignition key
|
X
|
|
|
|
|
|
Ignition key cylinder
|
X
|
|
|
|
|
|
Steering lock unit
|
X
|
|
|
X
|
|
|
Keyless control module
|
X
|
|
X
|
X
|
|
|
Instrument cluster
|
X
|
X
|
|
|
|
|
PCM
|
|
X
|
|
|
|
Procedure
amxzzw00003970
|
1. Prepare two or more keys to be programmed after the key ID number is cleared.
2. Connect the M-MDS to the DLC-2. (See M-MDS Connecting Procedure.)
3. Using key 1, turn the ignition switch to the ON position.
4. Verify that the keyless warning light illuminates for approx. 3 s and then goes out.
5. Select “Body/Security/PATS Function” from the M-MDS screen menu.
6. Select “Ignition key code erase” from the M-MDS screen menu and perform the procedure according to the M-MDS screen.
7. Perform the security access according to the directions on the M-MDS screen. (See SECURITY ACCESS PROCEDURE.)
8. Select “Parameter Reset” from the M-MDS screen menu.
9. Perform security access again as indicated on the M-MDS screen. (See SECURITY ACCESS PROCEDURE.)
10. Select the replaced part as indicated on the M-MDS screen.
11. Perform the ”Program additional card key”. (When replacing keyless control module) (See CARD KEY ID CODE REGISTRATION [WITH ADVANCED KEYLESS SYSTEM].)
12. Perform the ”Steering lock unit programming”. (When replacing keyless control module) (See STEERING LOCK UNIT ID CODE REGISTRATION [WITH ADVANCED KEYLESS SYSTEM].)
13. After verifying that the PATS function menu is displayed again on the M-MDS screen, select “Exit (From This Menu)” to finish the M-MDS procedure.
14. After Step 11, wait 5 s or more and then turn the ignition switch to the LOCK position.
15. Using key 1, turn the ignition switch to the ON position.
16. After verifying that the security light and keyless warning light illuminate for 3 s or more, turn the ignition switch to the LOCK position and remove key 1.
17. Using key 2, turn the ignition switch to the ON position.
18. Verify that the security light and keyless warning light illuminate for approx. 3 s, and then goes out.
19. After verifying that the security light goes out, turn the ignition switch to the LOCK position using key 2, and then remove key 2.
20. If additional keys need to be programmed, repeat Steps 15—16 with the additional key to be programmed being key 3. If the ignition switch is held in the ON position for 1 min or more, additional key programming according to Steps 18—19 will not be possible. If this occurs, refer to “No.1 Additional Key Programming Procedure (Using Two Valid Keys)” to program any additional keys.
21. Start the engine with key 1.
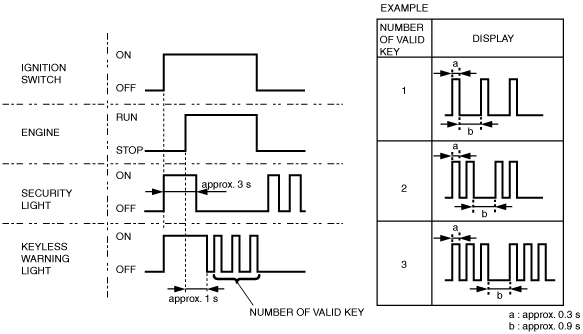
22. Verify that the security light and keyless warning light operate as follows:
e6u914zw1026
|
23. After verifying that the keyless warning light goes out, turn the ignition switch to the LOCK position using key 1, and then remove the key.
24. Repeat Steps 22—23 using key 2 instead of key 1.
25. Start the engine using the card key.
26. Verify that the security light and keyless warning light operate as follows:
27. After verifying that the keyless warning light goes out, turn the ignition switch to the LOCK position.
No.6 Key Programming Procedure (If there is no programmed key or programmed advanced key)
Procedure
1. Fully lower the driver-side door glass.
2. Connect the M-MDS to the DLC-2.
3. Pull out the M-MDS cable from the door glass opening and set the M-MDS outside the vehicle.
4. After the vehicle is identified, select the following items from the initialization screen of the M-MDS.
5. Then, select items from the screen menu in the following order.
6. Security access begins and the M-MDS displays the “OUT-CODE”.
7. Input the “IN-CODE” that corresponds to the “OUT-CODE” displayed in the M-MDS screen.
8. Select “CARD KEY CLEARING” from the M-MDS screen menu.
9. Then, select the following items from the initialization screen of the M-MDS.
10. Then, select items from the screen menu in the following order.
11. Security access begins and the M-MDS displays the “OUT-CODE”.
12. Input the “IN-CODE” that corresponds to the “OUT-CODE” displayed on the M-MDS screen.
13. Select “CARD KEY PROGRAMMING” from the M-MDS screen menu.
14. Press the unprogrammed card key UNLOCK button twice.
15. If programming more card keys, remove the supplementary key once, and then repeat the procedure from Step 12 by following the instructions on the M-MDS screen.
16. After verifying that the PATS function menu is displayed again on the M-MDS screen, select “Exit (From This Menu)” to finish the M-MDS procedure.
17. After Step 16, wait 5 s or more and then turn the ignition switch to the LOCK position.
18. Using key 1, turn the ignition switch to the ON position.
19. After verifying that the security light and keyless warning light illuminate for 3 s or more, turn the ignition switch to the LOCK position and remove key 1.
20. Using key 2, turn the ignition switch to the ON position.
21. Verify that the security light and keyless warning light illuminate for approx. 3 s, and then goes out.
22. After verifying that the security light goes out, turn the ignition switch to the LOCK position using key 2, and then remove key 2.
23. If additional keys need to be programmed, repeat Steps 18—19 with the additional key to be programmed being key 3. If the ignition switch is held in the ON position for 1 min or more, additional key programming according to Steps 21—22 will not be possible. If this occurs, refer to “No.1 Additional Key Programming Procedure (Using Two Valid Keys)” to program any additional keys.
24. Start the engine with key 1.
25. Verify that the security light and keyless warning light operate as follows:
e6u914zw1026
|
26. After verifying that the keyless warning light goes out, turn the ignition switch to the LOCK position using key 1, and then remove the key.
27. Repeat Steps 25—26 using key 2 instead of key 1.
28. Start the engine using the card key.
29. Verify that the security light and keyless warning light operate as follows:
30. After verifying that the keyless warning light goes out, turn the ignition switch to the LOCK position.