|
amxzzw00002456
DIAGNOSTIC ASSIST FUNCTION [AUDIO]
id0902f6804500
Display Inspection
1. Turn the ignition switch to the ACC or ON position.
2. Turn the audio unit power to ON.
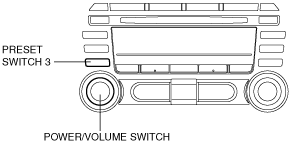
3. While pressing the POWER/VOLUME switch, simultaneously press the SEEK/TRACK switch (UP) for 0.2 s or more.
With RDS (radio data system)
amxzzw00002456
|
Without RDS (radio data system)
amxzzw00002457
|
4. Inspect according to the following table:
|
Inspection |
Display |
Action |
|
|---|---|---|---|
|
• Launch the display inspection mode.
• The characters displayed on the display are not truncated or faint.
|
 |
Yes
|
Display is normal.
|
|
No
|
Replace the center panel.
|
||
5. Cancel the diagnostic assist function by either turning off the audio unit power or by turning the ignition switch to the LOCK position.
Switch Inspection
1. Turn the ignition switch to the ACC or ON position.
2. Turn the audio unit power to ON.
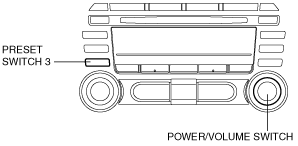
3. While pressing the POWER/VOLUME switch, simultaneously press the PRESET switch 3 for 0.2 s or more.
With RDS (radio data system)
amxzzw00002458
|
Without RDS (radio data system)
amxzzw00002459
|
4. Inspect according to the following table:
|
Inspection |
Display |
Action |
|
|---|---|---|---|
|
• Launch the switch inspection mode.
• Operate all of the switches (press).
• Does the buzzer sound?
• Does the dial rotation direction correspond with the direction displayed in information display?
|
Switch name or dial rotation direction
|
Yes
|
The switch is normal.
|
|
No
|
Verify the switch.
|
||
5. Cancel the diagnostic assist function by either turning off the audio unit power or by turning the ignition switch to the LOCK position.
Speaker Inspection
1. Turn the ignition switch to the ACC or ON position.
2. Turn the audio unit power to ON.
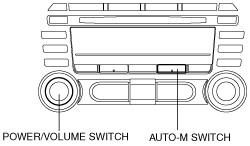
3. While pressing the POWER/VOLUME switch, simultaneously press the AUTO-M switch for 0.2 s or more.
With RDS (radio data system)
amxzzw00000872
|
Without RDS (radio data system)
amxzzw00002460
|
4. Inspect according to the following table:
|
Inspection |
Display |
Action |
|
|---|---|---|---|
|
• Launch the speaker inspection mode.
• Does each speaker output sound in the following order?:
Without Bose®
With Bose®
|
―
|
Yes
|
The speakers and the wiring harness between the audio unit and speakers are normal.
|
|
No
|
• If no sound is produced from all of the speakers.
• If no sound is produced from some of the speakers.
|
||
5. Cancel the diagnostic assist function by either turning off the audio unit power or by turning the ignition switch to the LOCK position.
Radio Reception Condition Inspection
1. Turn the ignition switch to the ACC or ON position.
2. Turn the audio unit power to ON.
3. Tune in the radio.
4. While pressing the POWER/VOLUME switch, simultaneously press the M/PRESET switch 2 for 0.2 s or more.
With RDS (radio data system)
amxzzw00002461
|
Without RDS (radio data system)
amxzzw00002462
|
5. Inspect according to the following table:
|
Inspection |
Display |
Action |
|---|---|---|
|
Launch the radio reception condition inspection mode.
|
S-METER 10 — S-METER 5
|
Manual antenna, antenna feeder and audio unit are normal.
|
|
S-METER 4 — S-METER 3
|
Change frequencies and re-perform the inspection.
|
|
|
S-METER 2 — S-METER 0
|
Inspect the manual antenna and antenna feeder.
(See MANUAL ANTENNA INSPECTION.)
|
6. Cancel the diagnostic assist function by either turning off the audio unit power or by turning the ignition switch to the LOCK position.
Antenna Control Condition Inspection
1. Turn the ignition switch to the ACC or ON position.
2. Turn the audio unit power to ON.
3. Tune in the radio.
4. While pressing the POWER/VOLUME switch, simultaneously press the AM switch for 0.2 s or more.
With RDS (radio data system)
amxzzw00000874
|
Without RDS (radio data system)
amxzzw00002463
|
5. Inspect according to the following table:
|
Inspection |
Display |
Action |
|
|---|---|---|---|
|
Launch the antenna control condition inspection mode.
|
ANT-ON
|
Sound quality good.
|
System is okay.
|
|
Sound quality poor.
|
Inspect the manual antenna and antenna feeder.
(See MANUAL ANTENNA INSPECTION.)
|
||
|
ANT-OFF
|
Replace the audio unit.
|
||
6. Cancel the diagnostic assist function by either turning off the audio unit power or by turning the ignition switch to the LOCK position.
Audio Amplifier Control Condition Inspection
1. Turn the ignition switch to the ACC or ON position.
2. Turn the audio unit power to ON.
3. While pressing the AUTO-M switch, simultaneously press the CD switch for 0.2 s or more.
amxzzw00000875
|
4. Inspect according to the following table:
|
Inspection |
Display |
Action |
|---|---|---|
|
Launch the audio amplifier control condition inspection mode.
|
AMP-ON
|
System is okay.
|
|
AMP-OFF
|
Replace the audio unit.
|
5. Cancel the diagnostic assist function by either turning off the audio unit power or by turning the ignition switch to the LOCK position.
Center Panel Specification Inspection
1. Turn the ignition switch to the ACC or ON position.
2. Turn the audio unit power to ON.
3. Tune in the radio.
4. While pressing the POWER/VOLUME switch, simultaneously press the PRESET switch 6 for 0.2 s or more.
With RDS (radio data system)
amxzzw00002464
|
Without RDS (radio data system)
amxzzw00002465
|
5. Inspect according to the following table:
|
Inspection |
Display |
Action |
|
|---|---|---|---|
|
• Launch the center panel specification inspection mode.
• Is there a match to the destination?
|
P—01(ID)—00(code)
|
Yes
|
The center panel is normal.
|
|
No
|
Replace the center panel.
|
||
|
ID |
Specification |
Code |
Destination |
|---|---|---|---|
|
01
|
MX-5
|
00
|
Japan
|
|
01
|
Australia
|
||
|
02
|
4A region (With AM frequency pitch: 9KHz pitch)
|
||
|
03
|
USA
|
||
|
04
|
Europe (With DIS)
|
||
|
05
|
Europe (Without DIS)
|
||
|
06
|
4A region (With AM frequency pitch: 5KHz pitch (with DIS))
|
||
|
07
|
4A region (With AM frequency pitch: 5KHz pitch (without DIS))
|
6. Cancel the diagnostic assist function by either turning off the audio unit power or by turning the ignition switch to the LOCK position.
Audio Amplifier Specification Inspection
1. Turn the ignition switch to the ACC or ON position.
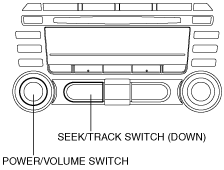
2. While pressing the POWER/VOLUME switch, simultaneously press the SEEK/TRACK switch (down) for 3 s or more.
With RDS (radio data system)
amxzzw00000877
|
Without RDS (radio data system)
amxzzw00002466
|
3. Inspect according to the following table:
|
Inspection |
Display |
Action |
|
|---|---|---|---|
|
• Launch the audio amplifier specification inspection mode.
• Verify the audio amplifier specification.
• Dose the audio amplifier specification correspond.
|
Without Bose®
• N (Normal)
With Bose®
• L (Line out)
|
Yes
|
System is okay.
|
|
No
|
Replace the audio unit.
|
||
4. Cancel the diagnostic assist function by either turning off the audio unit power or by turning the ignition switch to the LOCK position.
Audio Amplifier (With Bose®) Identify Inspection
1. Turn the ignition switch to the ACC or ON position.
2. Turn the audio unit power to ON.
3. While pressing the POWER/VOLUME switch, simultaneously press the AUTO-M switch and RPT/PRESET switch 4 for 3 s or more.
With RDS (radio data system)
amxzzw00000878
|
Without RDS (radio data system)
amxzzw00002467
|
4. Inspect according to the following table:
|
Inspection |
Display |
Action |
|
|---|---|---|---|
|
• Launch the audio amplifier (With Bose®) identify inspection mode.
• Dose the audio amplifier specification correspond.
|
With normal seat
• The rear speaker sounds.
With leather seat
• The door speaker sounds.
|
Yes
|
Audio amplifier is okay.
|
|
No
|
Replace the audio amplifier.
|
||
5. Cancel the diagnostic assist function by either turning off the audio unit power or by turning the ignition switch to the LOCK position.