 |
am2zzw00003962
FRONT STABILIZER REMOVAL/INSTALLATION
id021300122000
1. Remove the steering shaft cover. (See STEERING WHEEL AND COLUMN REMOVAL/INSTALLATION [L.H.D.].) (See STEERING WHEEL AND COLUMN REMOVAL/INSTALLATION [R.H.D.].)
2. Disconnect the steering shaft from the steering gear and linkage. (See STEERING WHEEL AND COLUMN REMOVAL/INSTALLATION [L.H.D.].) (See STEERING WHEEL AND COLUMN REMOVAL/INSTALLATION [R.H.D.].) (See STEERING GEAR AND LINKAGE REMOVAL/INSTALLATION.)
3. Remove the front crossmember component. (See FRONT CROSSMEMBER REMOVAL/INSTALLATION.)
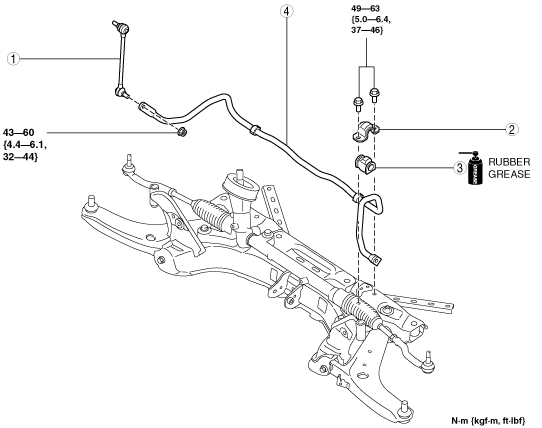
4. Remove in the order indicated in the table.
5. Install in the reverse order of removal.
6. Inspect the wheel alignment and adjust it if necessary. (See FRONT WHEEL ALIGNMENT.)
am2zzw00003962
|
|
1
|
Stabilizer control link
|
|
2
|
Stabilizer bracket
|
|
3
|
Stabilizer bushing
|
|
4
|
Stabilizer
(See Stabilizer Installation Note.)
|
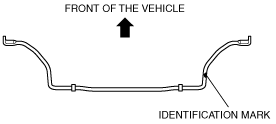
Stabilizer Installation Note
1. Install the stabilizer with the identification mark facing the right side of the vehicle.
am2zzw00001556
|