 |
am2zzw00001228
POWER BRAKE UNIT REMOVAL/INSTALLATION (L.H.D.)
id041100803700
1. Remove the battery and battery tray. (See BATTERY REMOVAL/INSTALLATION [ZJ, ZY].) (See BATTERY REMOVAL/INSTALLATION [MZ-CD 1.4 DI Turbo].) (See BATTERY REMOVAL/INSTALLATION [MZ-CD 1.6 (Y6)].)
2. Remove the windshield wiper arm and blade. (See WINDSHIELD WIPER ARM AND BLADE REMOVAL/INSTALLATION.)
3. Remove the front fender molding. (See FRONT FENDER PANEL REMOVAL/INSTALLATION.)
4. Remove the cowl grille. (See COWL GRILLE REMOVAL/INSTALLATION.)
5. Remove the windshield wiper motor. (See WINDSHIELD WIPER MOTOR REMOVAL/INSTALLATION.)
6. Remove the cowl panel. (See COWL PANEL REMOVAL/INSTALLATION.)
7. Remove the master cylinder. (See MASTER CYLINDER REMOVAL/INSTALLATION [L.H.D.].)
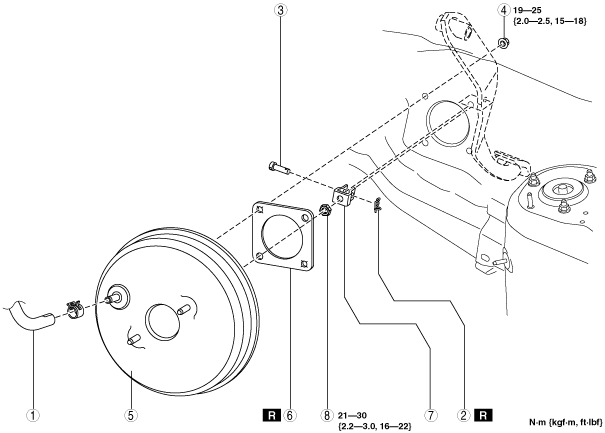
8. Remove in the order indicated in the table.
9. Install in the reverse order of removal.
10. After installation, inspect the brake pedal. (See BRAKE PEDAL INSPECTION.)
11. Perform the shift-lock and key interlock inspections with the ATX vehicles. (See AUTOMATIC TRANSAXLE SHIFT MECHANISM INSPECTION.)
am2zzw00001228
|
|
1
|
Vacuum hose
|
|
2
|
Snap pin
|
|
3
|
Clevis pin
|
|
4
|
Nut
|
|
5
|
Power brake unit
|
|
6
|
Gasket
|
|
7
|
Fork
(See Fork Installation Note.)
|
|
8
|
Locknut
|
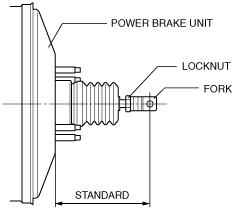
Fork Installation Note
1. Install the fork as shown in the figure.
am2zzw00001076
|