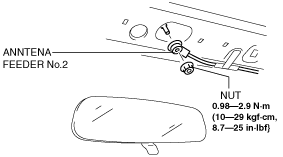
ANTENNA FEEDER NO.2 INSPECTION


id092000812500

1.  Disconnect the negative battery cable.

2.  Remove the following parts:

(1)  A-pillar trim (See A-PILLAR TRIM REMOVAL/INSTALLATION.)
(2)  Sunvisor (See SUNVISOR REMOVAL/INSTALLATION.)
(3)  Assist handle (See ASSIST HANDLE REMOVAL/INSTALLATION.)
(4)  Front scuff plate (5HB) (See FRONT SCUFF PLATE REMOVAL/INSTALLATION.)
(5)  Rear scuff plate (5HB) See REAR SCUFF PLATE REMOVAL/INSTALLATION.)
(6)  B-pillar lower trim (5HB) (See B-PILLAR LOWER TRIM REMOVAL/INSTALLATION.)
(7)  Front seat belt upper anchor installation bolt (5HB) (See FRONT SEAT BELT REMOVAL/INSTALLATION.)
(8)  B-pillar upper trim (5HB) (See B-PILLAR UPPER TRIM REMOVAL/INSTALLATION.)

3.  Disconnect the rain sensor connector. (vehicles with auto light/wiper system) (See RAIN SENSOR REMOVAL/INSTALLATION.)

4.  Partially peel back the seaming welt.

5.  Partially peel back the headliner.

6.  Remove the nut.

am2zzw00001593

7.  Disconnect antenna feeder No.1.

am2zzw00001594

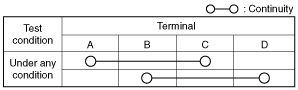
8.  Verify that the continuity between antenna feeder No.2 terminals is as indicated in the table.

adejjw00000960

•  If not as indicated in the table, replace antenna feeder No.2.
am2zzw00000313