 |
am2zzw00003466
BUMPER REINFORCEMENT REMOVAL/INSTALLATION
id091000405700
Front Bumper Reinforcement
1. Disconnect the negative battery cable.
2. Remove the front bumper. (See FRONT BUMPER REMOVAL/INSTALLATION)
3. Remove the front combination light. (See FRONT COMBINATION LIGHT REMOVAL/INSTALLATION)
4. Remove the horn. (See HORN REMOVAL/INSTALLATION)
5. Remove the washer tank. (See WASHER TANK REMOVAL/INSTALLATION)
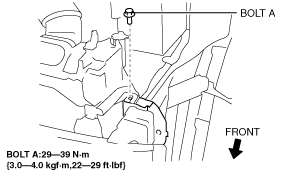
6. Remove bolt A.
am2zzw00003466
|
7. Remove bolts B.
am2uuw00000707
|
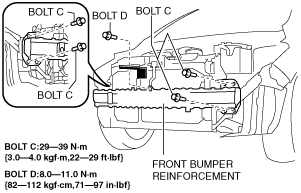
8. Remove bolts C and D then remove the front bumper reinforcement in the direction of the arrow shown in the figure.
am2uuw00000708
|
9. Remove the bracket in the direction shown of the arrow shown in the figure.
am2zzw00003468
|
10. Install in the reverse order of removal.
Rear Bumper Reinforcement
1. Disconnect the negative battery cable.
2. Remove the following the parts:
3. Remove the nuts.
am2zzw00005893
|
4. Remove the rear bumper reinforcement.
5. Install in the reverse order of removal.