 |
am2zzw00003413
B-PILLAR UPPER TRIM REMOVAL/INSTALLATION [3HB]
id0917004590z3
1. Remove the following parts:
2. Partially peel back the seaming welt.
3. Remove the trunk side trim. (See TRUNK SIDE TRIM REMOVAL/INSTALLATION [3HB])
4. Remove the C-pillar trim. (See C-PILLAR TRIM REMOVAL/INSTALLATION [3HB])
5. Remove the fastener.
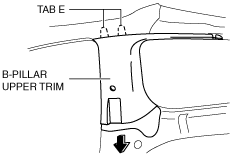
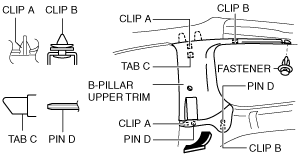
6. Grasp the lower end of the B-pillar upper trim, pull it in the direction of the arrow shown in the figure, and remove clip A, clip B, tab C, and pin D.
am2zzw00003413
|
7. Remove the B-pillar upper trim in the direction of the arrow shown in the figure.
am2zzw00003414
|
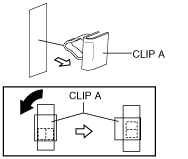
8. If there is a remaining clip A, rotate it 90° in the direction of the arrow shown in the figure and remove it.
am2zzw00003415
|
9. Remove clip A and install it to the B-pillar upper trim.
10. Install in the reverse order of removal.