SOLENOID VALVE REMOVAL/INSTALLATION [FS5A-EL]
id051721293200
-
Warning
-
• A hot transaxle and ATF can cause severe burns. Turn off the engine and wait until they are cool.
Primary Control Valve Body
1. Remove the primary control valve body.
- (1) Remove the battery cover. (See BATTERY REMOVAL/INSTALLATION [LF, L5].) (See BATTERY REMOVAL/INSTALLATION [MZR 2.0 DISI i-stop].)
- (2) Disconnect the negative battery cable.
- (3) Remove the aerodynamic under cover No.2. (See AERODYNAMIC UNDER COVER NO.2 REMOVAL/INSTALLATION.)
- (4) Clean the transaxle exterior throughout with a steam cleaner or cleaning solvents.
- (5) Drain the ATF. (See AUTOMATIC TRANSAXLE FLUID (ATF) REPLACEMENT [FS5A-EL].)
- (6) Remove the oil pan. (See CONTROL VALVE BODY REMOVAL/INSTALLATION [FS5A-EL].)
- (7) Remove the primary control valve body. (See CONTROL VALVE BODY REMOVAL/INSTALLATION [FS5A-EL].)
2. Remove in the order indicated in the table.
|
1
|
Bracket
|
|
2
|
Shift solenoid A
|
|
3
|
Shift solenoid C
|
|
4
|
Shift solenoid B
|
|
5
|
Shift solenoid E
|
|
6
|
Shift solenoid D
|
|
7
|
Pressure control solenoid A
|
|
8
|
O-ring
|
3. Install in the reverse order of removal.
4. Add ATF. (See AUTOMATIC TRANSAXLE FLUID (ATF) REPLACEMENT [FS5A-EL].)
5. Perform the “Mechanical System Test”. (See MECHANICAL SYSTEM TEST [FS5A-EL].)
6. Perform the “Road Test”. (See ROAD TEST [FS5A-EL].)
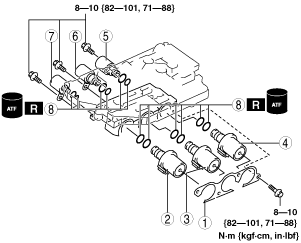
Secondary Control Valve Body
1. Remove the secondary control valve body.
- (1) Remove the battery cover. (See BATTERY REMOVAL/INSTALLATION [LF, L5].) (See BATTERY REMOVAL/INSTALLATION [MZR 2.0 DISI i-stop].)
- (2) Disconnect the negative battery cable.
- (3) Remove the battery . (See BATTERY REMOVAL/INSTALLATION [LF, L5].) (See BATTERY REMOVAL/INSTALLATION [MZR 2.0 DISI i-stop].)
- (4) Remove the battery box. (See BATTERY REMOVAL/INSTALLATION [LF, L5].) (See BATTERY REMOVAL/INSTALLATION [MZR 2.0 DISI i-stop].)
- (5) Remove the battery tray. (See BATTERY REMOVAL/INSTALLATION [LF, L5].) (See BATTERY REMOVAL/INSTALLATION [MZR 2.0 DISI i-stop].)
- (6) Remove the aerodynamic under cover No.2. (See AERODYNAMIC UNDER COVER NO.2 REMOVAL/INSTALLATION.)
- (7) Clean the transaxle exterior throughout with a steam cleaner or cleaning solvents.
- (8) Drain the ATF. (See AUTOMATIC TRANSAXLE FLUID (ATF) REPLACEMENT [FS5A-EL].)
- (9) Remove the oil cover. (See CONTROL VALVE BODY REMOVAL/INSTALLATION [FS5A-EL].)
- (10) Remove the secondary control valve body. (See CONTROL VALVE BODY REMOVAL/INSTALLATION [FS5A-EL].)
2. Remove in the order indicated in the table.
|
1
|
Bracket
|
|
2
|
Pressure control solenoid B
|
|
3
|
Shift solenoid F
|
|
4
|
O-ring
|
3. Install in the reverse order of removal.
4. Add ATF. (See AUTOMATIC TRANSAXLE FLUID (ATF) REPLACEMENT [FS5A-EL].)
5. Perform the “Mechanical System Test”. (See MECHANICAL SYSTEM TEST [FS5A-EL].)
6. Perform the “Road Test”. (See ROAD TEST [FS5A-EL].)