CLIMATE CONTROL UNIT REMOVAL/INSTALLATION [MANUAL AIR CONDITIONER]


id0740a2807400

1.  Disconnect the negative battery cable.

2.  Remove the following parts:

(1)  Upper panel (See UPPER PANEL REMOVAL/INSTALLATION.)
(2)  Shift lever knob (MTX) (See MANUAL TRANSAXLE SHIFT MECHANISM REMOVAL/INSTALLATION.)
(3)  Selector lever knob (ATX/CVT) (See AUTOMATIC TRANSAXLE SHIFT MECHANISM REMOVAL/INSTALLATION.) (See CVT (CONTINUOUSLY VARIABLE TRANSAXLE) SHIFT MECHANISM REMOVAL/INSTALLATION.)
(4)  Shift panel (See SHIFT PANEL REMOVAL/INSTALLATION.)
(5)  Side wall (See SIDE WALL REMOVAL/INSTALLATION.)
(6)  Console (See CONSOLE REMOVAL/INSTALLATION.)
(7)  Front scuff plate (See FRONT SCUFF PLATE REMOVAL/INSTALLATION.)
(8)  Front side trim (See FRONT SIDE TRIM REMOVAL/INSTALLATION.)
(9)  Dashboard under cover (See DASHBOARD UNDER COVER REMOVAL/INSTALLATION.)
(10)  Glove compartment (See GLOVE COMPARTMENT REMOVAL/INSTALLATION.)
(11)  Bonnet release lever (See BONNET LATCH AND RELEASE LEVER REMOVAL/INSTALLATION.)
(12)  Lower panel (See LOWER PANEL REMOVAL/INSTALLATION.)
(13)  Center panel (See CENTER PANEL REMOVAL/INSTALLATION.)
(14)  Audio unit (See AUDIO UNIT REMOVAL/INSTALLATION.)

3.  Remove in the order indicated in the table.

am3uuw00004200

1
Screw
2
Climate control unit
3
Connector

4.  Install in the reverse order of removal.


Climate Control Unit Removal Note

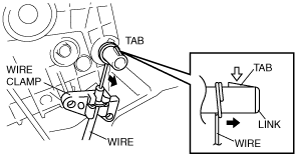
1.  Disconnect each wire to links and remove it to the wire clamps.

am3uuw00004201

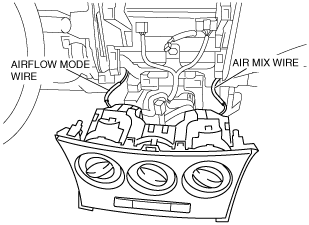
2.  Pull out the air mix wire and airflow mode wire from the dashboard.

am3uuw00004202


Climate Control Unit Installation Note

1.  Pass each wire through the hole on the dashboard as shown in the figure.

am3uuw00004203

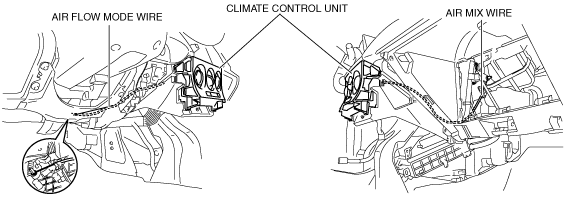
2.  Route each wire as shown in the figure.

am3uuw00004204

3.  Connect the climate control unit connector.

4.  Connect each wire to links and install it to the wire clamps.

am3uuw00004205

5.  Verify that the dial is turned fully from one end to the other.