 |
am3uuw00003311
MANUAL TRANSAXLE SHIFT MECHANISM REMOVAL/INSTALLATION
id051600800200
F35M-R
1. Remove the battery cover. (See BATTERY REMOVAL/INSTALLATION [ZY, Z6].)
2. Disconnect the negative battery cable. (See BATTERY REMOVAL/INSTALLATION [ZY, Z6].)
3. Remove the battery and battery tray. (See BATTERY REMOVAL/INSTALLATION [ZY, Z6].)
4. Remove the fresh-air duct and the air cleaner as a single unit. (See INTAKE-AIR SYSTEM REMOVAL/INSTALLATION [ZY, Z6].)
5. Remove the aerodynamic under cover NO.2. (See AERODYNAMIC UNDER COVER NO.2 REMOVAL/INSTALLATION.)
6. Remove the tunnel member (rear). (See EXHAUST SYSTEM REMOVAL/INSTALLATION [ZY, Z6].)
7. Remove the upper panel. (See UPPER PANEL REMOVAL/INSTALLATION.)
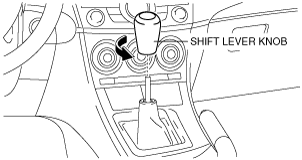
8. Remove the shift lever knob.
am3uuw00003311
|
9. Remove the shift panel (See SHIFT PANEL REMOVAL/INSTALLATION.)
10. Remove the side wall. (See SIDE PANEL REMOVAL/INSTALLATION.)
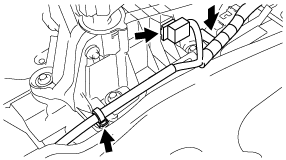
11. Detach the clip as shown in the figure.
am3uuw00003313
|
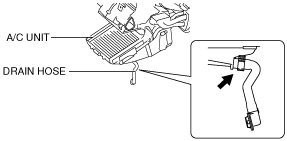
12. Disconnect the drain hose connected to A/C unit. (See A/C UNIT REMOVAL/INSTALLATION.)
am3uuw00004384
|
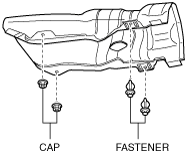
13. Remove the cap and fastener securing the insulator (front) and set the insulator (front) aside.
am3uuw00003312
|
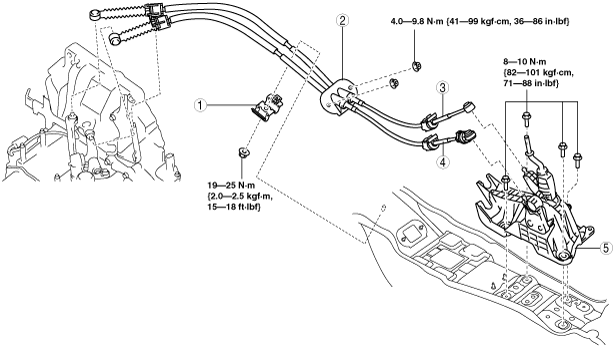
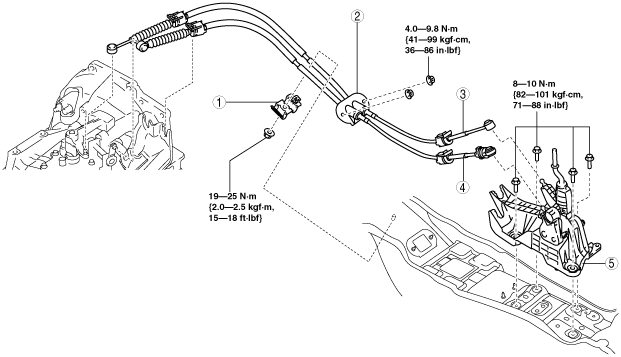
14. Remove in the order indicated in the table.
15. Install in the reverse order of removal.
16. After installation, verify that the shift lever can be shifted smoothly into each position.
am3zzw00005938
|
|
1
|
Clip
|
|
2
|
Grommet
|
|
3
|
Main shift cable
|
|
4
|
Main select cable
|
|
5
|
Shift lever component
|
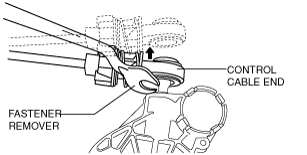
Main shift cable and main select cable removal note
1. Remove the both shift cable end and select cable end using a fastener remover.
am5uuw00003737
|
J65M-R
1. Remove the battery cover.
2. Disconnect the negative battery cable.
3. Remove the battery and battery tray. (See BATTERY REMOVAL/INSTALLATION [MZ-CD 1.6 (Y6)].)
4. Remove the air cleaner component. (See INTAKE-AIR SYSTEM REMOVAL/INSTALLATION [MZ-CD 1.6 (Y6)].)
5. Remove the aerodynamic under cover NO.2. (See AERODYNAMIC UNDER COVER NO.2 REMOVAL/INSTALLATION.)
6. Remove the tunnel member (rear).(See EXHAUST SYSTEM REMOVAL/INSTALLATION [MZ-CD 1.6 (Y6)].)
7. Remove the upper panel. (See UPPER PANEL REMOVAL/INSTALLATION.)
8. Remove the shift lever knob.
am3uuw00003311
|
9. Remove the shift panel (See SHIFT PANEL REMOVAL/INSTALLATION.)
10. Remove the side wall. (See SIDE PANEL REMOVAL/INSTALLATION.)
11. Detach the clip as shown in the figure.
am3uuw00003313
|
12. Disconnect the drain hose connected to A/C unit. (See A/C UNIT REMOVAL/INSTALLATION.)
am3uuw00004384
|
13. Remove the cap and fastener securing the insulator (front) and set the insulator (front) aside.
am3uuw00003312
|
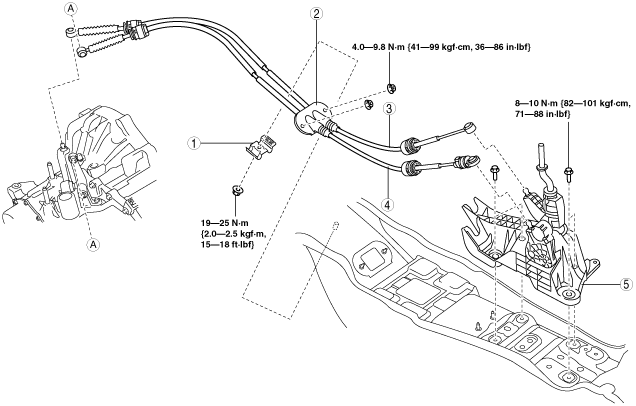
14. Remove in the order indicated in the table.
15. Install in the reverse order of removal.
16. After installation, verify that the shift lever can be shifted smoothly into each position.
am3zzw00005939
|
|
1
|
Clip
|
|
2
|
Grommet
|
|
3
|
Main shift cable
|
|
4
|
Main select cable
|
|
5
|
Shift lever component
|
Main shift cable and main select cable removal note
1. Remove the both shift cable end and select cable end using a fastener remover.
am5uuw00003737
|
G66M-R
1. Disconnect the negative battery cable. (See BATTERY REMOVAL/INSTALLATION [LF, L5].)(See BATTERY REMOVAL/INSTALLATION [MZR 2.0 DISI i-stop].)
2. Remove the battery component (ex: battery, battery tray and PCM component). (See BATTERY REMOVAL/INSTALLATION [LF, L5].)(See BATTERY REMOVAL/INSTALLATION [MZR 2.0 DISI i-stop].)
3. Remove the air cleaner component. (See INTAKE-AIR SYSTEM REMOVAL/INSTALLATION [LF, L5].)(See INTAKE-AIR SYSTEM REMOVAL/INSTALLATION [MZR 2.0 DISI i-stop].)
4. Remove the aerodynamic under cover NO.2. (See AERODYNAMIC UNDER COVER NO.2 REMOVAL/INSTALLATION.)
5. Remove the tunnel member (rear). (See EXHAUST SYSTEM REMOVAL/INSTALLATION [LF, L5].)(See EXHAUST SYSTEM REMOVAL/INSTALLATION [MZR 2.0 DISI i-stop].)
6. Remove the upper panel. (See UPPER PANEL REMOVAL/INSTALLATION.)
7. Remove the shift lever knob.
am3uuw00003311
|
8. Remove the shift panel (See SHIFT PANEL REMOVAL/INSTALLATION.)
9. Remove the side wall. (See SIDE PANEL REMOVAL/INSTALLATION.)
10. Detach the clip as shown in the figure.
am3uuw00003313
|
11. Disconnect the drain hose connected to A/C unit. (See A/C UNIT REMOVAL/INSTALLATION.)
am3uuw00004384
|
12. Remove the cap and fastener securing the insulator (front) and set the insulator (front) aside.
am3uuw00003312
|
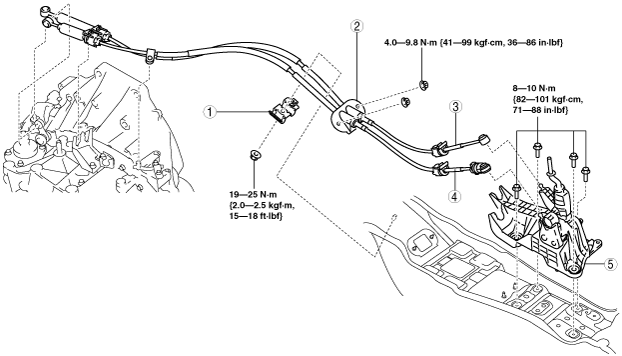
13. Remove in the order indicated in the table.
14. Install in the reverse order of removal.
15. After installation, verify that the shift lever can be shifted smoothly into each position.
am3uuw00002141
|
|
1
|
Clip
|
|
2
|
Grommet
|
|
3
|
Main shift cable
|
|
4
|
Main select cable
|
|
5
|
Shift lever component
|
Main shift cable and main select cable removal note
1. Remove the both shift cable end and select cable end using a fastener remover.
am5uuw00003737
|
A26M-R
1. Disconnect the negative battery cable.
2. Remove the battery and battery tray. (See BATTERY REMOVAL/INSTALLATION [MZR-CD 2.2].)
3. Remove the engine cover. (See ENGINE COVER REMOVAL/INSTALLATION [MZR-CD 2.2].)
4. Remove the air cleaner and air inlet hose. (See INTAKE-AIR SYSTEM REMOVAL/INSTALLATION [MZR-CD 2.2].)
5. Remove the aerodynamic under cover NO.2. (See AERODYNAMIC UNDER COVER NO.2 REMOVAL/INSTALLATION.)
6. Remove the tunnel member (rear). (See EXHAUST SYSTEM REMOVAL/INSTALLATION [MZR-CD 2.2].)
7. Remove the upper panel. (See UPPER PANEL REMOVAL/INSTALLATION.)
8. Remove the shift lever knob.
am3uuw00003311
|
9. Remove the shift panel (See SHIFT PANEL REMOVAL/INSTALLATION.)
10. Remove the side wall. (See SIDE PANEL REMOVAL/INSTALLATION.)
11. Detach the clip as shown in the figure.
am3uuw00003313
|
12. Disconnect the drain hose connected to A/C unit. (See A/C UNIT REMOVAL/INSTALLATION.)
am3uuw00004384
|
13. Remove the cap and fastener securing the insulator (front) and set the insulator (front) aside.
am3uuw00003312
|
14. Remove in the order indicated in the table.
15. Install in the reverse order of removal.
16. After installation, verify that the shift lever can be shifted smoothly into each position.
am3zzw00005940
|
|
1
|
Clip
|
|
2
|
Grommet
|
|
3
|
Main shift cable
|
|
4
|
Main select cable
|
|
5
|
Shift lever component
|
Main shift cable and main select cable removal note
1. Remove the both shift cable end and select cable end using a fastener remover.
am5uuw00003737
|
B76M-R
1. Disconnect the negative battery cable.
2. Remove the battery and battery tray. (ex: battery, battery tray) (See BATTERY REMOVAL/INSTALLATION [MZ-CD 1.6 (Y6)].)
3. Remove the air cleaner component. (ex: air cleaner, air hose) (See INTAKE-AIR SYSTEM REMOVAL/INSTALLATION [MZ-CD 1.6 (Y6)].)
4. Remove the aerodynamic under cover NO.2. (See AERODYNAMIC UNDER COVER NO.2 REMOVAL/INSTALLATION.)
5. Remove the tunnel member (rear).(See EXHAUST SYSTEM REMOVAL/INSTALLATION [MZ-CD 1.6 (Y6)].)
6. Remove the upper panel. (See UPPER PANEL REMOVAL/INSTALLATION.)
7. Remove the shift lever knob.
am3uuw00003311
|
8. Remove the shift panel (See SHIFT PANEL REMOVAL/INSTALLATION.)
9. Remove the side wall. (See SIDE PANEL REMOVAL/INSTALLATION.)
10. Detach the clip as shown in the figure.
am3uuw00003313
|
11. Disconnect the drain hose connected to A/C unit. (See A/C UNIT REMOVAL/INSTALLATION.)
am3uuw00004384
|
12. Remove the cap and fastener securing the insulator (front) and set the insulator (front) aside.
am3uuw00003312
|
13. Remove in the order indicated in the table.
14. Install in the reverse order of removal.
15. After installation, verify that the shift lever can be shifted smoothly into each position.
am3zzw00009832
|
|
1
|
Clip
|
|
2
|
Grommet
|
|
3
|
Main select cable
|
|
4
|
Main shift cable
|
|
5
|
Shift lever component
|
Main shift cable and main select cable removal note
1. Remove the both shift cable end and select cable end using a fastener remover.
am5uuw00003737
|