AUXILIARY JACK INSPECTION
id092000812600
1. Disconnect the negative battery cable.
2. Remove the following parts:
- (1) Upper panel (See UPPER PANEL REMOVAL/INSTALLATION.)
- (2) Shift knob (MTX) (See MANUAL TRANSAXLE SHIFT MECHANISM REMOVAL/INSTALLATION.)
- (3) Selector lever knob (ATX/CVT) (See AUTOMATIC TRANSAXLE SHIFT MECHANISM REMOVAL/INSTALLATION.) (See CVT (CONTINUOUSLY VARIABLE TRANSAXLE) SHIFT MECHANISM REMOVAL/INSTALLATION.)
- (4) Shift panel (See SHIFT PANEL REMOVAL/INSTALLATION.)
- (5) Side wall (See SIDE WALL REMOVAL/INSTALLATION.)
- (6) Center panel (See CENTER PANEL REMOVAL/INSTALLATION.)
- (7) Audio unit (See AUDIO UNIT REMOVAL/INSTALLATION.)
- (8) Console (See CONSOLE REMOVAL/INSTALLATION.)
- (9) Auxiliary jack (See AUXILIARY JACK REMOVAL/INSTALLATION.)
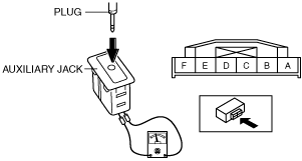
3. Connect a commercially-available nonresistant plug to the auxiliary jack.
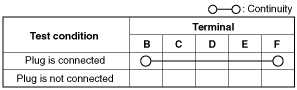
4. Verify that the continuity between the auxiliary jack terminals is as indicated in the table.
-
• If not as indicated in the table, replace the auxiliary jack.