 |
am6xuw00000016
PUSH BUTTON START INSPECTION [WITH ADVANCED KEYLESS ENTRY AND PUSH BUTTON START SYSTEM]
id0921008023z5
1. Disconnect the negative battery cable.
2. Remove the following parts:
3. Set the bonnet release lever out of the way. (See BONNET LATCH AND RELEASE LEVER REMOVAL/INSTALLATION.)
4. Remove the lower panel. (Driver-side) (See LOWER PANEL REMOVAL/INSTALLATION.)
5. Remove the push button start. (See PUSH BUTTON START REMOVAL/INSTALLATION [WITH ADVANCED KEYLESS ENTRY AND PUSH BUTTON START SYSTEM].)
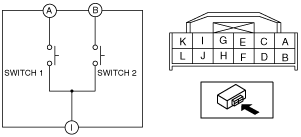
6. Verify that the continuity is as indicated in the table.
am6xuw00000016
|
am6xuw00000023
|
7. Apply battery positive voltage and connect the ground to the push button start terminals and verify that the LED illuminates.
|
Terminal |
Illumination positions |
|
|---|---|---|
|
B+ |
Ground |
|
|
C
|
E
|
ACC indicator light
|
|
C
|
G
|
ON indicator light
|
|
C
|
H
|
Indicator (Green)
|
|
C
|
F
|
Indicator (Red)
|
|
D
|
J
|
START/STOP/ENGINE
|
am6xuw00000017
|

