 |
am3zzw00001416
OIL PUMP REMOVAL/INSTALLATION[MZ-CD 1.6 (Y6)]
id0111d2800600
1. Remove the battery cover. (See BATTERY REMOVAL/INSTALLATION[MZ-CD 1.6 (Y6)].)
2. Disconnect the negative battery cable.
3. Remove the under cover.
4. Drain the engine oil. (See ENGINE OIL REPLACEMENT[MZ-CD 1.6 (Y6)].)
5. Remove the engine cover.
6. Remove the drive belt. (See DRIVE BELT REPLACEMENT[MZ-CD 1.6 (Y6)].)
7. Remove the timing belt. (See TIMING BELT REMOVAL/INSTALLATION[MZ-CD 1.6 (Y6)].)
8. Install the No.3 engine mount bracket and No. 3 engine mount rubber. (See ENGINE REMOVAL/INSTALLATION[MZ-CD 1.6 (Y6)].)
9. Remove the oil pan. (See OIL PAN REMOVAL/INSTALLATION[MZ-CD 1.6 (Y6)].)
10. Remove the CKP sensor. (See CRANKSHAFT POSITION (CKP) SENSOR REMOVAL/INSTALLATION[MZ-CD 1.6 (Y6)].)
11. Remove the front oil seal. (See FRONT OIL SEAL REPLACEMENT[MZ-CD 1.6 (Y6)].)
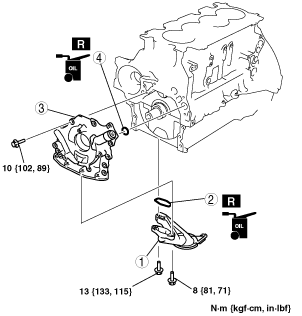
12. Remove in the order indicated in the table.
am3zzw00001416
|
|
1
|
Oil strainer
|
|
2
|
O-ring
|
|
3
|
Oil pump
(See Oil Pump Installation Note.)
|
|
4
|
Gasket
|
13. Install in the reverse order of removal.
14. Refill the engine with the specified type and amount of the engine oil. (See ENGINE OIL REPLACEMENT[MZ-CD 1.6 (Y6)].)
15. Start the engine and inspect for oil leakage.
16. Inspect the oil level. (See ENGINE OIL LEVEL INSPECTION[MZ-CD 1.6 (Y6)].)
Oil Pump Installation Note
am3zzw00001417
|
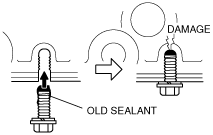
1. Completely clean and remove any oil, dirt, sealant or other foreign material that may be adhering to the housing and oil pump.
2. When revising oil pump installation bolts, clean any old sealant from bolts.
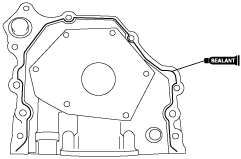
3. Apply silicone sealant to the areas shown in the figure.
am3zzw00001418
|
4. Hand-tighten the oil pump installation bolts.
5. Tighten the oil pump installation bolts in the order shown in the figure.
am3zzw00001419
|