 |
b3e0140w000
PCM REMOVAL/INSTALLATION[LF, L3]
id0140a9802400
Except for U.K. Specs.
1. When replacing the PCM, perform the following:
2. Remove the battery cover, battery duct, battery, and battery tray. (See BATTERY REMOVAL/INSTALLATION[LF, L3].)
3. Remove the PCM from the battery tray.
b3e0140w000
|
4. When replacing the PCM on the vehicles, perform the following:
5. Install in the reverse order of removal.
U.K. Specs.
1. When replacing the PCM, perform the following:
2. Remove the battery cover, battery duct, battery, and battery tray. (See BATTERY REMOVAL/INSTALLATION[LF, L3].)
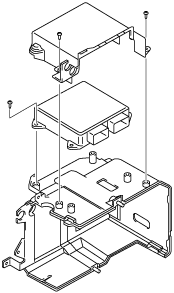
3. Remove the PCM cover.
b3e01401001
|
4. Loosen the screws, then remove the PCM and PCM brackets from the battery tray.
5. Remove the set bolts. (See Set Bolt Removal Note.) (See Set Bolt Installation Note.)
6. When replacing the PCM on the vehicle, perform the following:
7. Install in the reverse order of removal.
Set Bolt Removal Note
Set bolt type A
1. Drill the set bolt using a drill bit with a diameter larger than the shank until the head is removed.
2. Clean all foreign material from the PCM connectors.
Set bolt type B
1. Remove the set bolt using pliers.
Set Bolt Installation Note
1. Install a new set bolt and tighten it until the neck of the bolt breaks off.
