TRUNK SIDE TRIM REMOVAL/INSTALLATION
id091700803100
4SD
1. Remove the following parts:
- (1) Rear seat (See REAR SEAT REMOVAL/INSTALLATION.)
-
- (2) Rear scuff plate (See REAR SCUFF PLATE REMOVAL/INSTALLATION.)
-
- (3) Tire house trim (See TIRE HOUSE TRIM REMOVAL/INSTALLATION.)
-
- (4) Trunk end trim (See TRUNK END TRIM REMOVAL/INSTALLATION.)
-
- (5) Service hole cover (LH)
-
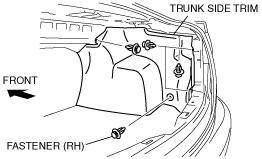
2. Remove the fasteners, then remove the trunk side trim.
3. Install in the reverse order of removal.
5HB
1. Remove the following parts:
- (1) Rear seat (See REAR SEAT REMOVAL/INSTALLATION.)
-
- (2) Rear scuff plate (See REAR SCUFF PLATE REMOVAL/INSTALLATION.)
-
- (3) Tire house trim (See TIRE HOUSE TRIM REMOVAL/INSTALLATION.)
-
- (4) Trunk end trim (See TRUNK END TRIM REMOVAL/INSTALLATION.)
-
- (5) Trunk side upper trim (See TRUNK SIDE UPPER TRIM REMOVAL/INSTALLATION.)
-
- (6) Cargo compartment light (See CARGO COMPARTMENT LIGHT REMOVAL/INSTALLATION.)
-
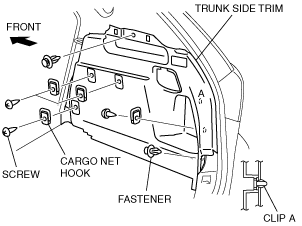
2. Remove the screws, then remove the trunk board.
3. Remove the screws, then remove the cargo net hooks.
4. Remove the fasteners.
5. Detach the clip A and remove the trunk side trim.
6. Install in the reverse order of removal.