DASHBOARD GARNISH REMOVAL/INSTALLATION
id091700804700
Driver’s Side
1. Disconnect the negative battery cable.
2. Remove the following parts:
- (1) A-pillar trim (See A-PILLAR TRIM REMOVAL/INSTALLATION.)
-
- (2) Front scuff plate (See FRONT SCUFF PLATE REMOVAL/INSTALLATION.)
-
- (3) Front side trim (See FRONT SIDE TRIM REMOVAL/INSTALLATION.)
-
- (4) Lower panel (See LOWER PANEL REMOVAL/INSTALLATION.)
-
- (5) Decoration panel (See DECORATION PANEL REMOVAL/INSTALLATION.)
-
- (6) Dashboard center panel (See DASHBOARD CENTER PANEL REMOVAL/INSTALLATION.)
-
- (7) Meter hood (See METER HOOD REMOVAL/INSTALLATION.)
-
- (8) Instrument cluster (See INSTRUMENT CLUSTER REMOVAL/INSTALLATION.)
-
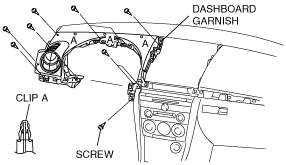
3. Remove the screws.
4. Pull the dashboard garnish outward, and detach clips A.
5. Remove the dashboard garnish.
6. Install in the reverse order of removal.
Passenger’s Side
-
Warning
-
• Handling the air bag module improperly can accidentally deploy the air bag module, which may seriously injure you. Read the service warnings and cautions before handling the air bag module. (See
SERVICE WARNINGS.) (See
SERVICE CAUTIONS.)
1. Disconnect the negative battery cable and wait for 1 min or more.
2. Remove the following parts:
- (1) A-pillar trim (See A-PILLAR TRIM REMOVAL/INSTALLATION.)
-
- (2) Front scuff plate (See FRONT SCUFF PLATE REMOVAL/INSTALLATION.)
-
- (3) Front side trim (See FRONT SIDE TRIM REMOVAL/INSTALLATION.)
-
- (4) Decoration panel (See DECORATION PANEL REMOVAL/INSTALLATION.)
-
- (5) Glove compartment (See GLOVE COMPARTMENT REMOVAL/INSTALLATION.)
-
- (6) Dashboard center panel (See DASHBOARD CENTER PANEL REMOVAL/INSTALLATION.)
-
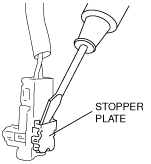
3. Using a flathead screwdriver, pry out the connector stopper plate.
4. Disconnect the passenger-side air bag module connector.
5. Remove the bolts and screws.
6. Pull the dashboard garnish outward, and detach clips A.
7. Remove the dashboard garnish.
8. Install in the reverse order of removal.