POSITIVE CRANKCASE VENTILATION (PCV) VALVE INSPECTION [SKYACTIV-G 2.0]


id0116z8800400


Airflow Inspection

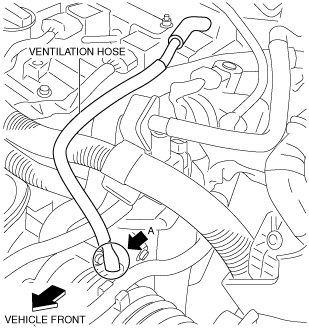
1.  Disconnect the section (A) of ventilation hose shown in the figure.

am3zzw00012522

2.  Start the engine and verify that vacuum is applied to the end of the disconnected ventilation hose while the engine is idling.

•  If vacuum does not occur in the ventilation hose, perform the procedure from Step 3.
Note
•  If the PCV valve is normally operating, vacuum is applied to the ventilation hose, however, if there is a malfunction in the PCV valve, positive pressure is applied to the ventilation hose because the blow-by gas is reduced from the ventilation hose to the air hose.
•  Verify the ventilation hose vacuum as follows:
―  When the tip of your figure is touched the end of the ventilation hose, the tip of your figure is suctioned by the hose.
―  When a thin scrap of paper is contacted the end of the ventilation hose. the paper is suctioned by the hose.

3.  Remove the battery cover. (See BATTERY REMOVAL/INSTALLATION [SKYACTIV-G 2.0].)

4.  Disconnect the negative battery cable. (See BATTERY REMOVAL/INSTALLATION [SKYACTIV-G 2.0].)

5.  Remove the intake manifold. (See INTAKE-AIR SYSTEM REMOVAL/INSTALLATION [SKYACTIV-G 2.0].)

6.  Remove the PCV valve and the oil separator as a single unit. (See POSITIVE CRANKCASE VENTILATION (PCV) VALVE REMOVAL/INSTALLATION [SKYACTIV-G 2.0].)

7.  Verify that there is no airflow when pressure is applied to port B.

am3uuw00007298

•  If there is airflow, replace the PCV valve and the oil separator as a single unit. (See POSITIVE CRANKCASE VENTILATION (PCV) VALVE REMOVAL/INSTALLATION [SKYACTIV-G 2.0].)

8.  Verify that there is airflow when vacuum is applied to port B.

•  If there is no airflow, replace the PCV valve and the oil separator as a single unit. (See POSITIVE CRANKCASE VENTILATION (PCV) VALVE REMOVAL/INSTALLATION [SKYACTIV-G 2.0].)