 |
am3zzw00012619
BATTERY REMOVAL/INSTALLATION [SKYACTIV-G 2.0]
id0117h5800500
Operation After Replacing Battery
|
Step |
Action |
|---|---|
|
1
|
Switch the ignition ON.
|
|
2
|
Shift the selector lever to the N position.
|
|
3
|
Perform the following work with the brake pedal depressed.
1. Depress the accelerator pedal for 5 s or more.
2. Verify that the charging system warning light flashes.
3. Depress and release the accelerator pedal 3 times.
4. Verify that the charging system warning light flashes.
|
|
4
|
Switch the ignition off and disconnect the negative battery cable.
|
|
5
|
Verifying battery condition initialization learning (i-stop learning). (See BATTERY CONDITION INITIALIZATION LEARNING (i-stop LEARNING) [SKYACTIV-G 2.0].)
|
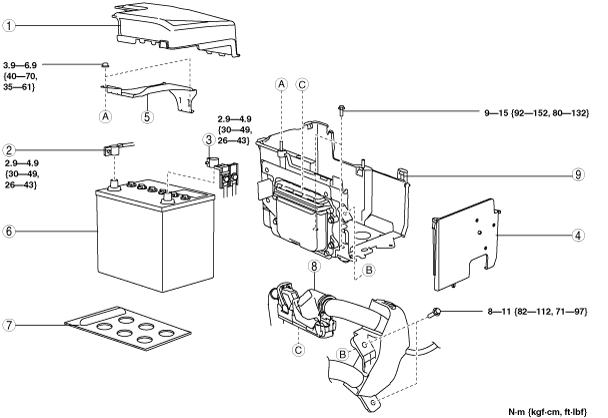
BATTERY REMOVAL/INSTALLATION [SKYACTIV-G 2.0]
1. Remove in the order indicated in the table.
2. Install in the reverse order of removal.
am3zzw00012619
|
|
1
|
Battery cover
(See Battery Cover Removal Note.)
|
|
2
|
Negative battery cable
|
|
3
|
Positive battery cable
|
|
4
|
Battery box
|
|
5
|
Battery clamp
|
|
6
|
Battery
(See Battery Installation Note.)
|
|
7
|
Battery stopper
|
|
8
|
PCM connectors
|
|
9
|
Battery tray and PCM component
|
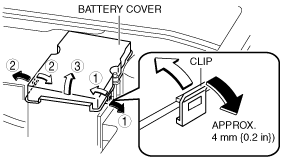
Battery Cover Removal Note
am3uuw00006602
|
1. Remove the battery cover using the following procedure.
am3uuw00006603
|
Battery Tray And PCM Component Removal Note
1. Remove the air cleaner component. (See INTAKE-AIR SYSTEM REMOVAL/INSTALLATION [SKYACTIV-G 2.0])
2. Remove the battery tray and PCM component.
Battery Stopper Installation Note
1. Assemble the battery stopper so that the arrow on it is pointed toward the front of the vehicle.
am3zzw00012620
|
Battery Installation Note
Battery Clamp Installation Note
1. Assemble the battery clamp so that the arrow on it is pointed toward the front of the vehicle.
am3uuw00006604
|
Battery Box Installation Note
1. Assemble with battery box hooks E aligned with the battery tray holes at two points.
am3zzw00012621
|
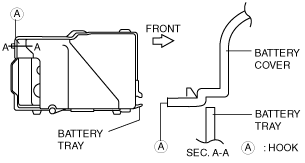
Battery Cover Installation Note
1. Install with battery cover hook A aligned with the battery tray hole.
am3zzw00012622
|
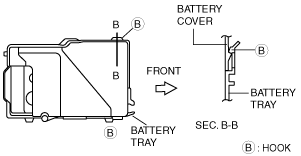
2. Set the battery cover to battery tray hooks B at two points.
am3zzw00012623
|