 |
am3zzw00012573
PCM REMOVAL/INSTALLATION [SKYACTIV-G 2.0]
id0140f4802400
1. Remove the battery cover. (See BATTERY REMOVAL/INSTALLATION [SKYACTIV-G 2.0].)
2. Disconnect the negative battery cable. (See BATTERY REMOVAL/INSTALLATION [SKYACTIV-G 2.0].)
3. Disconnect the PCM connector. (See PCM Connector Connection Note.)
4. Remove the battery. (See BATTERY REMOVAL/INSTALLATION [SKYACTIV-G 2.0].)
5. Remove the battery tray and PCM component. (See BATTERY REMOVAL/INSTALLATION [SKYACTIV-G 2.0].)
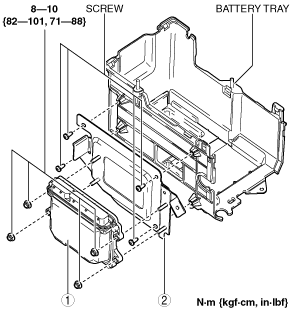
6. Remove in the order indicated in the table.
am3zzw00012573
|
|
1
|
PCM
|
|
2
|
PCM bracket
|
7. Install in the reverse order of removal.
8. When replacing the PCM on the vehicles, perform the following:
PCM Connector Connection Note
am3zzw00012574
|
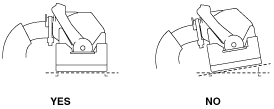
1. Set the PCM connector to the position shown in the figure.
am3uuw00007476
|
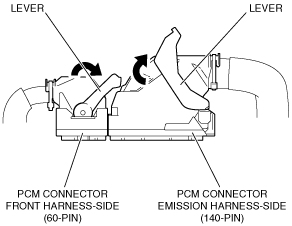
2. Align the PCM connector straight against the connection surface.
am3uuw00007477
|
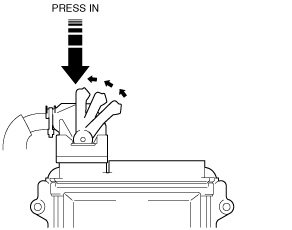
3. Insert the PCM connector straight and press it in until the lever moves up naturally. (Front harness-side connector)
am3uuw00007478
|
4. Press the PCM connector lever until a click sound is heard.
am3uuw00007479
|
Operation After Replacing PCM
|
Step |
Action |
|---|---|
|
1
|
Replace the PCM.
|
|
2
|
Perform the PCM configuration using the M-MDS.
|
|
3
|
Switch the ignition off and disconnect the negative battery cable.
|
|
4
|
Verifying battery condition initialization learning (i-stop learning).
|