 |
am3uuw00006433
FIRE EXTINGUISHER INSTALLATION
id091700999800
1. Switch the ignition to off.
2. Disconnect the negative battery cable and wait 1 min or more. (See BATTERY REMOVAL/INSTALLATION [MZR 2.0, MZR 2.5].) (See BATTERY REMOVAL/INSTALLATION [MZR 2.3 DISI Turbo].) (See BATTERY REMOVAL/INSTALLATION [MZR 2.0 DISI i-stop].) (See BATTERY REMOVAL/INSTALLATION [MZ-CD 1.6].) (See BATTERY REMOVAL/INSTALLATION [MZR-CD 2.2].) (See BATTERY REMOVAL/INSTALLATION [SKYACTIV-G 2.0].) (See BATTERY REMOVAL/INSTALLATION [MZR 1.5, MZR 1.6].)
3. Remove the following parts:
4. Partially peel back the floor covering. (See FLOOR COVERING REMOVAL/INSTALLATION.)
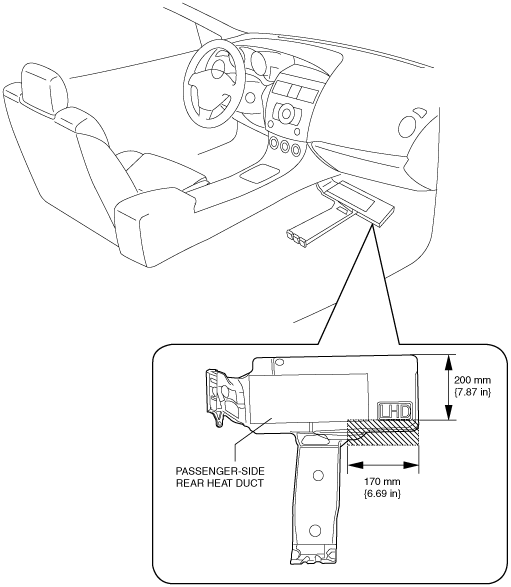
5. Cut the passenger-side rear heater duct cover shown in the figure.
am3uuw00006433
|
6. Drill a 7 mm {0.3 in} diameter hole at the point shown in the figure.
am3zzw00009402
|
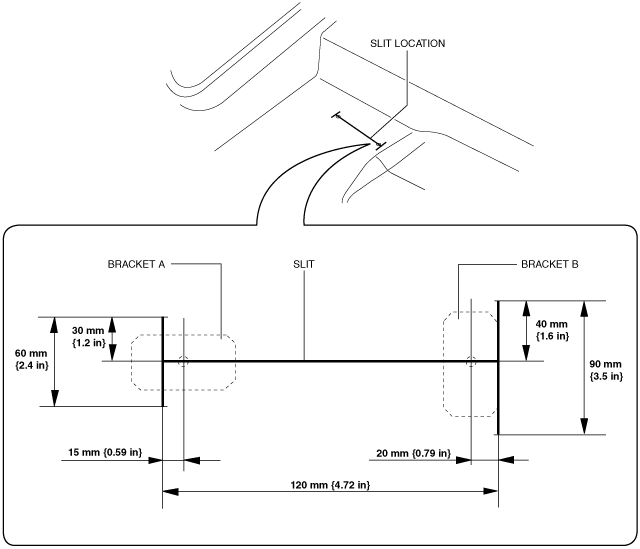
7. Return the floor covering to its original position and open the slit at the position shown in the figure.
am3zzw00009403
|
8. Install in the order shown in the figure.
am3uuw00006435
|
|
1
|
Bracket A
|
|
2
|
Bracket B
|
|
3
|
Spacer C
|
|
4
|
Spacer D
|
|
5
|
Bracket assembly
|
|
6
|
Spring washer
|
|
7
|
Bolt E
|
|
8
|
Plate nut F
|
|
9
|
Plate nut G
|
|
10
|
Fire extinguisher
|
9. Apply silicone sealant to the shaded area on the under body as shown in the figure.
am3zzw00009404
|
10. Install the following parts: