CLIMATE CONTROL UNIT REMOVAL [MANUAL AIR CONDITIONER]
id0740008018a2
1. Disconnect the negative battery cable.
2. Remove the following parts:
-
(1) Ashtray panel (See CONSOLE REMOVAL/INSTALLATION.)
-
(2) Detach the bonnet release lever from the lower panel. (SeeBONNET LATCH AND RELEASE LEVER REMOVAL/INSTALLATION.)
-
(3) Front scuff plate (SeeFRONT SCUFF PLATE REMOVAL/INSTALLATION.)
-
(4) Front side trim (SeeFRONT SIDE TRIM REMOVAL/INSTALLATION.)
-
(5) Lower panel (See LOWER PANEL REMOVAL/INSTALLATION.)
-
(6) Front scuff plate (RH) (SeeFRONT SCUFF PLATE REMOVAL/INSTALLATION.)
-
(7) Front side trim (RH) (SeeFRONT SIDE TRIM REMOVAL/INSTALLATION.)
-
(8) Decoration panel (SeeDECORATION PANEL REMOVAL/INSTALLATION.)
-
(9) Glove compartment (See GLOVE COMPARTMENT REMOVAL/INSTALLATION.)
-
(10) PJB and PJB bracket (See PASSENGER JUNCTION BOX (PJB) REMOVAL/INSTALLATION.)
3. Detach the PJB wiring harness clamp from the dashboard.
4. Remove the center panel module. (See CENTER PANEL MODULE REMOVAL/INSTALLATION.)
5. Remove the air intake wire, air mix wire and airflow mode wire from the A/C unit.
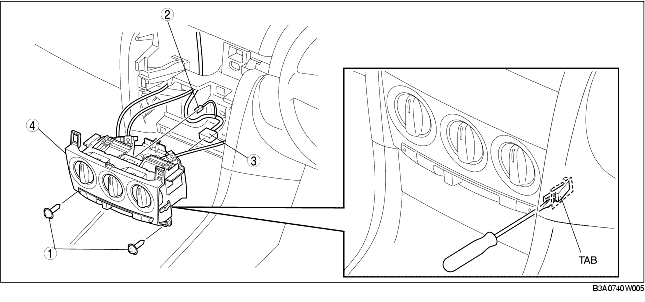
6. Release the left and right tabs and remove in the order indicated in the table.
.
|
1
|
Screw
|
|
2
|
Fan switch connector
|
|
3
|
Climate control unit connector
|
|
4
|
Climate control unit
|