1. Disconnect the negative battery cable.
2. Remove the trunk end trim. (See TRUNK END TRIM REMOVAL/INSTALLATION.)
3. Remove the fasteners and slightly bend back the trunk side trim. (RH)
4. Remove the fasteners and slightly bend back the trunk side trim. (LH) (4SD)
5. Remove the service hole cover. (LH) (5HB)
6. Remove the rear combination light. (See REAR COMBINATION LIGHT REMOVAL/INSTALLATION.)
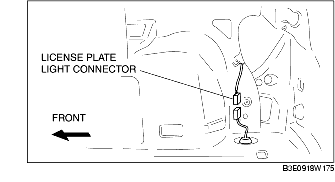
7. Disconnect the license plate light connector.
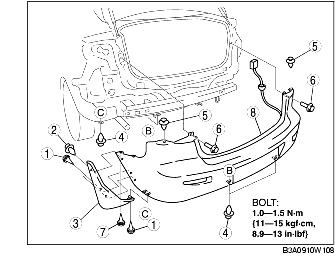
8. Remove in the order indicated in the table.
|
1
|
Screw A
|
|
2
|
Fastener A
|
|
3
|
Rear flap
|
|
4
|
Fastener B
|
|
5
|
Fastener C
|
|
6
|
Screw B
|
|
7
|
Screw C
|
|
8
|
Rear bumper
(See Rear Bumper Removal Note.)
|
9. Install in the reverse order of removal.
1. Pull the rear bumper ends (wheel arch) outward to detach from the bumper slider.
2. Remove the rear bumper.
1. Spread the rear bumper ends (wheel arches) apart.
2. Attach the rear bumper to the body.
3. Press the rear bumper connecting area into the body to engage with the bumper slider.