SUNROOF MOTOR REMOVAL/INSTALLATION
id091500805000
1. Disconnect the negative battery cable.
2. Remove the following parts:
- (1) Sunroof seaming welt
- (2) A-pillar trims (See A-PILLAR TRIM REMOVAL/INSTALLATION.)
- (3) Upper anchor of the front seat belt (See FRONT SEAT BELT REMOVAL/INSTALLATION.)
- (4) Front scuff plate (See FRONT SCUFF PLATE REMOVAL/INSTALLATION.)
- (5) Rear scuff plate (See REAR SCUFF PLATE REMOVAL/INSTALLATION.)
- (6) B-pillar lower trims (See B-PILLAR LOWER TRIM REMOVAL/INSTALLATION.)
- (7) B-pillar upper trims (See B-PILLAR UPPER TRIM REMOVAL/INSTALLATION.)
- (8) Lower anchor of the front seat belt installation bolts (See FRONT SEAT BELT REMOVAL/INSTALLATION.)
- (9) Rear side seat (See REAR SEAT BACK REMOVAL/INSTALLATION [4SD].)
- (10) Tire house trim (See TIRE HOUSE TRIM REMOVAL/INSTALLATION.)
- (11) C-pillar trims (See C-PILLAR TRIM REMOVAL/INSTALLATION.)
- (12) Lower anchor of the rear seat belt installation bolts (See REAR SEAT BELT REMOVAL/INSTALLATION [4SD].)(See REAR SEAT BELT REMOVAL/INSTALLATION [5HB, WGN].)
- (13) Rain sensor cover (Vehicles with auto light / wiper system) (See RAIN SENSOR REMOVAL/INSTALLATION.)
3. Disconnect the auto-dimming mirror connector. (Vehicles with auto-dimming mirror)
4. Remove the sunvisors. (See SUNVISOR REMOVAL/INSTALLATION.)
5. Remove the assist handle. (See ASSIST HANDLE REMOVAL/INSTALLATION.)
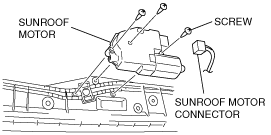
6. Disconnect the sunroof motor connector.
7. Remove the screws, and then remove the sunroof motor.
8. Install in the reverse order of removal.
-
Note
-
• If the glass panel or the sunroof motor is moved with the sunroof motor removed, initial position setting of the sunroof motor will be required. Perform initial position setting referring to the Sunroof Motor Assembly Note. (See
SUNROOF UNIT DISASSEMBLY/ASSEMBLY.)