|
am6zzw00006150
DISCHARGE HEADLIGHT CONTROL MODULE REMOVAL/INSTALLATION
id091800805300
With AFS (Adaptive front lighting system)
1. Disconnect the negative battery cable.
2. Remove the front bumper. (See FRONT BUMPER REMOVAL/INSTALLATION.)
3. Remove the front combination light. (See FRONT COMBINATION LIGHT REMOVAL/INSTALLATION.)
4. Remove the screw A.
am6zzw00006150
|
5. Disconnect the connector A.
6. Remove the screw B.
am6zzw00006151
|
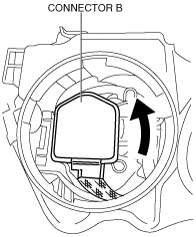
7. Disconnect the connector B.
8. Remove the discharge headlight control module.
9. Install in the reverse order of removal.
Without AFS (Adaptive front lighting system)
1. Disconnect the negative battery cable.
2. Remove the front bumper. (See FRONT BUMPER REMOVAL/INSTALLATION.)
3. Remove the front combination light. (See FRONT COMBINATION LIGHT REMOVAL/INSTALLATION.)
4. Remove the screw A shown in the figure, then remove the cover A.
am6zzw00007366
|
5. Remove the screw B shown in the figure.
am6zzw00007367
|
6. Disconnect the connector A.
am6zzw00007368
|
7. Remove the cover B.
am6zzw00007377
|
8. Disconnect the connector B.
am6zzw00007369
|
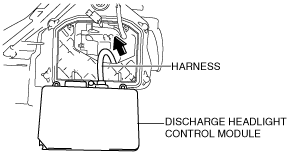
9. Pull out the wiring harness and remove the discharge headlight control module.
am6zzw00007371
|
10. Install in the reverse order of removal.