Caution
• Affix the protective tape to the position (vehicle body side) shown in the figure to prevent scratches and damage.
am6zzw00015791
|
FRONT BUMPER REMOVAL/INSTALLATION
id091000800300
am6zzw00015791
|
1. Disconnect the negative battery terminal. (See NEGATIVE BATTERY TERMINAL DISCONNECTION/CONNECTION.)
2. Remove the set plate. (See SET PLATE REMOVAL/INSTALLATION.)
3. Remove the fresh-air duct installation bolts. (See INTAKE-AIR SYSTEM REMOVAL/INSTALLATION [SKYACTIV-G 2.5T].) (See INTAKE-AIR SYSTEM REMOVAL/INSTALLATION [SKYACTIV-G 2.5 (WITH CYLINDER DEACTIVATION)].) (See INTAKE-AIR SYSTEM REMOVAL/INSTALLATION [SKYACTIV-G 2.0, SKYACTIV-G 2.5 (WITHOUT CYLINDER DEACTIVATION)].) (See INTAKE-AIR SYSTEM REMOVAL/INSTALLATION [SKYACTIV-D 2.2].)
4. Remove the fastener which can be verified at the position where the fresh-air duct was pulled back.
am6xuw00011391
|
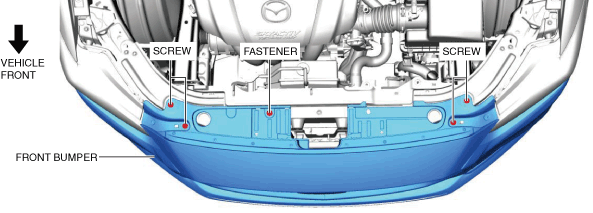
5. Remove the fasteners.
am6xuw00011392
|
6. Remove the screws.
7. Remove the fasteners.
am6xuw00011393
|
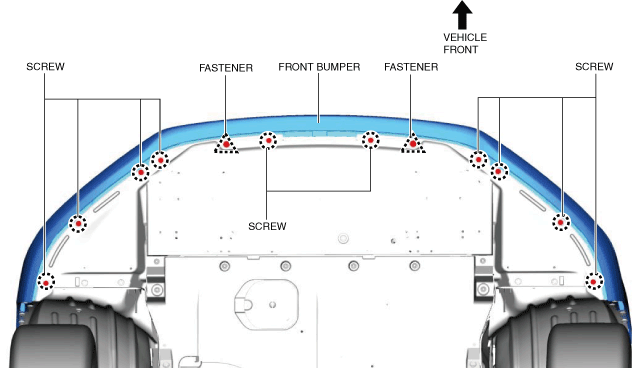
8. Remove the screws.
9. Slightly bend back front undercover No.1 and remove the fasteners shown in the figure.
am6xuw00011394
|
10. Remove the fasteners.
am6xuw00011395
|
11. Bend back the front mudguard and then remove the screw.
am6xuw00011396
|
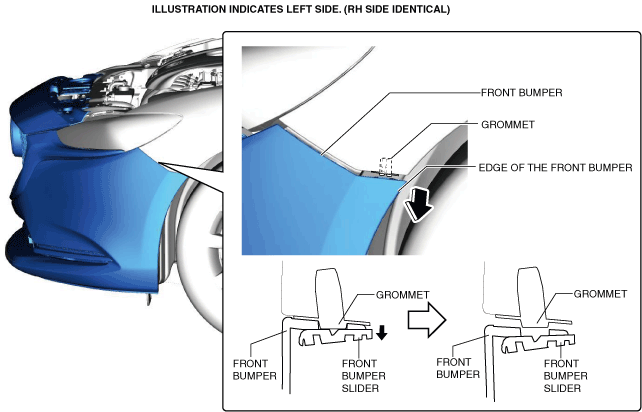
12. Grasp the front bumper end, move it in the direction of the arrow shown in the figure, and remove the front bumper from the grommet.
am6xuw00011397
|
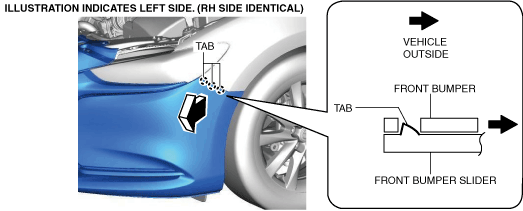
13. Pull the edge of the front bumper in the direction of the arrow shown in the figure, then remove the tabs.
am6xuw00011398
|
14. Pull the front bumper in the direction of the arrows shown in the figure and remove it while detaching the guides.
am6xuw00011399
|
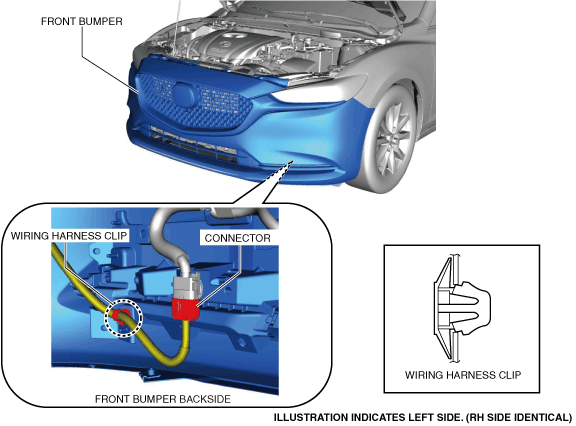
15. Disconnect the connector.
am6zzw00015792
|
16. Remove the wiring harness clip. (with parking sensor system)
17. While pressing the hook of the joint pipe in the direction of arrow (1) shown in the figure, pull the joint pipe in the direction of arrow (2) to disconnect the joint pipe from headlight cleaner motor. (with headlight cleaner system)
am6zzw00015793
|
18. Install in the reverse order of removal.
19. Perform the front camera aiming. (with 360° view monitor system) (See 360°VIEW MONITOR SYSTEM AIMING.)