|
am6zzw00011161
CAR-NAVIGATION UNIT REMOVAL/INSTALLATION
id092000801000
Without Display
1. Disconnect the negative battery cable. (See NEGATIVE BATTERY CABLE DISCONNECTION/CONNECTION [SKYACTIV-D 2.2].) (See NEGATIVE BATTERY CABLE DISCONNECTION/CONNECTION [SKYACTIV-G 2.0, SKYACTIV-G 2.5].) (See NEGATIVE BATTERY CABLE DISCONNECTION/CONNECTION [SKYACTIV-G 2.0, SKYACTIV-G 2.5 (WITHOUT i-stop)].)
2. Remove the pocket lid. (See LOWER PANEL REMOVAL/INSTALLATION.)
3. Remove the bolt shown in the figure.
am6zzw00011161
|
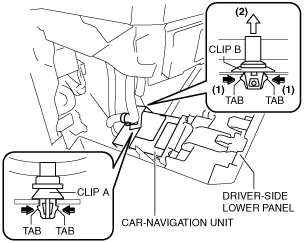
4. Pull the driver-side lower panel in the direction of the arrow in the order of (1), (2), (3) while detaching clip A, hooks B and pin C.
5. Partially peel back the driver-side lower panel.
6. While pressing the tabs of clip A in the direction of arrows (1) shown in the figure, press clip A in the direction of arrow (2) to detach it from the car-navigation unit.
am6zzw00012739
|
7. Remove the clip A.
8. While pressing the tabs of clip B in the direction of arrows (1) shown in the figure, press clip B in the direction of arrow (2) to detach it from the car-navigation unit.
9. Remove the clip B.
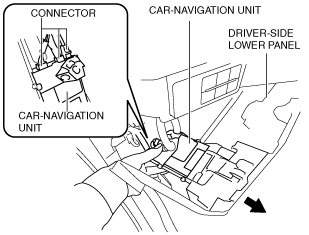
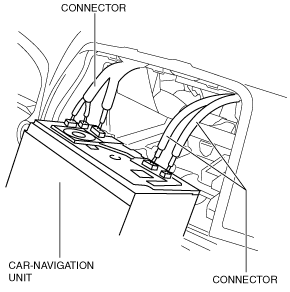
10. Disconnect the connectors.
am6zzw00012740
|
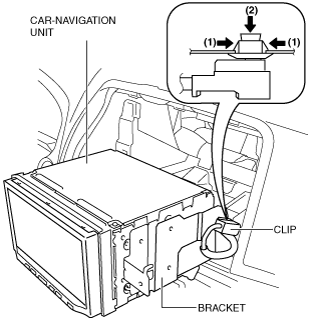
11. Press the car-navigation unit in the direction shown in the figure to detach the clip of the car-navigation unit from the driver-side lower panel.
12. Remove the car-navigation unit.
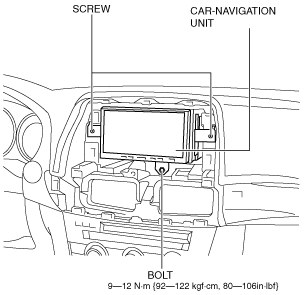
13. Remove the screws.
am6zzw00010030
|
14. Remove the car-navigation unit from bracket.
15. Install in the reverse order of removal. (See Installation Note.)
16. If required, perform updating of the SD card. (See SD CARD UPDATING PROCEDURE.)
Installation Note
With Display
1. Disconnect the negative battery cable. (See NEGATIVE BATTERY CABLE DISCONNECTION/CONNECTION [SKYACTIV-D 2.2].) (See NEGATIVE BATTERY CABLE DISCONNECTION/CONNECTION [SKYACTIV-G 2.0, SKYACTIV-G 2.5].) (See NEGATIVE BATTERY CABLE DISCONNECTION/CONNECTION [SKYACTIV-G 2.0, SKYACTIV-G 2.5 (WITHOUT i-stop)].)
2. Remove the decoration panel. (See DECORATION PANEL REMOVAL/INSTALLATION.)
3. Remove the genuine navigation system panel. (See GENUINE NAVIGATION SYSTEM PANEL REMOVAL/INSTALLATION.)
4. Remove the bolt.
am6zzw00012159
|
5. Remove the screws.
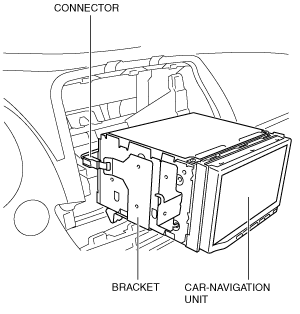
6. Disconnect the connectors from the bracket.
am6zzw00012160
|
7. While pressing the clip tabs in the direction of the arrows (1) shown in the figure, press the clip in the direction of the arrow (2) to detach the clip tabs from the upper console.
am6zzw00012161
|
8. Remove the clip from the bracket.
9. Disconnect the connectors.
am6zzw00012162
|
10. Remove the car-navigation unit.
11. Install in the reverse order of removal.