 |
am6zzw00001559
REAR CROSSMEMBER REMOVAL/INSTALLATION
id021400801000
1. Remove main silencer, middle pipe. (See EXHAUST SYSTEM REMOVAL/INSTALLATION [L8, LF, L5].)
2. Remove the rear auto leveling sensor link. (Vehicle with discharge headlight system) (See AUTO LEVELING SENSOR REMOVAL/INSTALLATION.)
3. Remove the rear stabilizer. (See REAR STABILIZER REMOVAL/INSTALLATION.)
4. Remove the rear coil spring. (See REAR COIL SPRING REMOVAL/INSTALLATION.)
5. Remove the rear lower arm. (See REAR LOWER ARM REMOVAL/INSTALLATION.)
6. Remove the rear lateral link. (See REAR LATERAL LINK REMOVAL/INSTALLATION.)
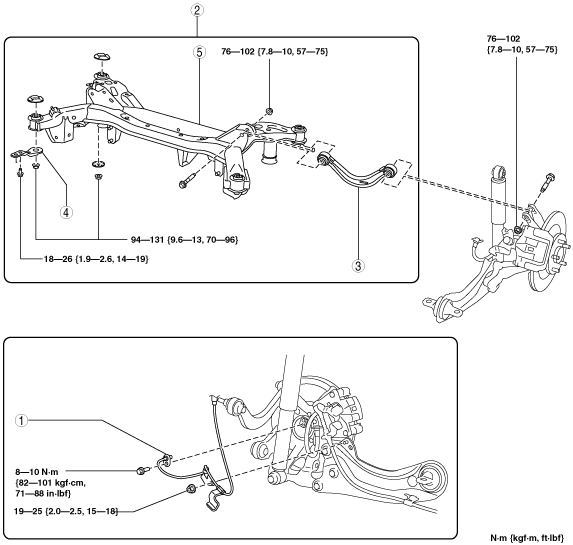
7. Remove in the order indicated in the table.
8. Install in the reverse order of removal.
9. Inspect the rear wheel alignment. (See REAR WHEEL ALIGNMENT.)
am6zzw00001559
|
|
1
|
Rear ABS wheel-speed sensor
|
|
2
|
Crossmember component
|
|
3
|
Rear upper arm
|
|
4
|
Stopper plate
|
|
5
|
Rear crossmember
|
Crossmember Component Removal Note
1. Loosen the rear upper arm inner side.
2. Remove the rear upper arm outer side.
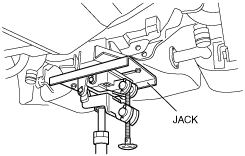
3. Support the crossmember component using a jack and remove the nuts.
am6zzw00001560
|
4. Remove the crossmember component.