 |
am6zzw00007562
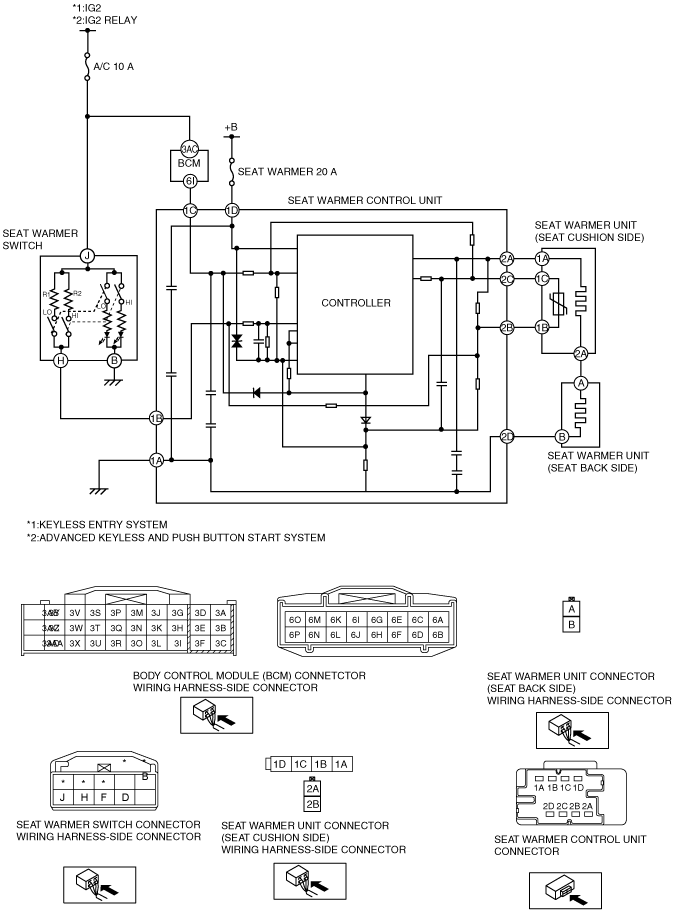
SEAT WARMER CONTROL UNIT INSPECTION
id091300976500
Forward
System Diagram
am6zzw00007562
|
Symptom Trouble Shooting Index
|
No. |
Troubleshooting item |
Description |
|---|---|---|
|
1
|
Seat warmer function is inoperative (See Inspection Procedure (No.1 Seat Warmer Function Is Inoperative).)
|
Seat warmer does not warm seat even though seat warmer switch is on
|
|
2
|
Seat warmer always operations (See Inspection Procedure (No.2 Seat Warmer Always Operations).)
|
Seat warmer warms seat even though seat warmer switch is off
|
|
3
|
Temperature of the seat warmer cannot be adjusted (See Inspection Procedure (No.3 Temperature Of Seat Warmer Cannot Be Adjusted).)
|
• Seat warmer does not adjust temperature even though seat warmer LOW/HIGH switch is switched between low and high
• Seat warmer temperature continues to rise
|
Inspection Procedure (No.1 Seat Warmer Function Is Inoperative)
|
No.1 |
Seat warmer function is inoperative |
|---|---|
|
DETECTION
|
Seat warmer does not warm seat even though seat warmer switch is on
|
|
POSSIBLE CAUSE
|
The power supply is not supplied to filament of seat warmer
• Open circuit in seat warmer control unit power supply circuit:
• SEAT WARMER 20 A fuse malfunction (Fuse to melt away or broken):
• Poor connect the connector:
• Open circuit in wiring harness between the following terminal:
Seat warmer control unit not operation
• Open circuit or short to ground in wiring harness between the following terminal:
Seat warmer unit cannot control filament on
• Seat warmer control LH malfunction
• Seat warmer control RH malfunction
Seat warmer filament does not generate heat
• Seat warmer unit (seat cushion side) LH malfunction
• Seat warmer unit (seat back side) LH malfunction
• Seat warmer unit (seat cushion side) RH malfunction
• Seat warmer unit (seat back side) RH malfunction
Seat warmer control unit cannot receive operation signal
• Seat warmer control LH malfunction
• Seat warmer control RH malfunction
• Open circuit or short to ground in wiring harness between the following terminal:
|
Diagnostic procedure
|
STEP |
INSPECTION |
ACTION |
|
|---|---|---|---|
|
1
|
DETERMINE MALFUNCTIONING SYSTEM
• Are the seat warmers on both sides not operating?
|
Yes
|
Go to the next step.
|
|
No
|
Go to step 8.
|
||
|
2
|
INSPECT THE SEAT WARMER POWER SUPPLY FUSE
• Inspect the S.WARM 15 A fuse.
• Is the fuse normal?
|
Yes
|
Go to the next step.
|
|
No
|
• If the fuse is deterioration:
• If the fuse is melt
Repair the short to ground in wiring harness between the following terminals:
|
||
|
3*
|
DETERMINE IF CAUSE OF MALFUNCTION IS CONTROLLER POWER SUPPLY WIRING HARNESS FOR SEAT WARMER OR OTHER CAUSE
• Switch the ignition to off.
• Disconnect the seat warmer control unit connector LH and RH.
• Measure the voltage at the following terminal (wiring harness-side):
• Is the voltage B+?
|
Yes
|
Go to the next step.
|
|
No
|
• Repair or replace the open circuit at the following wiring harness.
|
||
|
4*
|
VERIFY IF MALFUNCTION CAUSE IS OPEN CIRCUIT IN SEAT WARMER CONTROL UNIT POWER SUPPLY WIRING HARNESS
• Seat warmer control unit RH and LH connector are disconnected.
• Switch the ignition to off.
• Disconnect the BCM connector.
• Verify the continuity at the following terminal:
• Is there continuity?
|
Yes
|
Inspect the BCM 3AC terminal. (See BODY CONTROL MODULE (BCM) INSPECTION.)
|
|
No
|
• Repair or replace the open circuit at the following wiring harness.
|
||
|
5*
|
VERIFY IF MALFUNCTION CAUSE IS OPEN CIRCUIT IN SEAT WARMER CONTROL UNIT POWER SUPPLY WITING HARNESS
• Switch the ignition to off.
• Disconnect the seat warmer control unit connector on the side that is not operating.
• Measure the voltage at the following terminal (wiring harness-side):
• Is the voltage B+?
|
Yes
|
Go to the next step.
|
|
No
|
• Repair or replace the open circuit at the following wiring harness.
|
||
|
6*
|
VERIFY IF MALFUNCTION CAUSE IS OPEN CIRCUIT IN SEAT WARMER CONTROL UNIT CONTROL POWER SUPPLY WIRING HARNESS
• Seat warmer control unit connector on the side that is not operating is disconnected.
• Switch the ignition to off.
• Disconnect the BCM connector.
• Inspect for continuity between the following terminals (wiring harness-side):
• Is there continuity?
|
Yes
|
Go to the next step.
|
|
No
|
• Repair or replace the open circuit at the following wiring harness.
|
||
|
7*
|
VERIFY IF MALFUNCTION CAUSE IS SHORT TO GROUND IN SEAT WARMER CONTROL UNIT
• Seat warmer control unit connector on the side that is not operating is disconnected.
• Disconnect the front climate control unit connector.
• Inspect for continuity between the following terminals (wiring harness-side):
• Is there continuity?
|
Yes
|
Go to the next step.
|
|
No
|
• Inspect the open circuit following.
• Inspect the GND connector terminals for poor connection.
• Repair or replace the malfunction.
|
||
|
8
|
VERIFY IF MALFUNCTION CAUSE IS SEAT WARMER SWITCH OR SEAT WARMER UNIT
• Seat warmer control unit connector on the side that is not operating is disconnected.
• Engine start.
• Operate the seat warmer switch on the side that is not operating while measure the voltage at the following terminal (wiring harness-side):
• Is the voltage normal?
|
Yes
|
Go to step 13.
|
|
No
|
Go to the next step.
|
||
|
9*
|
VERIFY IF MALFUNCTION CAUSE IS SEAT WARMER SWITCH
• Inspect the seat warmer switch. (See SEAT WARMER SWITCH INSPECTION.)
• Is the seat warmer switch normal?
|
Yes
|
Go to the next step.
|
|
No
|
Replace the seat warmer switch. (See SEAT WARMER SWITCH REMOVAL/INSTALLATION.)
|
||
|
10*
|
VERIFY IF MALFUNCTION CAUSE IS OPEN CIRCUIT IN WIRING HARNESS OF SEAT WARMER SWITCH SIGNAL
• Seat warmer control unit connector on the side that is not operating is disconnected.
• Inspect for continuity between the following terminals (wiring harness-side):
• Is the voltage B+?
|
Yes
|
Go to the next step.
|
|
No
|
Repair or replace the open circuit in wiring harness.
|
||
|
11*
|
VERIFY IF MALFUNCTION CAUSE IS SHORT TO GROUND IN SEAT WARMER SWITCH
• Is the operation of the air conditioner (mode, switch the temperature) normal
|
Yes
|
Go to the next step.
|
|
No
|
• Inspect the malfunction following.
• Repair or replace the short to ground in wiring harness.
|
||
|
12*
|
VERIFY IF MALFUNCTION CAUSE IS OPEN CIRCUIT IN SEAT WARMER SWITCH
• Switch the ignition to off.
• Disconnect the seat warmer switch connector on the side that is not operating.
• Remove the A/C 20 A fuse.
• Inspect for continuity between the following terminals (wiring harness-side):
• Is there continuity?
|
Yes
|
Replace the seat warmer switch on the side that is not operating. (See SEAT WARMER SWITCH REMOVAL/INSTALLATION.)
|
|
No
|
Repair or replace the open circuit in wiring harness.
|
||
|
13*
|
INSPECT SEAT WARMER CONTROL UNIT AND SEAT WARMER UNIT CONNECTOR
• Disconnect the seat warmer control unit and seat warmer unit connector on the side not operating.
• Inspect the seat warmer control unit and seat warmer unit connector terminals for poor connection (such as damaged/pulled-out pins, and corrosion).
• Is there any malfunction?
|
Yes
|
Repair or replace the malfunctions.
|
|
No
|
Go to the next step.
|
||
|
14*
|
VERIFY IF MALFUNCTION CAUSE IS SEAT WARMER SWITCH
• Inspect the seat warmer unit (seat cushion side and seat back side). (See SEAT WARMER UNIT INSPECTION.)
• Is the seat warmer unit (seat cushion side and seat back side) normal?
|
Yes
|
Go to the next step.
|
|
No
|
Replace the seat warmer unit (seat cushion side or seat back side). (See FRONT SEAT CUSHION TRIM REMOVAL/INSTALLATION.) (See FRONT SEAT BACK TRIM REMOVAL/INSTALLATION.)
|
||
|
15*
|
VERIFY IF MALFUNCTION CAUSE IS OPEN CIRCUIT IN WIRING HARNESS OF SEAT WARMER UNIT CONTROL CIRCUIT
• Seat warmer control unit connector on the side that is not operating is disconnected.
• Switch the ignition to off.
• Disconnect the seat warmer unit (seat back side) connector on the side that is operating.
• Verify the continuity at the following terminal (wiring harness-side):
• Is there continuity?
|
Yes
|
Replace the seat warmer unit on the side that is not operating. (Seat warmer control unit can not to
ON for the seat warmer unit.)
|
|
No
|
Repair or replace the open circuit in wiring harness.
|
||
Inspection Procedure (No.2 Seat Warmer Always Operations)
|
No.2 |
Seat warmer always operations |
|---|---|
|
DETECTION
|
Seat warmer warms seat even though seat warmer switch is off
|
|
POSSIBLE CAUSE
|
Seat warmer switch is always ON
• Seat warmer switch malfunction
Seat warmer control unit falsely detects seat warmer switch is ON
• Seat warmer control unit LH malfunction
• Seat warmer control unit RH malfunction
• Short circuit in wiring harness between the following terminal:
Seat warmer unit is in constant ON control status
• Seat warmer control unit LH malfunction
• Seat warmer control unit RH malfunction
• Short to ground or short circuit in wiring harness between the following terminal:
|
Diagnostic procedure
|
STEP |
INSPECTION |
ACTION |
|
|---|---|---|---|
|
1*
|
DETERMINE IF MALFUNCTION CAUSE IS SIGNAL OF SEAT WARMER SWITCH OR MALFUNCTION IN CONTROL SIGNAL OF SEAT WARMER UNIT
• Switch the ignition to off.
• Disconnect the seat warmer control unit connector on the side that is malfunction.
• Engine start.
• Measure the voltage at the following terminal (wiring harness-side):
|
Yes
|
Go to the next step.
|
|
No
|
Go to step 4.
|
||
|
2
|
VERIFY IF MALFUNCTION CAUSE IS SEAT WARMER SWITCH
• Inspect the seat warmer switch. (See SEAT WARMER SWITCH INSPECTION.)
• Is the seat warmer switch normal?
|
Yes
|
Go to the next step.
|
|
No
|
Replace the seat warmer switch. (See SEAT WARMER SWITCH REMOVAL/INSTALLATION.)
|
||
|
3*
|
VERIFY IF MALFUNCTION CAUSE IS OPEN CIRCUIT IN WIRING HARNESS OF SEAT WARMER SWITCH SIGNAL
• Disconnect the seat warmer switch and seat warmer control unit connector on the side that is malfunction.
• Engine start.
• Measure the voltage at the following terminal (wiring harness-side):
• Is the voltage 1.0 or more?
|
Yes
|
Repair or replace for a short to ground in the wiring harness.
|
|
No
|
Replace the seat warmer control unit on the side that is malfunction.
|
||
|
4*
|
VERIFY IF MALFUNCTION CAUSE IS SHORT CIRCUIT FROM CONTROL SIGNAL WIRING HARNESS OF SEAT WARMER TO OTHER WIRING HARNESS
• Seat warmer control unit connector on the side that is malfunction is disconnected.
• Engine start.
• Disconnect the seat warmer unit (front seat back) connector on the side that is not operating.
• Measure the voltage at the following terminal (wiring harness-side):
• Is the voltage 1.0 or more?
|
Yes
|
Repair or replace for a short to ground in the wiring harness.
|
|
No
|
Go to the next step.
|
||
|
5*
|
VERIFY IF MALFUNCTION CAUSE IS SHORT CIRCUIT FROM CONTROL SIGNAL WIRING HARNESS OF SEAT WARMER TO GND WIRING HARNESS
• Seat warmer control unit connector on the side that is malfunction is disconnected.
• Verify the continuity at the following terminal (wiring harness-side):
• Is there continuity?
|
Yes
|
Repair for a short to ground in the wiring harness.
|
|
No
|
Replace the seat warmer control unit on the side that is malfunction.
|
||
Inspection Procedure (No.3 Temperature Of Seat Warmer Cannot Be Adjusted)
|
No.3 |
Temperature of seat warmer cannot be adjusted |
|---|---|
|
DETECTION
|
• Seat warmer does not adjust temperature even though seat warmer Lo/Hi switch is switched between low and high
• Seat warmer temperature continues to rise
|
|
POSSIBLE CAUSE
|
Seat warmer switch does not Lo/Hi switched
• Seat warmer switch LH malfunction
• Seat warmer switch RH malfunction
Seat warmer control unit falsely detects always seat warmer switch to Lo or Hi
• Seat warmer control unit LH malfunction
• Seat warmer control unit RH malfunction
• Short to ground in wiring harness between the following terminal:
Seat warmer control unit cannot control seat warmer unit
• Seat warmer control unit LH malfunction
• Seat warmer control unit RH malfunction
• Thermostat (Built-in seat warmer unit LH) malfunction
• Thermostat (Built-in seat warmer unit RH) malfunction
• Short to ground or short circuit in wiring harness between the following terminal:
|
Diagnostic procedure
|
STEP |
INSPECTION |
ACTION |
|
|---|---|---|---|
|
1*
|
VERIFY IF MALFUNCTION CAUSE IS SIGNAL OF SEAT WARMER SWITCH OR THE OTHER
• Switch the ignition to off.
• Disconnect the seat warmer control unit connector on the side that is malfunction.
• Measure the voltage at the following terminal (wiring harness-side):
• Is the seat warmer switch normal?
|
Yes
|
Go to step 3.
|
|
No
|
Go to the next step.
|
||
|
2
|
VERIFY IF MALFUNCTION CAUSE IS SEAT WARMER SWITCH
• Inspect the seat warmer switch. (See SEAT WARMER SWITCH INSPECTION.)
• Is the seat warmer switch normal?
|
Yes
|
Go to the next step.
|
|
No
|
Replace the seat warmer switch. (See SEAT WARMER SWITCH REMOVAL/INSTALLATION.)
|
||
|
3*
|
VERIFY IF MALFUNCTION CAUSE IS SHRT CIRCUIT IN WIRING HARNESS OF SEAT WARMER SWITCH SIGNAL
• Seat warmer switch and seat warmer control unit connector on the side that is malfunction disconnected.
• Engine start.
• Measure the voltage at the following terminal (wiring harness-side):
• Is the voltage 1.0 or more?
|
Yes
|
Repair or replace for a short to ground in the wiring harness.
|
|
No
|
Replace the seat warmer control unit.
|
||
|
4
|
VERIFY IF MALFUNCTION CAUSE IS THERMOSTAT (BILT-IN SEAT WARMER UNIT)
• Inspect the seat warmer unit (seat cushion side). (See SEAT WARMER UNIT INSPECTION.)
• Is the seat warmer unit (seat cushion side) normal?
|
Yes
|
Go to the next step.
|
|
No
|
Replace the seat warmer unit (seat cushion side). (See FRONT SEAT CUSHION TRIM REMOVAL/INSTALLATION.)
|
||
|
5*
|
VERIFY IF MALFUNCTION CAUSE IS SHRT CIRCUIT IN WIRING HARNESS OF SEAT WARMER UNIT CONTROL SIGNAL
• Seat warmer control unit connector on the side that is malfunction disconnected.
• Engine start.
• Measure the voltage at the following terminal (wiring harness-side):
• Is the voltage 1.0 or more?
|
Yes
|
Repair or replace for a short to ground in the wiring harness.
|
|
No
|
Go to the next step.
|
||
|
6*
|
VERIFY IF MALFUNCTION CAUSE IS SHORT CIRCUIT FROM CONTROL SIGNAL WIRING HARNESS OF SEAT WARMER TO GND WIRING HARNESS
• Seat warmer control unit connector on the side that is malfunction disconnected.
• Verify the continuity at the following terminal (wiring harness-side):
• Is there continuity?
|
Yes
|
Repair or replace for a short to ground in the wiring harness.
|
|
No
|
Go to the next step.
|
||
|
7*
|
VERIFY IF MALFUNCTION CAUSE IS CONTROL SIGNAL WIRING HARNESS OF THERMOSTAT (BILT-IN SEAT WARMER UNIT)
• Seat warmer control unit connector on the side that is malfunction disconnected.
• Verify the continuity at the following terminal (wiring harness-side):
• Is there continuity?
|
Yes
|
Repair or replace for a short to ground in the wiring harness.
|
|
No
|
Replace the seat warmer control unit.
|
||