 |
ar8uuw00002024
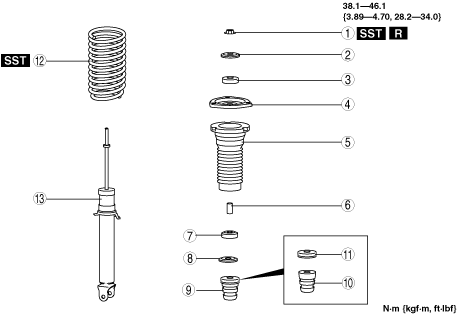
FRONT SHOCK ABSORBER AND COIL SPRING DISASSEMBLY/ASSEMBLY
id021300801300
1. Remove the engine cover. (See ENGINE COVER REMOVAL/INSTALLATION [13B-MSP].)
2. Remove the front suspension tower bar. (See FRONT SUSPENSION TOWER BAR REMOVAL/INSTALLATION [MT].) (See FRONT SUSPENSION TOWER BAR REMOVAL/INSTALLATION [AT].)
3. Remove the front shock absorber and coil spring. (See FRONT SHOCK ABSORBER AND COIL SPRING REMOVAL/INSTALLATION.)
4. Disassemble in the order indicated in the table.
5. Assemble in the reverse order of removal.
ar8uuw00002024
|
|
1
|
Piston rod nut
(See Piston Rod Nut Removal Note.)
|
|
2
|
Retainer
|
|
3
|
Bushing
|
|
4
|
Upper spring seat
|
|
5
|
Dust boot
|
|
6
|
Spacer
|
|
7
|
Bushing
|
|
8
|
Retainer
|
|
9
|
Stopper casing and bound stopper
|
|
10
|
Bound stopper
|
|
11
|
Stopper casing
|
|
12
|
Coil spring
|
|
13
|
Front shock absorber
|
Piston Rod Nut Removal Note
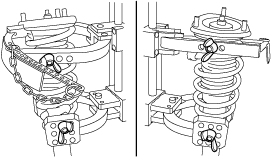
1. Install the coil spring to the SST using the following procedure.
ar8jjw00002186
|
ar8jjw00002187
|
2. Compress the coil spring using the SST.
3. Remove the piston rod nut.
Coil Spring Installation Note
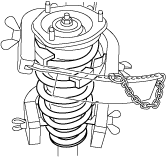
1. Protect the coil spring from scratches using a piece of cloth and install the SSTs.
2. Compress the coil spring using the SSTs.
ar8uuw00001572
|
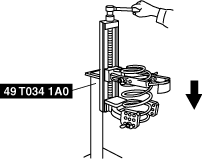
3. Install the shock absorber so that the lower end of the coil spring is seated on the step of the lower spring seat.
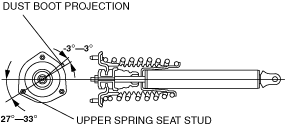
Upper Spring Seat Installation Note
1. Align the mark on the upper spring seat with the dust boot projection.
chu0213w028
|
2. Install the upper spring seat so that the upper spring seat stud is at a 27°—33° angle to the shock absorber installation shaft (lower side).
chu0213w003
|