EPS CONTROL MODULE REMOVAL/INSTALLATION
id061300283100
-
Caution
-
• If the EPS control module is replaced, set the EPS system to the neutral position. If not set to the neutral position, the system may not operate correctly. (See
EPS SYSTEM NEUTRAL POSITION SETTING.)
• Do not drop the EPS control module. Replace the EPS control module if it subjected to an impact.
1. Remove the following parts:
- (1) Engine cover. (See ENGINE COVER REMOVAL/INSTALLATION [13B-MSP].)
- (2) Battery cover. (See BATTERY REMOVAL/INSTALLATION [13B-MSP].)
- (3) PCM cover (See PCM REMOVAL/INSTALLATION [13B-MSP].)
- (4) PCM (See PCM REMOVAL/INSTALLATION [13B-MSP].)
- (5) PCM bracket No.1 (See PCM REMOVAL/INSTALLATION [13B-MSP].)
- (6) PCM bracket No.2 (See PCM REMOVAL/INSTALLATION [13B-MSP].)
- (7) PCM bracket No.3 (See PCM REMOVAL/INSTALLATION [13B-MSP].)
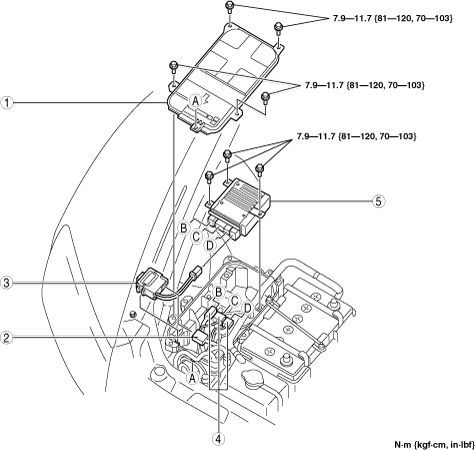
2. Remove in the order indicated in the table.
3. Install in the reverse order of removal.
4. After installation, set the EPS system to the neutral position. (See EPS SYSTEM NEUTRAL POSITION SETTING.)
|
1
|
Cover
|
|
2
|
Connector
|
|
3
|
Noise filter
|
|
4
|
Connector
|
|
5
|
EPS control module
|