 |
ar8uuw00001074
DIAGNOSTIC ASSIST FUNCTION [AUDIO]
id0902f6361100
Switch Inspection
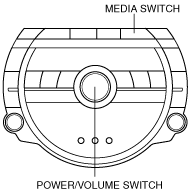
1. With the audio unit power to ON, press the POWER/VOLUME switch and simultaneously press the MEDIA switch for approx. 1 s.
ar8uuw00001074
|
2. Inspect according to the following table:
|
INSPECTION |
INFORMATION DISPLAY |
ACTION |
|
|---|---|---|---|
|
• Launch the switch inspection mode.
• Operate all of the switches (press).
• Does the buzzer sound?
|
—
|
Yes
|
The switch is normal.
|
|
No
|
Verify the switch.
|
||
3. Turn the audio unit to OFF or the ignition switch to the LOCK position to stop the diagnostic assist function.
Speaker Inspection
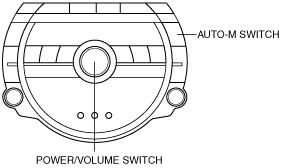
1. With the audio unit power to ON, press the POWER/VOLUME switch and simultaneously press the AUTO-M switch for approx. 1 s.
ar8uuw00001075
|
2. Inspect according to the following table:
|
INSPECTION |
INFORMATION DISPLAY |
ACTION |
|
|---|---|---|---|
|
• Launch the speaker inspection mode.
• Does each speaker output sound in the following order?:
Without Bose®
With Bose®
|
—
|
Yes
|
The speakers and the wiring harness between the audio unit and speakers are normal.
|
|
No
|
• If no sound is produced from all of the speakers.
• If no sound is produced from some of the speakers.
|
||
3. Turn the audio unit to OFF or the ignition switch to the LOCK position to stop the diagnostic assist function.
Radio Reception Condition Inspection
1. Turn the audio unit power to ON.
2. Tune in the radio.
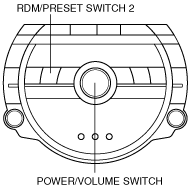
3. While pressing the POWER/VOLUME switch, simultaneously press the RDM/PRESET switch 2 for approx. 1 s.
ar8uuw00001076
|
4. Inspect according to the following table:
|
INSPECTION |
INFORMATION DISPLAY |
ACTION |
|---|---|---|
|
Start the radio reception condition inspection mode.
|
LEV-9 ↔ LEV5
|
Antenna, glass antenna, antenna feeder and audio unit are normal.
|
|
LEV-4 ↔ LEV3
|
Change frequencies and re-perform the inspection.
|
|
|
LEV-2 ↔ LEV0
|
Inspect the antenna, glass antenna and antenna feeder.
|
5. Turn the audio unit to OFF or the ignition switch to the LOCK position to stop the diagnostic assist function.
Audio Amplifier Specification Inspection
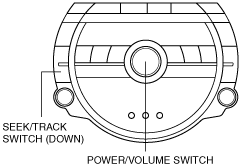
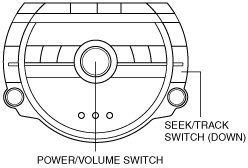
1. With the audio unit power to ON, press the POWER/VOLUME switch and simultaneously press the SEEK/TRACK switch (down) for approx. 3 s.
With RDS (radio date system)
ar8uuw00001077
|
Without RDS (radio date system)
ar8wzw00000905
|
2. Inspect according to the following table:
|
INSPECTION |
INFORMATION DISPLAY |
ACTION |
|
|---|---|---|---|
|
• Launch audio amplifier specification inspection mode.
• Verify the audio amplifier specification.
• Dose the audio amplifier specification correspond.
|
Without Bose®
N
With Bose®
L
|
Yes
|
System is okay.
|
|
No
|
Replace the audio unit.
|
||
3. Turn the audio unit to OFF or the ignition switch to the LOCK position to stop the diagnostic assist function.
Audio Amplifier (With Bose®) Identify Inspection
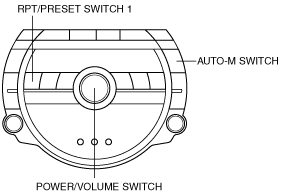
1. With the audio unit power to ON, press the POWER/VOLUME switch and simultaneously press the RPT/PRESET switch 1 and AUTO-M switch for approx. 3 s.
ar8uuw00001078
|
2. Inspect according to the following table:
|
INSPECTION |
— |
ACTION |
|
|---|---|---|---|
|
• Launch audio amplifier (With Bose®) identify inspection mode.
• Dose the audio amplifier specification correspond.
|
With normal seat
The rear speaker sounds.
With leather seat
The front door speaker sounds.
|
Yes
|
Audio amplifier is okay.
|
|
No
|
Replace the audio amplifier.
|
||
3. Turn the audio unit to OFF or the ignition switch to the LOCK position to stop the diagnostic assist function.