 |
atraaw00002589
JOINT SHAFT REMOVAL/INSTALLATION[AJ (3.0L Duratec)]
id0313008009a2
1. Drain the ATF.
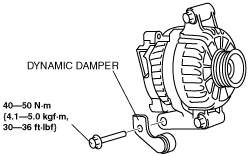
2. Remove the generator dynamic damper.
atraaw00002589
|
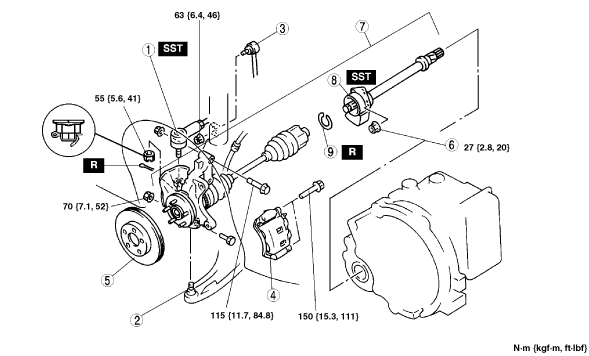
3. Remove in the order indicated in the table.
4. Install in the reverse order of removal.
5. Add the ATF. (See AUTOMATIC TRANSAXLE FLUID (ATF) REPLACEMENT[LA4AX-EL (CD4E)])
atraaw00003130
|
|
1
|
Tie-rod end
|
|
2
|
Lower arm ball joint
|
|
3
|
Stabilizer control link
|
|
4
|
Brake caliper component
|
|
5
|
Disc plate
|
|
6
|
Joint shaft bracket nut
|
|
7
|
Wheel hub, steering knuckle, drive shaft and joint shaft
|
|
8
|
Joint shaft
(See Joint Shaft Removal Note.)
|
|
9
|
Clip
(See Clip Removal Note.)
|
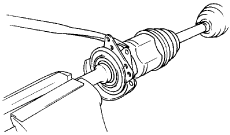
Wheel Hub, Steering Knuckle, Drive Shaft and Joint Shaft Removal Note
1. Pull the joint shaft straight out.
Joint Shaft Removal Note
1. Secure the shaft portion of the joint shaft in a vise.
2. As shown in the figure, insert a pry bar between the drive shaft and the joint shaft and tap on the bar to uncouple them.
atraaw00003131
|
Clip Removal Note
1. Install a new clip on the joint shaft with the opening facing upward. Ensure that the diameter of the clip does notexceed the specification on installation.
2. After installation, measure the outer diameter. If it exceeds the specification, repeat steps 1—2 using a new clip.
atraaw00002569
|
Joint Shaft Installation Note
1. Secure the shaft portion of the drive shaft in a vise.
2. Install the joint shaft using a plastic hammer as shown.
atraaw00003132
|
Wheel Hub, Steering Knuckle, Drive Shaft and Joint Shaft Installation Note
1. Apply ATF to the oil seal lip.
2. Push the drive shaft and joint shaft into the transaxle.