1. Disconnect the negative battery cable.
2. Remove the audio unit. (See AUDIO UNIT REMOVAL.)
3. Remove in the order indicated in the table.
|
1
|
Screw
(See Screw Installation Note.)
|
|
2
|
Upper module
(See Upper Module Removal Note.)
|
|
3
|
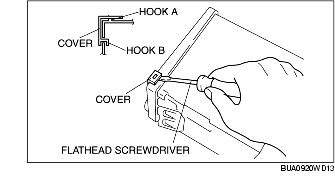
Cover
(See Cover Removal Note.)
|
4. Install in the order of removal.
1. Insert a screwdriver into the hole stamped mark.
2. To remove upper module, lift it by pushing down the screwdriver's handle.
1. Insert a tape-wrapped screwdriver between the cover and the base unit, then unhook the hook A.
2. To unhook the hook B, pull the cover upward.
1. If an undesignated screw is used, the inside of the upper module could be damaged. When installing the module, be sure to use a designated screw (red).