Windshield Washer Pump: Service and Repair
REMOVALNOTE: The washer pump/motor unit can be removed from the washer reservoir without removing the reservoir from the vehicle.
1. Disconnect and isolate the battery negative cable.
2. Siphon the washer fluid from the washer reservoir into a clean container for reuse.
3. Raise and support the vehicle.
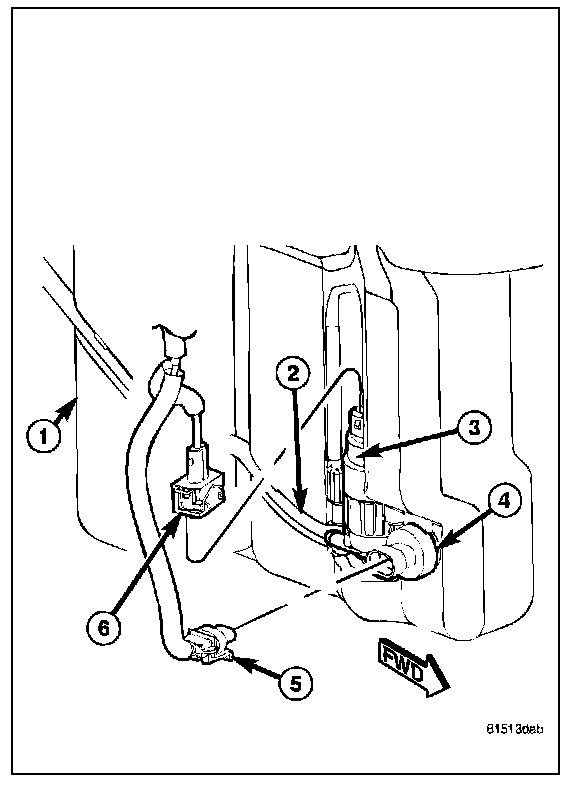
4. Reach between the front of the right front wheel house splash shield and the right front bumper support to access the outboard facing lower surface of the combination washer reservoir/coolant reserve bottle (1).
5. Disconnect the wire harness connector (6) from the washer pump/motor unit (3).
6. Disconnect the washer hose (2) from the pump outlet nipple.
7. Grasp the top of the washer pump/motor housing and pull it firmly rearward far enough to disengage the snap fit between the motor housing and the molded motor receptacle in the reservoir.
8. Using a trim stick or another suitable wide flat-bladed tool, gently pry the inlet nipple of the washer pump out of the rubber grommet seal in the reservoir sump. Care must be taken not to damage the reservoir.
9. Remove the rubber grommet seal from the washer pump mounting hole in the reservoir and discard.
INSTALLATION
1. Install a new rubber grommet seal into the washer pump mounting hole in the sump on the outboard facing side of the combination washer reservoir/coolant reserve bottle (1). Always use a new rubber grommet seal on the reservoir.
2. Position the inlet nipple of the washer pump/motor unit (3) to the rubber grommet seal in the reservoir.
3. Using hand pressure, press firmly and evenly downward on the washer pump/motor unit until the inlet nipple is fully seated in the rubber grommet seal in the pump mounting hole of the reservoir.
4. Align the top of the washer pump/motor housing with the molded motor receptacle in the washer reservoir.
5. Using hand pressure, press firmly and evenly on the top of washer pump/motor unit until the motor housing snaps into the receptacle.
6. Reconnect the reservoir washer hose (2) to the pump outlet nipple.
7. Reconnect the wire harness connector (6) to the connector receptacle on the top of the pump motor.
8. Lower the vehicle.
9. Refill the washer reservoir with the washer fluid siphoned from the reservoir during the removal procedure.
10. Reconnect the battery negative cable.