Outer Panel
REMOVAL
1. Remove screw from mirror trim panel, loosen forward edge of window frame garnish molding and pull trim panel rearward to disengage.
2. On driver side, loosen set screw and disconnect cable from trim panel.
3. Remove trim panel.

4. Remove foam filler from mirror reinforcement area.
5. On passenger side power mirror disconnect harness connector.

6. Remove nuts from mirror assembly and remove mirror and seal.
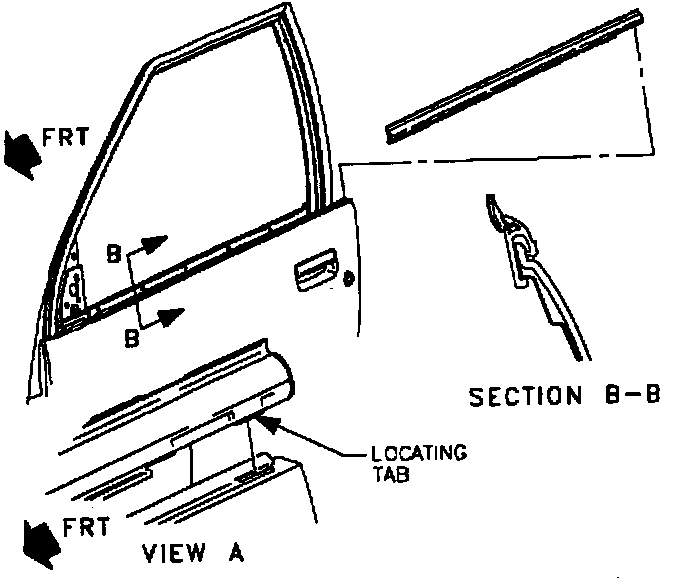
7. Disengage outer seal strip by pulling up at rear end and lifting. Use of a putty knife with blade covered with tape may be needed to gently pry sealing strip from flange. Remove seal.

8. Push center part of outer handle pushpins through pins. Pull pins out of handle. Slide handle off pivot assembly and remove handle.

9. Remove door panel screws and remove door panel by pulling front out, rear out, and then move entire panel rearward.
10. If damaged, remove foam seal strips from perimeter of door structure.
11. If damaged, remove foam tape fillers at the front edge of outer door panel.
12. If replacing panel:
a. Remove door lock cylinder bezel compressing retainer tabs and pushing out.
b. Remove J-clips.
c. Remove trim molding and clip.
INSTALLATION
1. If replacing panel:
a. Install clip and trim molding.
b. Install J-clips.
c. Install door lock cylinder bezel.
d. Install outer door panel lower sealing strip with rivets.

2. Install foam tape fillers at front edge of outer door panel in locations shown in illustration. Using Kent Industries P/N 40130 1/2" x 9/16" or equivalent cut to length and align foam tape to scribe lines on outer door panel for the following:
a. Sedan: A = 50mm (1.97 in.),
B = 120mm (4.72 in.), on piece "B" trim 5mm (0.197 in.) of thickness from area indicated by arrow.
b. Coupe: A = 90mm (3.54 in.),
B = 50mm (1.97 in.) and
C = 135mm (5.31 in.)
3. Install foam tape damper in middle of outer door panel using Kent Industries 40140 3/4 in. x 7/16 in. or equivalent cut length and align to scribe lines in center of back side of panel for the following:
a. Sedan: C = 100mm (3.94 in.) length
b. Coupe: D = 100mm (3.94 in.) length
E = 100mm (3.94 in.) length

4. If removed, install foam seal strip to perimeter of door structure using Kent Industries P/N 40105 1/4 in. x 5/32 in. or equivalent.
5. Install outer door panel aligN.ment pins into net hole and slot in outer belt reinforcement (door structure).
NOTICE: Apply Loctite(R) 242 Threadlocker (or equivalent) to fasteners before installation.

6. On Sedan, install fasteners and tighten in designated sequence.
Torque: 6 N.m (53 in-lbs)

7. On Coupe, install fasteners and tighten in designated sequence.
Torque: 6 N.m (53 in-lbs)

8. Install door handle by lifting pivot assembly and sliding handle on pivot and inserting pushpins.

9. Install outer sealing strip by aligning location tab at rear of sealing strip with slot in door panel. Working from the rear forward, push seal strip down on to flange until fully seated.
10. Check seal on mirror assembly for proper location and install mirror assembly to door, install nuts and tighten.
Torque: 6 N.m (53 in-lbs)
11. If passenger side power mirror connect harness connector and install connector position assurance (CPA) device.
12. Install foam filler in mirror patch area.

13. On driver side, install mirror cable into trim panel and tighten set screw.
Torque: 3 N.m (27 in-lbs)
14. Install trim panel to door frame with screw and tighten.
15. Install removed portion of window frame garnish by pushing to seat in channel.