12. Output Shaft Assembly

IMPORTANT: Lube O-rings with Saturn Transaxle Fluid.

1. Install the two O-ring seals for the 4th clutch hub onto the output shaft.
2. Use emery cloth (or equivalent) to gently remove any nicks that may be present on 4th clutch housing to prevent seal from being damaged when installed.
NOTICE: To verify repair and installation of 4th clutch seals, air check input shaft.
3. Lube clutch housing inner diameter and install the 4th clutch assembly.
IMPORTANT: Due to the high helix performance 4th gear set, it is necessary to install the 4th driven clutch spacer in all performance (MP7) transaxles. However, the 4th driven clutch spacer may also be used in base transmissions.
4. Install 4th driven gear clutch spacer.
5. Install 4th driven gear thrust washer.
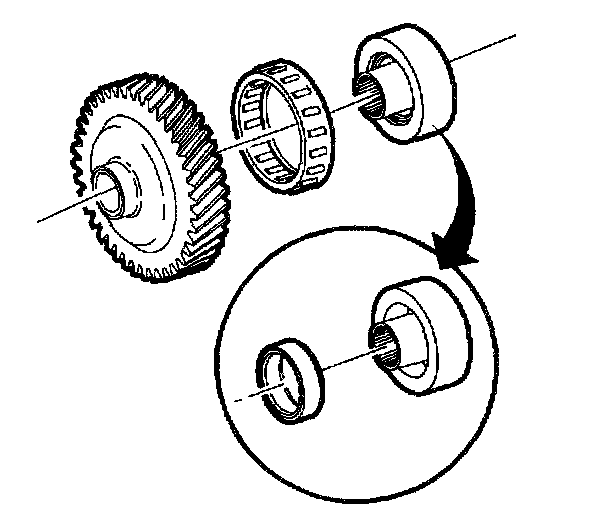
6. Install and lube 4th driven gear thrust bearing.
IMPORTANT: The 4th driven gear thrust bearing looks very similar to the 2nd/Reverse gear thrust bearing. However, the 2nd gear thrust bearing is slightly larger than the 4th gear thrust bearing. Also, the rollers on the 4th gear thrust bearing are centered between the inner and outer edges of the thrust bearing while the rollers on the 2nd gear thrust bearing are located closer to the outside edge.
7. Install the 4th driven gear needle bearing and lube bearing.

8. Install 4th gear and hub assembly. While installing into the clutch pack, rotate the gear and hub assembly back and forth to align the clutch plates. If you are not sure that all the clutch plates have been engaged, lift the gear out of the clutch housing and verify that all clutch tangs are aligned.
9. Install and lube 3rd/4th gear thrust bearing.
10. Install 3rd driven gear split thrust washer.
11. Install 3rd driven gear.
12. Install 2nd/3rd driven gear spacer.
13. Install 2nd driven gear thrust washer.
14. Use heat gun to heat the 2nd driven gear bearing race and install.
15. Install 2nd driven gear.

16. Install the forward/reverse dog clutch hub with wide end of slots (indicated by the arrow) toward 2nd gear and oil groove on facing (indicated by the circle) towards reverse gear.
17. Install the forward/reverse dog clutch sleeve with the groove on the outside of sleeve toward reverse gear.
18. Use heat gun to heat the reverse driven gear bearing race and install.
19. Install and lube the reverse driven gear needle bearing.
20. Install the reverse driven gear.
21. Install the reverse driven gear thrust washer.
22. Assemble sprag clutch assembly if disassembled. If disassembled, plastic retainer sprag clutch must be discarded and replaced with new one.
22.1 Assemble sprag clutch into 1st driven gear.
22.2 Install 1st gear bearing into 1st driven gear hub and install hub into 1st driven gear.
22.3 When viewing the 1st driven gear assembly from the sprag clutch opening side, and holding the 1st driven hub stationary, the 1st driven gear must rotate freely in the clockwise direction and lock in the counterclockwise direction.