Removal
DRIVE AXLE REMOVAL- TOOLS REQUIRED
- SA91100C Tie Rod Separator
- SA9132S Lower Control Arm Ball Stud Separator

1. With vehicle on ground, depress brake pedal and loosen drive axle-to-hub nut.
CAUTION: MAKE SURE VEHICLE IS PROPERLY SUPPORTED AND SQUARELY POSITIONED ON HOIST. TO HELP AVOID PERSONAL INJURY, PROVIDE ADDITIONAL SUPPORT TO THE OPPOSITE END OF THE VEHICLE THAT COMPONENTS WILL BE REMOVED FROM.
2. Raise vehicle on hoist.
3. Remove road wheel corresponding to the drive axle being removed.
4. Remove side splash shield corresponding to the drive axle being removed.
4.1. Remove two push pins.
4.2. Remove lower shield to cradle molded-in fasteners at cradle by gently prying at three fastener locations.
IMPORTANT: For left side, remove front section of shield first, then rear. For right side, remove rear section of shield first, then front
IMPORTANT: If molded-in fasteners are damaged or broken, drill out with a 8 mm (5/16 inch) bit and replace with a push pin.

5. If left drive axle or intermediate axle shaft is to be removed, place approved container under transaxle, remove drain plug, and drain fluid.
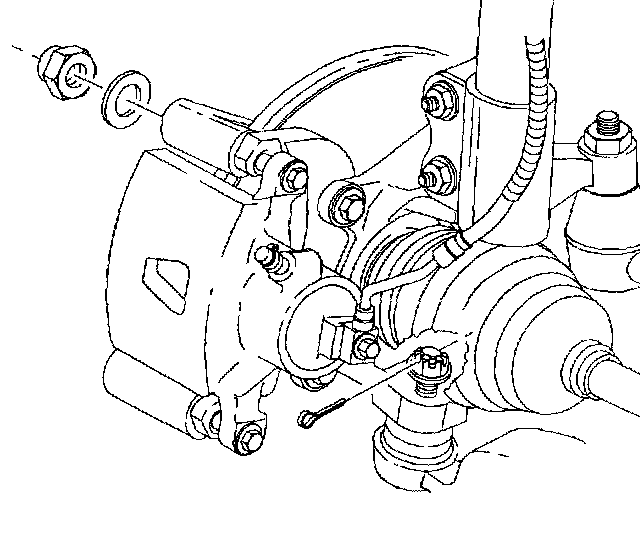
6. Remove drive axle nut and washer and discard nut.
7. Remove and discard lower control arm-to-steering knuckle cotter pin.
8. Loosen lower control arm-to-steering knuckle castle nut to the point where the top of the castle nut is even with the top of the ball stud. Do not remove the castle nut at this time.
NOTICE: On ABS equipped vehicles, the outer CV joint has a speed sensor ring. Using the incorrect tool or procedure to separate the control arm from the knuckle can damage the ring, resulting in a loss of ABS operation. Even minor scratching of speed sensor ring may result in a loss of ABS operation.
NOTICE: Do not attempt to separate the joint using a wedge-type tool because seal may be damaged.

9. Using Lower Control Arm Ball Stud Separator SA9132S (or equivalent), separate lower control arm from steering knuckle.

10. Remove torque prevailing nut and discard. A new nut will be required during re-assembly.
NOTICE: Do not attempt to separate the joint using a wedge-type tool because seal may be damaged.

11. Using Tie Rod Separator SA91100C (or equivalent), separate tie rod end from steering knuckle.
12. Remove lower control arm-to-steering knuckle castle nut.
NOTICE: Be sure to use cloths where the pry bar contacts the front stabilizer shaft and cradle to avoid surface damage to these components.

13. Position a long pry bar at the proper cradle and front stabilizer shaft locations.
NOTICE: Be careful not to allow steering knuckle to contact the ball stud seal. Contact may cause the seal to rip, requiring control arm replacement.
IMPORTANT: Place a cloth over ball stud boot, protecting it from damage caused by contact with steering knuckle.
14. Pull down on pry bar, separating the lower control arm ball stud from the steering knuckle. Pull the steering knuckle away from the ball stud.
NOTICE: To prevent damage to CV Joint boots, be careful not to allow them to contact other parts during the removal/installation process. Also, never pull on the shaft assembly.
IMPORTANT: If difficulty is encountered in separating axle from hub, tap on end of drive axle, using a block of wood and a hammer. Do not hammer directly on end of axle.

15. While pulling knuckle/strut assembly away from vehicle, pull outer end of drive axle out of the wheel hub.

16. Support or suspend drive axle assembly.

17. For right side drive axle, remove drive axle from intermediate axle shaft by tapping axle at the correct location with a hammer, using a block of wood between the hammer and drive axle. Separate drive axle from intermediate shaft.
NOTICE: When inserting pry bar between the transaxle and drive axle, be careful not to contact transaxle oil seal or axle shaft deflector ring. Damage can occur to transaxle oil seal or axle shaft deflector ring if contact is made, requiring seal or deflector ring replacement.

18. For left side drive axle only, remove drive axle by inserting a large pry par into the correct location and prying axle out of transaxle.
19. Remove drive axle from vehicle.