In-Vehicle Service
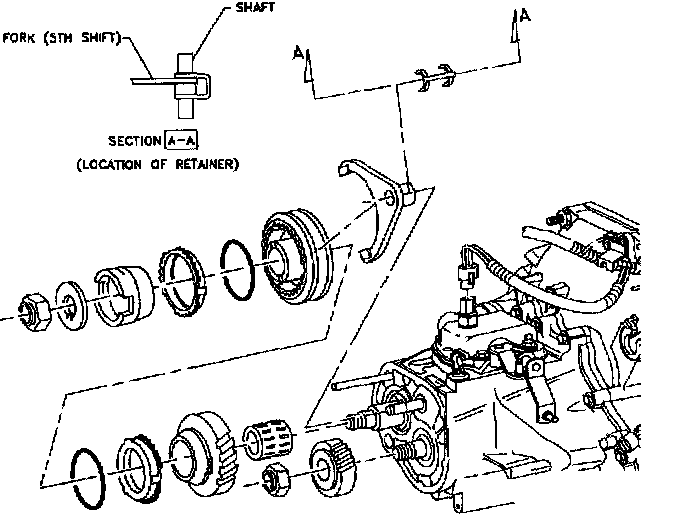
5TH GEAR AND 5TH/REVERSE SYNCHRONIZER ASSEMBLY (ON-VEHICLE)TOOLS REQUIRED
- SA9211T Shaft Protector
- SA9211T-2 5th Gear Remover
REMOVAL
1. Remove end cover.
2. Place transaxle in 1st gear.
3. Remove 5th/Reverse fork retainer and discard.
4. Move 5th/Reverse fork to lock transaxle in 5th gear.
5. Remove input shaft nut and discard.
6. If required, remove output shaft nut and discard.
7. Remove reverse cone, thrust washer, and reverse blocker ring.
8. Remove 5th/Reverse shift fork.

9. Remove 5th/Reverse synchronizer, 5th/Reverse blocker ring, and 5th drive gear.
IMPORTANT: Synchronizer hub and sleeve must be kept together as a match set. Note spline alignment marks (indicated by the arrows) on hub and sleeve (3rd/4th synchronizer shown, 5th/Reverse synchronizer similar). II alignment marks are not visible, put new marks on hub and sleeve before they are separated.
IMPORTANT: If the 5th/Reverse hub is press fit on the input shaft:
9.1 Install Shaft Protector SA921IT on the end of input shaft with counter bore in the shaft protector going over input shaft.
9.2 Install 5th Gear Remover SA921IT-2 on the input shaft. Engage legs of puller under clutching teeth ring on 5th drive gear and center the forcing screw on the shaft protector.
9.3 Tighten forcing screw to remove 5th drive gear along with 5th/Reverse hub.
10. Remove 5th driven gear, if required.
IMPORTANT: If the 5th driven gear is press fit on the input shaft:
10.1 Install Shaft Protector, SA921IT-3 on the end of the output shaft with counter bore in shaft protector going over output shaft.
10.2 Install 5th Gear Remover, SA921IT-2 on output shaft. Engage legs of puller under 5th driven gear and center forcing screw on shaft protector.
IMPORTANT: It may be necessary to release the bearing snap-ring and pull the shaft out to provide access for the puller under the 5th driven gear.
10.3 Tighten forcing screw on puller to remove 5th driven gear.
INSTALLATION

1. Install 5th driven gear (if removed).
IMPORTANT: If the 5th driven gear is press fit on the input shaft:
1.1 Place the 5th driven gear on the output shaft engaging the splines.
1.2 Thread the 5th Gear Installer, SA9211T-1 onto the output shaft until it is snug.
IMPORTANT: Before installing the 5th Gear Installer SA921IT-1, make sure that the nut is backed off all the way on the forcing screw.
1.3 Tighten the nut on the forcing screw until the 5th driven gear has been seated.
2. Install 5th gear thrust washer (if removed).
3. Install 5th gear bearing race (if removed).
4. Install 5th gear bearing.
5. Install 5th gear.
6. Install 5th gear synchronizer blocker ring to 5th gear.
7. Install 5th gear synchronizer spring to 5th blocker ring.

8. Install 5th/Reverse hub onto input shaft.
IMPORTANT: Be sure tabs on blocker ring are aligned with slots on hub. (3rd/4th synchronizer shown, 5th/Reverse synchronizer similar.)
IMPORTANT: If 5th/Reverse hub is press fit on the input shaft:
8.1 Place 5th/Reverse hub on input shaft engaging splines.
8.2 Thread 5th Gear Installer SA921IT onto input shaft until it is snug.
IMPORTANT: Before installing 5th driven gear installer SA921IT-1, make sure nut is backed off all the way on forcing screw.
8.3 Tighten nut on forcing screw until 5th/Reverse hub has been seated.

9. Slide 5th/Reverse fork over 5th/Reverse synchronizer sleeve and install sleeve onto hub and fork onto shift fork shaft at the same time.
IMPORTANT: Be sure to align the mark on the sleeve to the mark on the hub indicated by the arrows (3/4 synchronizer shown, 5th/Reverse synchronizer similar).
10. Install synchronizer spring to reverse blocker ring and install assembly to 5th/Reverse sleeve.

11. Install reverse cone and thrust washer.
12. Lock transaxle in two gears by shifting into 1st gear, and moving 5th/Reverse shift fork into 5th gear at the same time.
IMPORTANT: Make sure threads on input and output shaft are clean and free of dirt and oil. A wire brush may be used to clean threads.
13. Install a new input shaft nut and torque.
Torque:
Input Shaft Clamp Nut: 150 Nm (111 ft. lbs.)
14. If removed, install a new output shaft nut and torque.
Torque:
Output Shaft Clamp Nut: 150 Nm (111 ft. lbs.)
15. Unlock transaxle by moving 5th/Reverse and 1-2 shift forks into neutral position.
IMPORTANT: Always use new retainer clips.
16. Install 5th/Reverse fork retainer clip.
17. Install end cover and wheel.