Disassembly
INTERIOR PANELS / TRIM: UPPER INSTRUMENT PANEL: DISASSEMBLY; 2013 MY FR-S [03/2012 -]
1. REMOVE NO. 2 HEATER TO REGISTER DUCT
(a) Remove the 3 screws.

(b) Disengage the claw to remove the No. 2 heater to register duct.
2. REMOVE NO. 1 HEATER TO REGISTER DUCT
HINT
Use the same procedure as for the No. 2 heater to register duct.
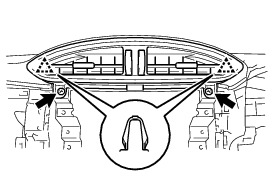
3. REMOVE DEFROSTER NOZZLE ASSEMBLY
(a) Remove the 3 screws.

(b) Disengage the 5 claws and remove the defroster nozzle assembly, No. 2 side defroster nozzle duct, and No. 1 side defroster nozzle duct as a single unit.
4. REMOVE NO. 2 SIDE DEFROSTER NOZZLE DUCT
(a) Disengage the 2 claws to remove the No. 2 side defroster nozzle duct.

5. REMOVE NO. 1 SIDE DEFROSTER NOZZLE DUCT
HINT
Use the same procedure as for the No. 2 side defroster nozzle duct.
6. REMOVE NO. 3 DEFROSTER NOZZLE GARNISH
(a) Disengage the 2 claws to remove the No. 3 defroster nozzle garnish.

7. REMOVE NO. 2 DEFROSTER NOZZLE GARNISH
HINT
Use the same procedure as for the No. 3 defroster nozzle garnish.
8. REMOVE CENTER INSTRUMENT PANEL REGISTER ASSEMBLY
(a) Remove the 2 screws.
(b) Disengage the 2 clips to remove the center instrument panel register assembly.
9. REMOVE NO. 2 INSTRUMENT PANEL REGISTER SUB-ASSEMBLY
(a) Disengage the 3 claws to remove the No. 2 instrument panel register sub-assembly.

10. REMOVE NO. 1 INSTRUMENT PANEL REGISTER SUB-ASSEMBLY
HINT
Use the same procedure as for the No. 2 instrument panel register sub-assembly.
11. REMOVE INSTRUMENT PANEL REGISTER BEZEL (for LH Side)
(a) Disengage the 3 claws to remove the instrument panel register bezel.

12. REMOVE INSTRUMENT PANEL REGISTER BEZEL (for RH Side)
HINT
Use the same procedure as for the LH side.
13. REMOVE NO. 1 DEFROSTER NOZZLE GARNISH
(a) Disengage the 16 claws and 8 guides to remove the No. 1 defroster nozzle garnish.

14. REMOVE INSTRUMENT PANEL CUSHION
(a) Remove the instrument panel cushion.
