Removal
SEAT: REAR SEAT ASSEMBLY: REMOVAL; 2013 MY FR-S [03/2012 -]
1. REMOVE SEPARATE TYPE REAR SEAT CUSHION ASSEMBLY LH
(a) Remove the bolt.

(b) Disengage the hook and remove the separate type rear seat cushion assembly LH.
2. REMOVE SEPARATE TYPE REAR SEAT CUSHION ASSEMBLY RH
HINT
Use the same procedure as for the LH side.
3. REMOVE NO. 1 CENTER CONSOLE SILENCER
(a) Remove the 2 clips and No. 1 center console silencer.

4. REMOVE BENCH TYPE REAR SEATBACK ASSEMBLY
(a) Remove the 3 clips and turn back rear seatback cover.
(b) Remove the 2 bolts and bench type rear seatback assembly.

NOTICE:
Be careful not to damage the vehicle body.
5. REMOVE FRONT DOOR SCUFF PLATE LH Removal
6. REMOVE FRONT DOOR SCUFF PLATE RH
HINT
Use the same procedure as for the LH side.
7. DISCONNECT FRONT DOOR OPENING TRIM WEATHERSTRIP LH
HINT
Disconnect the front door opening trim weatherstrip LH to the extent that allows the removal of the luggage compartment trim cover LH.
8. DISCONNECT FRONT DOOR OPENING TRIM WEATHERSTRIP RH
HINT
Use the same procedure as for the LH side.
9. REMOVE LUGGAGE COMPARTMENT TRIM COVER LH
(a) Remove the 2 clips. (w/ luggage compartment inner trim cover)
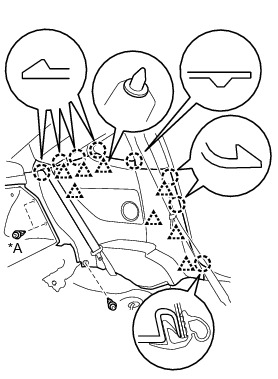

(b) Remove the clip from floor panel.
(c) Disengage the 8 clips and 8 claws to remove the quarter trim panel LH.
10. REMOVE LUGGAGE COMPARTMENT TRIM COVER RH
HINT
Use the same procedure as for the LH side.
11. REMOVE QUARTER TRIM LID SUB-ASSEMBLY LH Removal
12. REMOVE QUARTER TRIM LID SUB-ASSEMBLY RH
HINT
Use the same procedure as for the LH side.
13. REMOVE REAR WINDOW SIDE GARNISH LH Removal
14. REMOVE REAR WINDOW SIDE GARNISH RH
HINT
Use the same procedure as for the LH side.
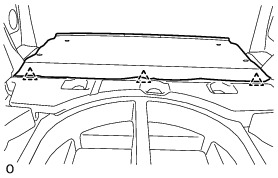
15. REMOVE PACKAGE TRAY TRIM PANEL ASSEMBLY Removal
16. REMOVE REAR SEATBACK LOCK STRIKER COVER LH
(a) Disengage the 3 clips to remove rear seatback lock striker cover LH.

17. REMOVE REAR SEATBACK LOCK STRIKER COVER RH
HINT
Use the same procedure as for the LH side.
18. REMOVE REAR SEATBACK LOCK STRIKER SUB-ASSEMBLY LH
(a) Remove the 2 bolts and rear seatback lock striker sub-assembly LH.

19. REMOVE REAR SEATBACK LOOK STRIKER SUB-ASSEMBLY RH
HINT
Use the same procedure as for the LH side.