Reassembly
FA20 BATTERY / CHARGING: GENERATOR: REASSEMBLY; 2013 MY FR-S [03/2012 -]
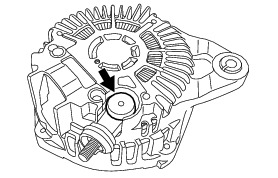
1. INSTALL GENERATOR HOLDER WITH RECTIFIER
(a) Install the generator holder with rectifier with the 3 bolts.

(b) Install the terminal with the nut.
Torque : 8.9 Nm (91 kgf-cm, 79 in-lbf)

(c) Install the terminal cover.
2. INSTALL BRUSH
(a) Using a soldering iron, install the 2 brushes to the brush holder assembly.


(b) Install the cover B to the brush holder assembly.

(c) Install the cover A to the brush holder assembly.

3. INSTALL GENERATOR BRUSH HOLDER ASSEMBLY
(a) Install the generator brush holder assembly with the 4 bolts.

Bolt A - Torque : 2.0 Nm (20 kgf-cm, 18 in-lbf)
Bolt B - Torque : 3.9 Nm (40 kgf-cm, 35 in-lbf)
(b) While pushing the 2 brushes into the generator rear end cover, insert a 1.0 mm (0.0394 in.) pin into the generator rear end cover.
NOTICE:
Remove the pin after reassembling the generator.


4. INSTALL GENERATOR COIL ASSEMBLY
(a) Install the generator coil assembly with the 6 bolts.
Torque : 2.0 Nm (20 kgf-cm, 18 in-lbf)

5. INSTALL GENERATOR ROTOR BEARING
(a) Using SST and a press, press in a new generator rotor bearing.
SST : 09632-36010
SST : 09820-36010

6. INSTALL GENERATOR DRIVE END FRAME BEARING
(a) Using SST and a press, press in a new generator drive end frame bearing.
SST : 09950-60010
09951-00520
SST : 09950-70010
09951-07100

(b) Install the bearing retainer with the 4 screws.

Torque : 3.9 Nm (40 kgf-cm, 35 in-lbf)
7. INSTALL GENERATOR DRIVE END FRAME ASSEMBLY
(a) Install the generator drive end frame assembly to the generator rotor assembly.

8. INSTALL GENERATOR PULLEY
(a) Mount the generator in a vise between aluminum plates.


(b) Install the generator pulley with the nut.

Torque : 108 Nm (1101 kgf-cm, 80 ft-lbf)
9. INSTALL GENERATOR REAR END COVER
(a) using the heat gun, heat the generator rear end cover.


Heating Temperature:

(b) Install the generator rear end cover.
(c) Pull out the pin of the generator rear end cover.
(d) Install the 4 through bolts.

Torque : 4.4 Nm (45 kgf-cm, 39 in-lbf)