Part 4
TX6A AUTOMATIC TRANSMISSION / TRANSAXLE: AUTOMATIC TRANSMISSION UNIT: DISASSEMBLY; 2013 MY FR-S [03/2012 -] (Continued)
46. REMOVE FORWARD CLUTCH PISTON SUB-ASSEMBLY
(a) Hold the forward clutch piston sub-assembly and apply compressed air (392 kPa, 4.0 kgf/cm2, 57 psi) to the input shaft to remove the forward clutch piston sub-assembly.
(b) Remove the coast clutch piston from the forward clutch piston sub-assembly.

(c) Remove the O-ring from the input shaft.


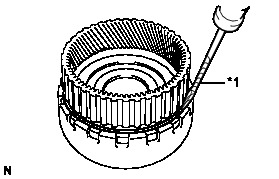
47. REMOVE REVERSE CLUTCH FLANGE
(a) Remove the reverse clutch flange from the reverse clutch drum sub-assembly.
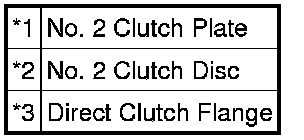
48. REMOVE NO. 2 CLUTCH DISC (DIRECT CLUTCH DISC)
(a) Using a screwdriver, remove the 2 snap rings from the reverse clutch drum sub-assembly.


NOTICE:
Be careful not to damage the reverse clutch drum sub-assembly.
HINT
Tape the screwdriver tip before use.
(b) Remove the direct clutch flange, 5 No. 2 clutch discs and the 5 No. 2 clutch plates from the reverse clutch drum sub-assembly.

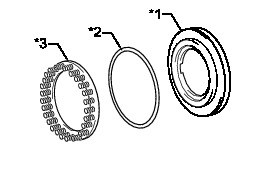
49. REMOVE NO. 3 CLUTCH BALANCER
(a) Place SST on the No. 3 clutch balancer, and compress the reverse clutch return spring sub-assembly with a press.

SST : 09387-00070
(b) Using SST, remove the snap ring.
SST : 09350-30020
09350-07070
(c) Remove the No. 3 clutch balancer.
50. REMOVE REVERSE CLUTCH RETURN SPRING SUB-ASSEMBLY
(a) Remove the reverse clutch return spring sub-assembly and O-ring from the reverse clutch piston sub-assembly.

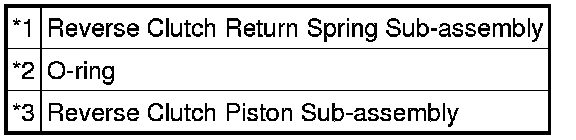
51. REMOVE REVERSE CLUTCH PISTON SUB-ASSEMBLY
(a) Remove the reverse clutch piston sub-assembly from the reverse clutch drum sub-assembly.


(b) Remove the O-ring from the reverse clutch piston sub-assembly.


(c) Remove the O-ring from the reverse clutch drum sub-assembly.


52. REMOVE DIRECT CLUTCH PISTON SUB-ASSEMBLY
(a) Place SST on the No. 2 clutch balancer, and compress the direct clutch return spring sub-assembly with a press.

SST : 09320-89010
(b) Using SST, remove the snap ring.
SST : 09350-30020
09350-07070
(c) Remove the No. 2 clutch balancer and the direct clutch return spring sub-assembly.
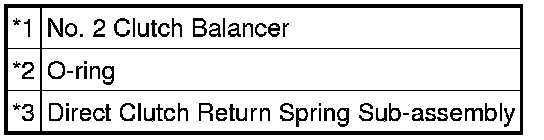
(d) Remove the O-ring from the No. 2 clutch balancer.
(e) Using 2 screwdrivers, remove the direct clutch piston sub-assembly from the reverse clutch drum sub-assembly.


NOTICE:
Be careful not to damage the direct clutch piston sub-assembly.
HINT
Tape the screwdriver tip before use.
(f) Remove the 2 O-rings from the direct clutch piston sub-assembly.


53. REMOVE NO. 3 BRAKE DISC (2ND BRAKE DISC SET)
(a) Using a screwdriver, remove the snap ring from the automatic transmission case sub-assembly.

NOTICE:
Be careful not to damage the automatic transmission case sub-assembly.
HINT
Tape the screwdriver tip before use.
(b) Remove the No. 3 brake flange, 3 No. 3 brake discs and the 3 No. 3 brake plates from the automatic transmission case sub-assembly.


54. REMOVE 2ND BRAKE CYLINDER
(a) Using SST, remove the snap ring from the automatic transmission case sub-assembly.

SST : 09350-30020
09350-07060
(b) Remove the 2nd brake cylinder from the automatic transmission case sub-assembly.

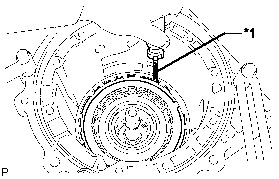
55. REMOVE 2ND BRAKE PISTON
(a) Using a screwdriver, remove the snap ring and the No. 3 brake piston return spring sub-assembly from the 2nd brake cylinder.

NOTICE:
Be careful not to damage the 2nd brake cylinder.
HINT
Tape the screwdriver tip before use.
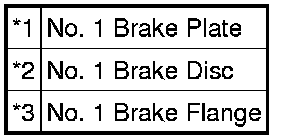
(b) Hold the 2nd brake piston and apply compressed air (392 kPa, 4.0 kgf/cm2, 57 psi) to the 2nd brake cylinder to remove the 2nd brake piston.
(c) Remove the 2 O-rings from the 2nd brake piston.


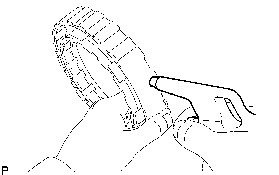
56. REMOVE ONE-WAY CLUTCH ASSEMBLY
(a) Remove the one-way clutch assembly and the No. 1 planetary carrier thrust washer from the automatic transmission case sub-assembly.


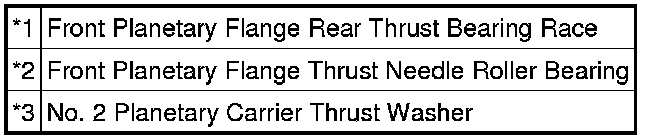
57. REMOVE FRONT PLANETARY GEAR ASSEMBLY
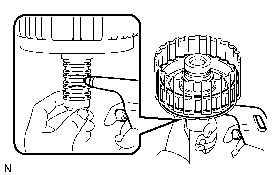
(a) Remove the front planetary gear assembly and the one-way clutch inner race sub-assembly from the automatic transmission case sub-assembly.


(b) Remove the front planetary flange rear thrust bearing race, front planetary flange thrust needle roller bearing and the No. 2 planetary carrier thrust washer from the automatic transmission case sub-assembly.

58. REMOVE FRONT PLANETARY RING GEAR
(a) Remove the front planetary ring gear from the automatic transmission case sub-assembly.

59. REMOVE CENTER PLANETARY RING GEAR
(a) Using a screwdriver, remove the snap ring.

NOTICE:
Be careful not to damage the front planetary ring gear.
HINT
Tape the screwdriver tip before use.
(b) Remove the center planetary ring gear from the front planetary ring gear.
(c) Using a screwdriver, remove the snap ring.


NOTICE:
Be careful not to damage the center planetary ring gear.
HINT
Tape the screwdriver tip before use.
(d) Remove the front planetary ring gear flange sub-assembly from the center planetary ring gear.
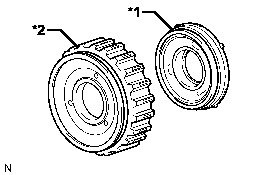
60. REMOVE NO. 1 BRAKE DISC
(a) Remove the No. 1 brake flange, 3 No. 1 brake discs and the 3 No. 1 brake plates from the automatic transmission case sub-assembly.