Part 3
TL70 MANUAL TRANSMISSION / TRANSAXLE: MANUAL TRANSAXLE UNIT: DISASSEMBLY; 2013 MY FR-S [03/2012 -] (Continued)
31. REMOVE NO. 2 GEAR SHIFT HEAD
(a) Using a 5 mm pin punch and hammer, remove the slotted spring pin.

NOTICE:
* Use a cloth to prevent the slotted spring pin from flying off.
* Take care in order that the slotted spring pin does not fall inside through the gear shift fork shaft hole.
(b) Remove the No. 2 gear shift head from the No. 2 gear shift fork shaft.
32. REMOVE NO. 1 GEAR SHIFT HEAD
(a) Using a 5 mm pin punch and a hammer, remove the slotted spring pin.

NOTICE:
* Use a cloth to prevent the slotted spring pin from flying off.
* Take care in order that the slotted spring pin does not fall inside through the gear shift fork shaft hole.
(b) Remove the No. 1 gear shift head from the No. 1 gear shift fork shaft.
33. REMOVE NO. 3 GEAR SHIFT HEAD
(a) Using a 5 mm pin punch and a hammer, remove the slotted spring pin.

NOTICE:
* Use a cloth to prevent the slotted spring pin from flying off.
* Take care in order that the slotted spring pin does not fall inside through the gear shift fork shaft hole.
(b) Remove the No. 3 gear shift head from the No. 3 gear shift fork shaft.
34. REMOVE OUTPUT SHAFT REAR BEARING RETAINER
(a) Using a T45 "TORX" socket wrench, remove the 4 bolts and output shaft rear bearing retainer.

(b) Remove the shift arm shoe.

35. REMOVE MANUAL TRANSMISSION CASE
(a) Using a snap ring expander, remove the output shaft bearing shaft snap ring.

(b) Remove the reverse idler gear shaft bolt and reverse idler gear shaft gasket. (manual transmission case side)

(c) Remove the 9 bolts and clamp.


(d) Using a plastic hammer, remove the manual transmission case.

NOTICE:
Do not damage the manual transmission case.
36. REMOVE NO. 1 OIL RECEIVER PIPE
(a) Remove the No. 1 oil receiver pipe.

37. REMOVE FRONT BEARING RETAINER
(a) Remove 7 bolts and front bearing retainer.

38. REMOVE TRANSMISSION FRONT BEARING RETAINER OIL SEAL
(a) Using a screwdriver with its tip wrapped with protective tape, remove the transmission front bearing retainer oil seal.


NOTICE:
Do not damage the front bearing retainer.
HINT
Remove the front bearing retainer while protecting it with a piece of cloth.
39. REMOVE COUNTER SHAFT
(a) Using a snap ring expander, remove the front bearing shaft snap ring and No. 1 counter gear front bearing snap ring.

HINT
Remove the 2 snap rings from the input shaft and counter shaft.
(b) Remove the reverse idler gear shaft bolt and reverse idler gear shaft gasket to free the reverse idler gear sub-assembly and reverse idler gear shaft. (Clutch housing side)

(c) Using a hammer handle edge, tap to remove the input shaft, output shaft, counter shaft, reverse idler gear sub-assembly, reverse idler gear shaft, No. 1 gear shift fork shaft, No. 2 gear shift fork shaft and No. 3 gear shift fork shaft all together from the clutch housing side.

40. REMOVE NO. 2 GEAR SHIFT FORK SHAFT
(a) Using 2 screwdrivers and a plastic hammer, remove the shift fork shaft shaft snap ring.

NOTICE:
Use a cloth to prevent the shift fork shaft shaft snap ring from flying off.
(b) Remove the bolt and No. 2 gear shift fork shaft.

41. REMOVE NO. 1 GEAR SHIFT FORK SHAFT
(a) Using 2 screwdrivers and a plastic hammer, remove the shift fork shaft shaft snap ring.

NOTICE:
Use a cloth to prevent the shift fork shaft shaft snap ring from flying off.
(b) Remove the No. 1 gear shift fork shaft and No.1 gear shift fork together.

(c) Using 2 screwdrivers and a plastic hammer, remove the shift fork shaft shaft snap ring.

NOTICE:
Use a cloth to prevent the shift fork shaft shaft snap ring from flying off.
(d) Remove the bolt and No. 1 gear shift fork shaft.

42. REMOVE NO. 3 GEAR SHIFT FORK SHAFT
(a) Remove the bolt and No. 3 gear shift fork shaft.

43. REMOVE INPUT SHAFT
(a) Remove the input shaft from the output shaft.

44. INSPECT REVERSE IDLER GEAR RADIAL CLEARANCE
(a) Use a vice to secure the reverse idler gear shaft, and then use a dial indicator to measure the radial clearance.
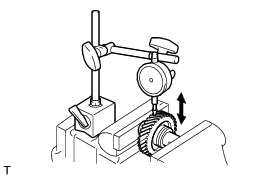
Standard clearance:
0.040 to 0.082 mm (0.00157 to 0.00323 in.)
Maximum clearance:
0.082 mm (0.00323 in.)
HINT
If the clearance exceeds the maximum, replace the reverse idler gear sub-assembly and reverse idler gear shaft with a new ones.
45. REMOVE REVERSE IDLER GEAR SHAFT
(a) Remove the reverse idler gear shaft from the reverse idler gear sub-assembly.
