Rear Door: Service and Repair
DISASSEMBLY1. REMOVE DOOR INSIDE HANDLE BEZEL

a. Remove the screw.
b. Using a screwdriver, remove the door inside handle bezel.
HINT: Tape the screwdriver tip before use.
2. REMOVE DOOR ARMREST
a. Remove the screw.
b. Using a screwdriver, remove the door armrest.
HINT: Tape the screwdriver tip before use.
3. REMOVE ACCESS DOOR TRIM
a. Release the quarter window lock.
b. Insert a screwdriver between the door trim and door panel to remove the door trim.
HINT: Tape the screwdriver tip before use.

4. REMOVE DOOR ARMREST BASE
Remove the 2 screws and door armrest base.
5. REMOVE SPEAKER
a. Disconnect the connector.
b. Remove the 4 screws and speaker.
6. REMOVE DOOR INSIDE HANDLE
a. Remove the screw and slide the inside handle forward.
b. Disconnect the cable as shown in the illustration.
7. REMOVE SERVICE HOLE COVER

a. Disconnect the connector.
b. Remove the service hole cover.
HINT: Bring out the cable and connector through the service hole cover.
8. REMOVE ACCESS DOOR CONTROLLER
a. Disconnect the 2 cables and 2 links.
b. Disengage the 2 clamps.
c. Remove the 3 bolts and access door controller.
9. REMOVE LOWER DOOR LOCK

a. Disconnect the connector.
b. Using a torx socket wrench, remove the 3 torx screws and lower door lock.
Torx socket wrench: T30 (Part No. 09042-00010 or locally manufactured tool)
10. REMOVE UPPER DOOR LOCK

a. Disconnect the connector.
b. Remove the 3 bolts and upper door lock.

11. REMOVE OUTSIDE HANDLE
Remove the 2 bolts and outside handle.

12. REMOVE CANCEL LEVER
Using a torx socket wrench, remove the 2 torx screws and cancel lever.
Torx socket wrench: T30 (Part No. 09042-00010 or locally manufactured tool)
13. REMOVE OUTER WEATHERSTRIP

a. Remove the 2 screws and 4 clips.
b. Using a clip remover, remove the outer weatherstrip.
14. REMOVE INNER WEATHERSTRIP
Using a clip remover, remove the inner weatherstrip.
15. REMOVE QUARTER WINDOW AND WEATHERSTRIP

a. Remove the 2 bolts, 4 nuts and quarter window.
b. Remove the weatherstrip.
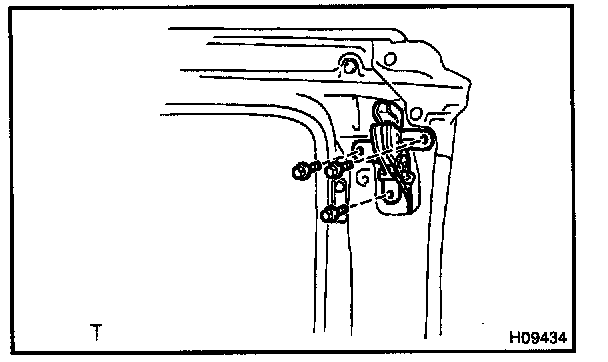
16. REMOVE QUARTER WINDOW LOCK AND HINGES
a. Remove the screws and window lock from the quarter window.
b. Remove the 2 screws and 2 hinges from the quarter window.
REASSEMBLY
1. INSTALL QUARTER WINDOW LOCK AND HINGES
a. Install the 2 hinges with the 2 screws to the quarter window.

b. Install the window lock with the screw to the quarter window.
2. INSTALL QUARTER WINDOW AND WEATHERSTRIP
a. Install the weatherstrip.
b. Install the quarter window with the 2 bolts and 4 nuts.
3. INSTALL INNER WEATHERSTRIP

4. INSTALL OUTER WEATHERSTRIP
Install the outer weatherstrip with the 2 screws and 4 clips.

5. INSTALL CANCEL LEVER
Using a torx socket wrench, install the cancel lever with the 2 torx screws.
Torx socket wrench: T30 (Part No. 09042-00010 or locally manufactured tool)
Torque: 5.0 N.m (51 kgf.cm, 44 in.lbf)
6. INSTALL OUTSIDE HANDLE
Install the outside handle with the 2 bolts.
Torque: 5.5 N.m (56 kgf.cm, 49 in.lbf)
7. INSTALL UPPER DOOR LOCK
a. Install the upper door lock with the 3 bolts.
Torque: 13 N.m (133 kgf.cm, 10 ft.lbf)
b. Connect the connector.
8. INSTALL LOWER DOOR LOCK

a. Using a torx socket wrench, install the lower door lock with the 3 torx screws.
Torx socket wrench: T30 (Part No. 09042-00010 or locally manufactured tool)
Torque: 5.0 N.m (51 kgf.cm, 44 in.lbf)
b. Connect the connector.
HINT: Apply adhesive to the 3 torx screws.
Part No. 08833-00070, THREE BOND 1342 or equivalent
9. INSTALL ACCESS DOOR CONTROLLER
HINT: Apply MP grease to the sliding and rotating parts of access door controller.

a. Install the access door controller with the 3 bolts.
Torque: 13 N.m (133 kgf.cm, 10 ft.lbf)

b. Attach the 2 clamps.
c. Connect the 2 cables and 2 links.
10. INSTALL SERVICE HOLE COVER

a. Install the service hole cover.
HINT:
- When installing the service hole cover, pull out the cable and connector through the service hole cover.
- There should be no wrinkles or folds after attaching the service hole cover.
- After attaching the service hole cover, sealing condition shall be confirmed.
b. Connect the connector.
11. INSTALL DOOR INSIDE HANDLE

a. Connect the cable to the inside handle.
b. Install the inside handle with the screw.
12. INSTALL SPEAKER
a. Install the speaker with the 4 screws.
b. Connect the connector.
13. INSTALL DOOR ARMREST BASE
Install the door armrest base with the 2 screws.
14. INSTALL ACCESS DOOR TRIM

a. Install the door trim.
b. Lock the quarter window lock.
15. INSTALL DOOR ARMREST
Install the door armrest with the screw.
16. INSTALL DOOR INSIDE HANDLE BEZEL
Install the door inside handle bezel with the screw.