Front Door: Service and Repair
FRONT DOORDISASSEMBLY

1. w/o Power window:
REMOVE REGULATOR HANDLE
Pull off the snap ring with a shop rag and remove the regulator handle and plate.

2. REMOVE TWEETER SPEAKER COVER
Using a screwdriver, remove the tweeter speaker cover.
HINT: Tape the screwdriver tip before use.

3. REMOVE THESE PARTS:
a. Inside handle bezel
b. w/ Power Window:
Power window switch
c. Courtesy light

4. REMOVE DOOR TRIM
a. Remove the 2 plug hole covers, 8 screws and 3 clips.

b. Pull the door trim upward to remove it.
5. REMOVE FRONT UPPER SPEAKER
a. Disconnect the connector.
b. Remove the 2 screws and front upper speaker.
6. REMOVE FRONT LOWER SPEAKER
a. Disconnect the connector.
b. Remove the 4 screws and front lower speaker.
7. REMOVE TWEETER SPEAKER
Disconnect the connector, then remove the 2 bolts and tweeter speaker.
8. REMOVE INSIDE HANDLE
a. Remove the 2 screws.
b. Disconnect the 2 links, then remove the inside handle.
9. REMOVE SERVICE HOLE COVER

10. REMOVE INSIDE PANEL FRAME
Remove the 4 screws and inside panel frame.
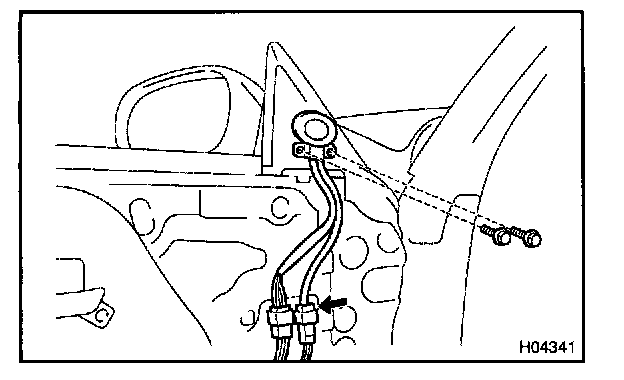
11. REMOVE OUTSIDE REAR VIEW MIRROR
a. Disconnect the connector, then remove the 3 bolts and outside rear view mirror.
12. REMOVE THESE PARTS:
a. Weatherstrip
b. Door window upper stops

c. Door belt moulding.

13. REMOVE DOOR GLASS
a. Open the door glass until the nuts appear in the service hole.
b. Remove the 3 nuts and door glass.
NOTE: Be careful not to drop the door glass.

14. REMOVE WINDOW REGULATOR
a. Remove the 2 bolts and inside panel plate.
b. Remove the setting nut.

c. Remove the 5 nuts and window regulator.
d. w/ Power Window:
Disconnect the connector.

15. REMOVE DOOR LOCK
a. Disconnect the open link and locking link No.1 from the bellcrank.
b. Remove the bellcrank.
c. w/ Power Door Lock:
Disconnect the connector.

d. Disconnect the 2 links from the outside handle.
e. Remove the 3 screws and door lock.

16. REMOVE OUTSIDE HANDLE
Remove the 2 bolts and outside handle.
17. REMOVE DOOR LOCK CYLINDER
Remove the snap ring and door lock cylinder from the outside handle.

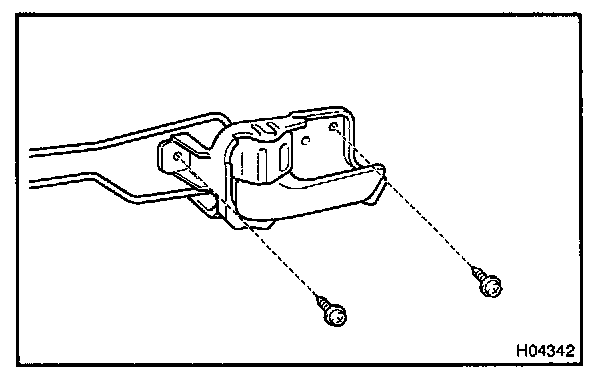
18. REMOVE MIRROR BRACKET
Remove the hole plug cover, then remove the 2 bolts, nut and mirror bracket.
REASSEMBLY

1. INSTALL MIRROR BRACKET
Install the mirror bracket with the 2 bolts and nut, then install the hole plug cover.
2. INSTALL DOOR LOCK CYLINDER
Install the door lock cylinder with the snap ring to the outside handle.

3. INSTALL OUTSIDE HANDLE
a. Install the outside handle with the 2 bolts.

4. INSTALL DOOR LOCK
HINT: Apply MP grease to the sliding and rotating parts of the door lock.
a. Install the door lock through the service hole.

b. Install the 3 screws.
Torque: 5.4 N.m (55 kgf.cm, 48 in.lbf)
HINT: Apply adhesive to the 3 screws.
Part No.08833-00070, THREE BOND 1324 or equivalent.
c. Connect the 2 links to the outside handle.
d. w/ Power Door Lock:
Connect the connector.
e. Install the bellcrank.
f. Connect the open link and locking link No.1 to the bell-crank.

5. INSTALL WINDOW REGULATOR
HINT: Apply MP grease to the glass guide and rollers of window regulator.
a. Install the window regulator through the service hole.

b. Install the window regulator with the 5 nuts.
Torque: 5.4 N.m (55 kgf.cm, 48 in.lbf)

c. Install the setting nut.
d. Install the inside lower plate with the 2 bolts.
Torque: 7.8 N.m (80 kgf.cm, 69 in.lbf)
e. w/ Power Window:
Connect the connector.

6. INSTALL DOOR GLASS
Install the door glass with the 3 nuts.
Torque: 7.4 N.m (75 kgf.cm, 65 in.lbf)
NOTE: Be careful not to drop the door glass.

7. INSTALL THESE PARTS:
a. Door belt moulding
b. Door window upper stops
Torque: 5.4 N.m (55 kgf.cm, 48 in.lbf)
c. Weatherstrip
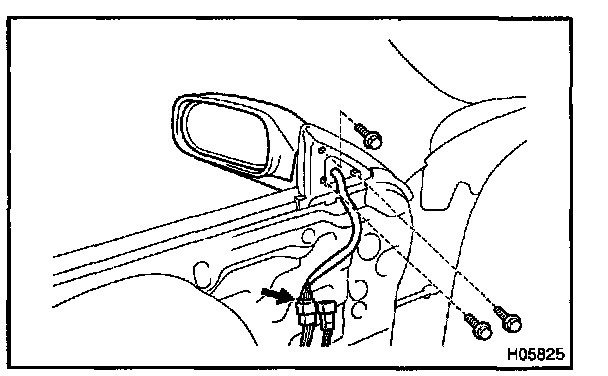
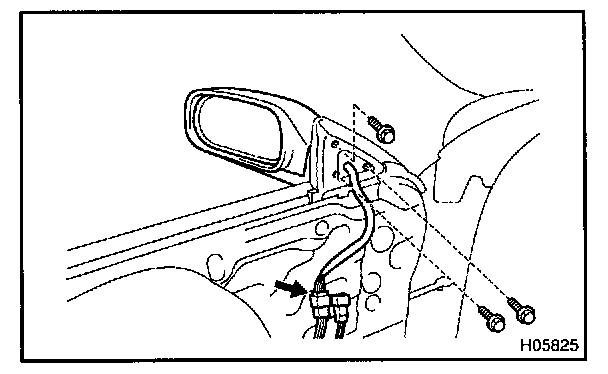
8. INSTALL OUTSIDE REAR VIEW MIRROR
Install the outside rear view mirror with the 3 bolts, then connect the connector.

9. INSTALL INSIDE PANEL FRAME
Install the inside panel frame with the 4 screws.

10. INSTALL SERVICE HOLE COVER
HINT: Bring out the links through the service hole cover.

11. INSTALL INSIDE HANDLE
a. Connect the 2 links to the inside handle.
b. Install the inside handle with the 2 screws.

12. INSTALL TWEETER SPEAKER
a. Install the tweeter speaker with the 2 bolts.
Torque: 7.8 N.m (80 kgf.cm, 69 in.lbf)
b. Connect the connector.
13. INSTALL FRONT LOWER SPEAKER
a. Install the front lower speaker with the 4 screws.
b. Connect the connector.
14. INSTALL FRONT UPPER SPEAKER
a. Install the front upper speaker with the 2 screws.
b. Connect the connector.

15. INSTALL DOOR TRIM
Install the door trim with the 8 screws and 3 clips, then install the 2 hole plug covers.
16. INSTALL THESE PARTS:
a. Courtesy light
b. w/ Power Window:
Power window switch
c. Inside handle bezel

17. INSTALL TWEETER SPEAKER COVER
Install the tweeter speaker cover.
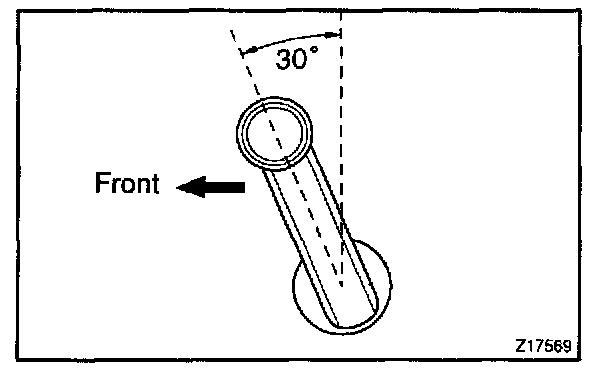
18. w/o Power Window:
INSTALL REGULATOR HANDLE
Install the regulator handle with the snap ring.
HINT: With door window fully closed, install the plate and the regulator handle with the snap ring, as shown in the illustration.